Products and Features
- Getting Started with CloudRaya Container Registry
- How to use Sudo on a CloudRaya Linux VM
- Keeping Your CloudRaya Linux VMs Up-to-Date
- Maximizing StorageRaya with Essential Practices
- Assign Multiple IP Addresses to Virtual Machine
- Generating a CloudRaya API key
- Simplify CloudRaya Management with API
- Deploying a Virtual Machine on CloudRaya
- Deploying a Kubernetes Cluster on KubeRaya
- Using StorageRaya – CloudRaya S3 Object Storage
- Opening Ping Access on Cloud Raya VM Public IP
- Maximize Your Storage Raya Access Speed with Content Delivery Network (CDN)
- How to Create Project Tag in Cloud Raya for More Organized VM Billing Report
- Exporting Cloud Raya VM to outer Cloud Raya's Infrastructure using Acronis Cyber Protect
- SSO Management on Cloud Raya
- Easy Steps to Enable VPC in Cloud Raya
- Using the SSH key Feature in Cloud Raya Dashboard
- Cloud Raya Load Balancer, Solution to Distribute Load Equally
- Create your own VPN server with DNS-Level AdBlocker using PiVPN
- Fix Broken LetsEncrypt SSL Certificate due to Expired Root CA Certificate
- How to Make a Snapshot and Configure VM Backup in Cloud Raya
- How to Request Services or Licenses Products
- Adding, Attaching, and Resize Root Storage Disk in Cloud Raya VPS
- Managing your DNS Zone with DNS Bucket in Cloud Raya
- Create VM, Custom Package, Reinstall VM, and Adjusting Security Profile
- How to backup Linux VM via Acronis in Cloud Raya
- How to Backup Desktop Linux and Windows via Acronis in Cloud Raya
- Backing-Up Cloud Raya Windows VM Using Acronis Cyber Protect
- Load Balancing in Cloud Raya
- Establishing a VPN in Cloud Raya
- Generating an API Token
- Deploying a Virtual Machine in Cloud Raya
- Show Remaining Articles ( 17 ) Collapse Articles
- How to backup Linux VM via Acronis in Cloud Raya
- How to Backup Desktop Linux and Windows via Acronis in Cloud Raya
- Maximizing StorageRaya with Essential Practices
- Using StorageRaya – CloudRaya S3 Object Storage
- Building a Static Website Using Storage Raya S3 Bucket
- Integrating S3 Storage Raya and Strapi for Asset Storage Optimization – Part 4
- Maximize Your Storage Raya Access Speed with Content Delivery Network (CDN)
- Managing Storage Raya from various tools and from various OS
- Binding NextCloud with CloudRaya S3 Object Storage as External Storage Mount
- How to use Sudo on a CloudRaya Linux VM
- Keeping Your CloudRaya Linux VMs Up-to-Date
- Implement Multi-Factor Authentication on CloudRaya Linux VM
- Assign Multiple IP Addresses to Virtual Machine
- Deploying a Virtual Machine on CloudRaya
- Configurating cPanel Using Ubuntu 20.04 on CloudRaya – Part 2
- Deploying cPanel Using Ubuntu 20.04 on CloudRaya - Part 1
- Exporting Cloud Raya VM to outer Cloud Raya's Infrastructure using Acronis Cyber Protect
- Using the SSH key Feature in Cloud Raya Dashboard
- Adding, Attaching, and Resize Root Storage Disk in Cloud Raya VPS
- Create VM, Custom Package, Reinstall VM, and Adjusting Security Profile
- How to backup Linux VM via Acronis in Cloud Raya
- Backing-Up Cloud Raya Windows VM Using Acronis Cyber Protect
- Deploying a Virtual Machine in Cloud Raya
Integration
- Implement Multi-Factor Authentication on CloudRaya Linux VM
- Accessing KubeRaya Cluster Using the Kubernetes Dashboard
- Building a Static Website Using Storage Raya S3 Bucket
- Integrating S3 Storage Raya and Strapi for Asset Storage Optimization – Part 4
- Integrating Strapi Content to Frontend React - Part 3
- Content Management with Strapi Headless CMS - Part 2
- Strapi Headless CMS Installation in CloudRaya - Part. 1
- Using SSH Key on CloudRaya VM with PuTTY
- Installing Multiple PHP Versions in One VM for More Flexible Web Development
- Replatforming Apps to K8s with RKE and GitLab CI
- OpenAI API Integration: Completions in PHP
- Building an Email Server on CloudRaya Using iRedMail
- Improving Email Delivery with Sendinblue SMTP Relay
- Building a Self Hosted Password Manager Using Passbolt
- How to Install Podman on Almalinux/Rocky Linux 9
- ElkarBackup: GUI Based backup Tools based on Rsync and Rsnapshot
- Improving Webserver Performance with SSL Termination on NGINX Load Balancer
- Using NGINX as an HTTP Load Balancer
- Automating Task with Cronjob
- Upgrade Zimbra and the OS Version
- Deploy Mailu on Rancher Kubernetes
- Export and Import Database in MySQL or MariaDB Using Mysqldump
- Backup & Sync Local and Remote Directories Using RSYNC
- Managing Storage Raya from various tools and from various OS
- Binding NextCloud with CloudRaya S3 Object Storage as External Storage Mount
- Simple monitoring and alerting with Monit on Ubuntu 22.04 LTS
- VS Code on your browser! How to install code-server on a VM
- Implementing Redis HA and Auto-Failover on Cloud Raya
- Using XFCE Desktop Environment on Cloud Raya VM
- Installing Python 3.7-3.9 on Ubuntu 22.04 Jammy LTS using PPA
- Implementing Continuous Integration with Gitlab CI and Continuous Delivery with Rancher Fleet
- Using Collabora Online on Cloud Raya NextCloud's VM
- Installing NextCloud in Cloud Raya- Detail Steps from the Beginning to the Very End
- Set Up High Availability PostgreSQL Cluster Using Patroni on Cloud Raya
- Set Up WAF KEMP in Cloud Raya Part 2
- Set Up WAF KEMP in Cloud Raya Part 1
- Using the SSH key Feature in Cloud Raya Dashboard
- Monitor Your Services Uptime Using Uptime Kuma
- Hosting Static Website with Hugo on Cloud Raya
- Kubernetes Ingress Controller using SSL in CloudRaya
- Reverse Proxy management using Nginx Proxy Manager
- Create your own VPN server with DNS-Level AdBlocker using PiVPN
- How to deploy Portainer on Linux to easily manage your docker containers
- High Availability Kubernetes Using RKE in Cloud Raya Part 3
- High Availability Kubernetes Using RKE in Cloud Raya Part 2
- High Availability Kubernetes Using RKE in Cloud Raya Part 1
- How to backup Linux VM via Acronis in Cloud Raya
- How to Backup Desktop Linux and Windows via Acronis in Cloud Raya
- Deploying Magento on Cloud Raya
- How to Install Nextcloud on Cloud Raya
- How to Install CWP in Cloud Raya
- How to Install Node.js and Launch Your First Node App
- How to install and secure MariaDB on Ubuntu 18.04 and 20.04 on Cloud Raya
- How to Install and Securing MongoDB on Ubuntu 18.04 and 20.04
- Classes: Post Installation on Ansible
- Classes: Install and Configure Ansible
- Classes: Introduction to Ansible for a robust Configuration Management
- How to Setup Active Directory Domain Service & DNS with Cloud Raya
- How to Host Your Own Docker Hub in Cloud Raya
- How to Setup Your Own Laravel with Nginx in Ubuntu 18.04
- How to Deploy Container in Cloud Raya using Docker
- Securing CentOS with iptables
- Install and Configure Squid Proxy in Ubuntu
- Installing Apache and Tomcat: A Quick Way
- Securing Ubuntu with UFW
- Install a Node.js and Launch a Node App on Ubuntu 18.04
- Installing LAMP in Ubuntu
- Installing LEMP Stack on Ubuntu 18.04
- Show Remaining Articles ( 53 ) Collapse Articles
- Articles coming soon
- Implement Multi-Factor Authentication on CloudRaya Linux VM
- Configurating cPanel Using Ubuntu 20.04 on CloudRaya – Part 2
- Deploying cPanel Using Ubuntu 20.04 on CloudRaya - Part 1
- Integrating S3 Storage Raya and Strapi for Asset Storage Optimization – Part 4
- Integrating Strapi Content to Frontend React - Part 3
- Content Management with Strapi Headless CMS - Part 2
- Strapi Headless CMS Installation in CloudRaya - Part. 1
- Using SSH Key on CloudRaya VM with PuTTY
- Building an Email Server on CloudRaya Using iRedMail
- Improving Email Delivery with Sendinblue SMTP Relay
- Building a Self Hosted Password Manager Using Passbolt
- ElkarBackup: GUI Based backup Tools based on Rsync and Rsnapshot
- Improving Webserver Performance with SSL Termination on NGINX Load Balancer
- Using NGINX as an HTTP Load Balancer
- Upgrade Zimbra and the OS Version
- Deploy Mailu on Rancher Kubernetes
- Managing Storage Raya from various tools and from various OS
- Binding NextCloud with CloudRaya S3 Object Storage as External Storage Mount
- Simple monitoring and alerting with Monit on Ubuntu 22.04 LTS
- VS Code on your browser! How to install code-server on a VM
- Implementing Redis HA and Auto-Failover on Cloud Raya
- Using XFCE Desktop Environment on Cloud Raya VM
- Implementing Continuous Integration with Gitlab CI and Continuous Delivery with Rancher Fleet
- Using Collabora Online on Cloud Raya NextCloud's VM
- Installing NextCloud in Cloud Raya- Detail Steps from the Beginning to the Very End
- Set Up WAF KEMP in Cloud Raya Part 2
- Set Up WAF KEMP in Cloud Raya Part 1
- Monitor Your Services Uptime Using Uptime Kuma
- Create your own VPN server with DNS-Level AdBlocker using PiVPN
- How to deploy Portainer on Linux to easily manage your docker containers
- High Availability Kubernetes Using RKE in Cloud Raya Part 3
- High Availability Kubernetes Using RKE in Cloud Raya Part 2
- High Availability Kubernetes Using RKE in Cloud Raya Part 1
- How to Install Nextcloud on Cloud Raya
- Classes: Post Installation on Ansible
- Classes: Install and Configure Ansible
- Classes: Introduction to Ansible for a robust Configuration Management
- Connect Windows Active Directory on Cloud Raya with Azure AD
- How to Host Your Own Docker Hub in Cloud Raya
- How to Deploy Container in Cloud Raya using Docker
- Show Remaining Articles ( 25 ) Collapse Articles
- Accessing KubeRaya Cluster Using the Kubernetes Dashboard
- Integrating S3 Storage Raya and Strapi for Asset Storage Optimization – Part 4
- Integrating Strapi Content to Frontend React - Part 3
- Content Management with Strapi Headless CMS - Part 2
- Strapi Headless CMS Installation in CloudRaya - Part. 1
- Creating Interactive Chatbot with OpenAI API in PHP
- Installing Multiple PHP Versions in One VM for More Flexible Web Development
- OpenAI API Integration: Completions in PHP
- Improving Webserver Performance with SSL Termination on NGINX Load Balancer
- Using NGINX as an HTTP Load Balancer
- Automating Task with Cronjob
- How to Deploy Django App on Cloud Raya VM Using Gunicorn, Supervisor, and Nginx
- How to Install Node.js and Launch Your First Node App
- How to Setup Your Own Laravel with Nginx in Ubuntu 18.04
- Install a Node.js and Launch a Node App on Ubuntu 18.04
- How to use Sudo on a CloudRaya Linux VM
- Keeping Your CloudRaya Linux VMs Up-to-Date
- Implement Multi-Factor Authentication on CloudRaya Linux VM
- Using SSH Key on CloudRaya VM with PuTTY
- Building a Self Hosted Password Manager Using Passbolt
- Improving Webserver Performance with SSL Termination on NGINX Load Balancer
- Export and Import Database in MySQL or MariaDB Using Mysqldump
- Backup & Sync Local and Remote Directories Using RSYNC
- How to Deploy Django App on Cloud Raya VM Using Gunicorn, Supervisor, and Nginx
- Set Up WAF KEMP in Cloud Raya Part 2
- Set Up WAF KEMP in Cloud Raya Part 1
- Using the SSH key Feature in Cloud Raya Dashboard
- How to backup Linux VM via Acronis in Cloud Raya
- How to Backup Desktop Linux and Windows via Acronis in Cloud Raya
- Securing CentOS with iptables
- Securing Ubuntu with UFW
- Show Remaining Articles ( 1 ) Collapse Articles
- Configurating cPanel Using Ubuntu 20.04 on CloudRaya – Part 2
- Deploying cPanel Using Ubuntu 20.04 on CloudRaya - Part 1
- Integrating S3 Storage Raya and Strapi for Asset Storage Optimization – Part 4
- Integrating Strapi Content to Frontend React - Part 3
- Content Management with Strapi Headless CMS - Part 2
- Strapi Headless CMS Installation in CloudRaya - Part. 1
- Creating Interactive Chatbot with OpenAI API in PHP
- Installing Multiple PHP Versions in One VM for More Flexible Web Development
- Building an Email Server on CloudRaya Using iRedMail
- Building a Self Hosted Password Manager Using Passbolt
- Improving Webserver Performance with SSL Termination on NGINX Load Balancer
- Using NGINX as an HTTP Load Balancer
- Installing Python 3.7-3.9 on Ubuntu 22.04 Jammy LTS using PPA
- Reverse Proxy management using Nginx Proxy Manager
- Install and Configure Squid Proxy in Ubuntu
- Installing Apache and Tomcat: A Quick Way
- Installing LAMP in Ubuntu
- Installing LEMP Stack on Ubuntu 18.04
- Show Remaining Articles ( 3 ) Collapse Articles
- Building a Static Website Using Storage Raya S3 Bucket
- Integrating S3 Storage Raya and Strapi for Asset Storage Optimization – Part 4
- Integrating Strapi Content to Frontend React - Part 3
- Content Management with Strapi Headless CMS - Part 2
- Strapi Headless CMS Installation in CloudRaya - Part. 1
- Creating Interactive Chatbot with OpenAI API in PHP
- Installing Multiple PHP Versions in One VM for More Flexible Web Development
- OpenAI API Integration: Completions in PHP
- Hosting Static Website with Hugo on Cloud Raya
- Deploying Magento on Cloud Raya
- How to Install CWP in Cloud Raya
- How to Setup Active Directory Domain Service & DNS with Cloud Raya
- Articles coming soon
Content Management with Strapi Headless CMS – Part 2
So, we have successfully installed Strapi from the previous tutorial. Now, let’s go to the next step, creating content in Strapi. In this tutorial we will discuss the steps to create contents in Strapi and how to access it from API testing platform, Postman.
Building Content Structure
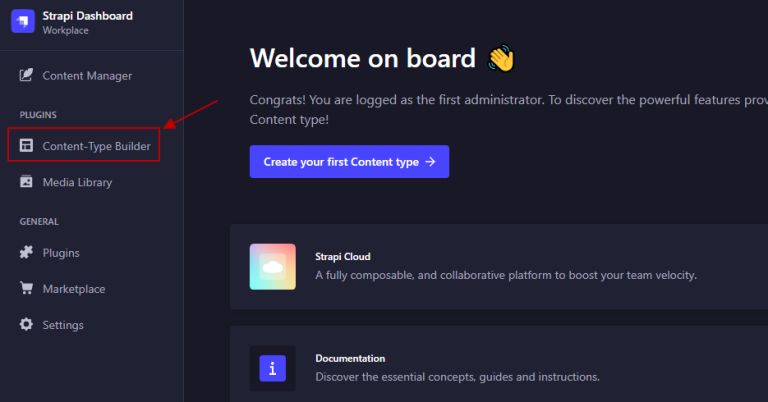
First, let’s create the content structure in Content-Type Builder.
Inside, you can find multiple content collections you can use. Choose which content type you want to use based on your need.
For example, when we use “Website Article“, we need to define the title and the content within the appropriate field, thus creating the structure of the content. By filling these fields, we can easily fill the content in the structure.
There are 3 content structure example given by Strapi based on the functionality in the Contenty-Type Builder:
Collection Types
This types is suitable to managed contents with similar characteristic from more than one kinds. For example, a web article site may contain a lot of article with multiple titles and contents. Collection Types can be used to create “articles”.Single Types
This type is suitable to managed a unique content. For example, a website may contain only one “Title” and one “About Us“. Thus, you create “Home Page” using Single Types.Components
This type is a collections of fields suitable for repeated use in multiple different content frames. For example, if multiple content frames have the same field, Components can make it easier for you.
You can refer to the following page to know more about these three content frame.
Creating content structure with Collection Type
We will use “Collection Type” to create our article.
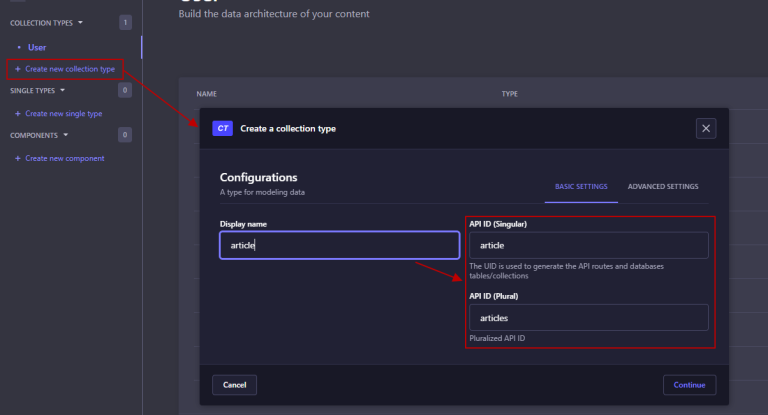
Click ‘Create new collection type’ and fill in the “Display Name”. Make sure the name is in singular format since Strapi will automatically create the plural format for us. In this tutorial, we will fill it with ‘article‘, and ‘Continue‘.
Next is to define the fields.
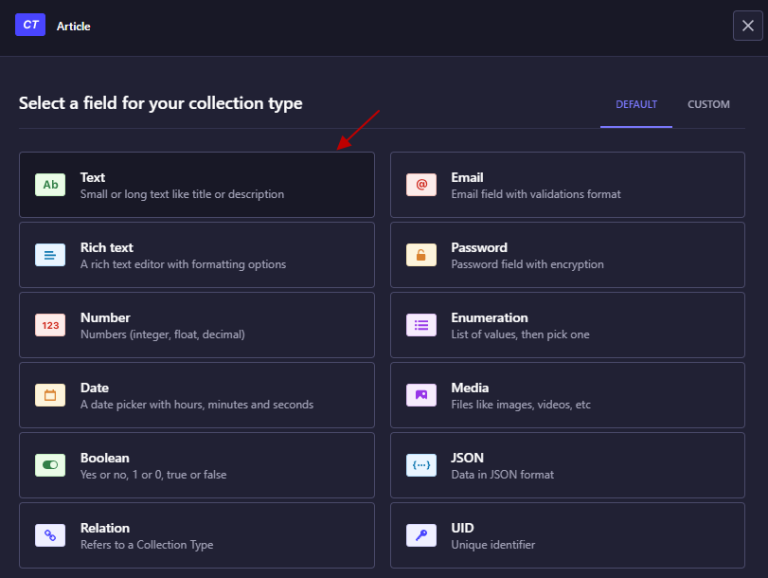
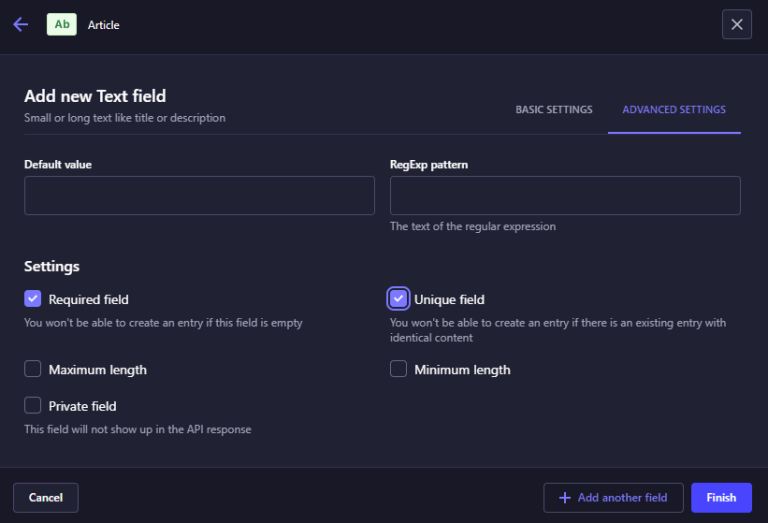
Add ‘Text‘ so we can create our title.
Let’s named it ‘title‘ in this field.
If necessary, we can configure it the default value to ‘required’ or ‘unique’ to ensure no two articles is the same or based on your need.
‘+ Add another field‘ when you finished configure the the field.
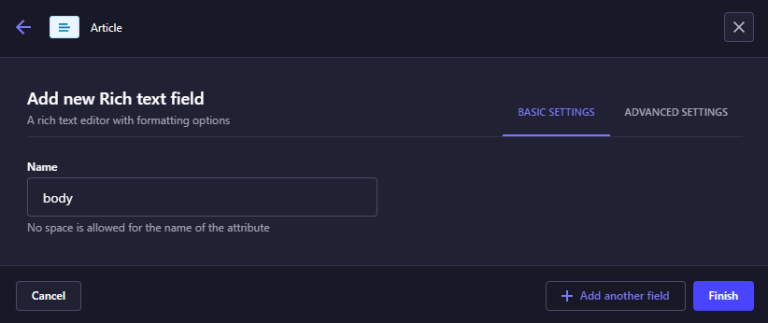
Add ‘body‘ as the body or content of the article and choose “Rich Text” so we can format the content.
Choose ‘Finish‘ when you are done.
Choose ‘Save‘ to apply the configuration.
Filling the Conten
Now we have the basic structure for our content.
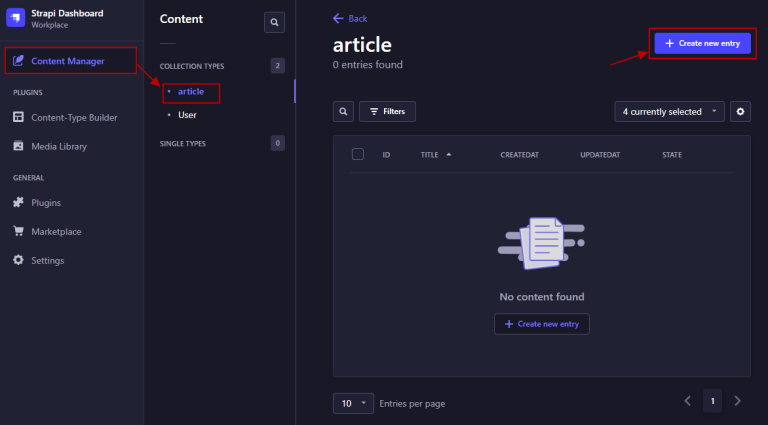
To start creating the content, open ‘Content Manager’, and choose ‘Add new entry‘ in the content structure ‘article’ we just made.
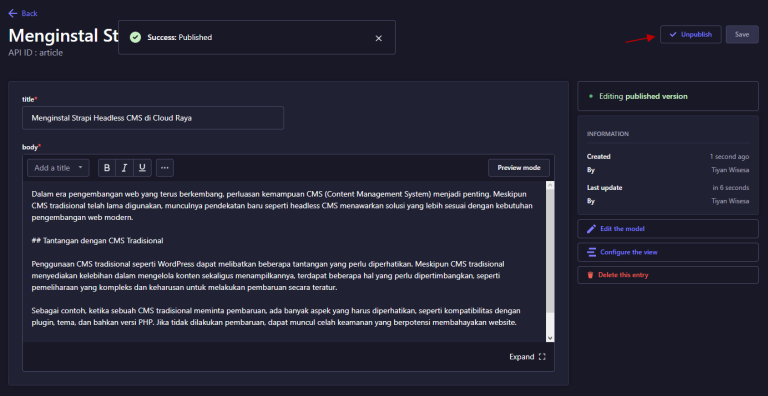
You will see previously made fields, such as title and body. Fill the fields accordingly and choose ‘Save‘ when you want to keep it as a draft or ‘Publish‘ if you want to immediately publish it.
User Configuration & Content Data Access Permision
The next step after we publish our first article is to configure the access permission of data for the public. This will ensure that only designated users can access our data.
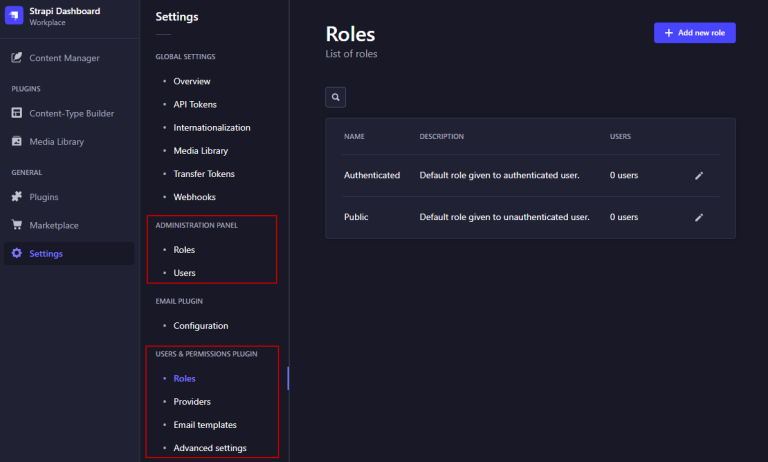
To do the configuration go to ‘Settings’ -> ‘Users & Permissions Plugin’ -> ‘Roles.’
Note that there are two ‘Roles‘, one for Administration Panel, and the other one for Users & Permissions Plugin.
Administration Panel Roles
- Used to manage permissions regarding Strapi administration.
- Users have access to Strapi’s administration panel.
- Three types are available: Author, Editor, and Super Admin, each with their own access rights
Users & Permissions Plugin Roles
- User does not have access to Strapi’s administration panel.
- Limited to only frontend side.
- Two types are available: Authenticated, and Public
In simple terms, “Administration Panel Roles” is used to managed permissions regarding Strapi’s administration, while “Users & Permissions Plugin Roles” is used to managed permissions regarding access and manipulation of data by external user through frontend application.
This time, we will configure the “Users & Permissions Plugin Roles“.
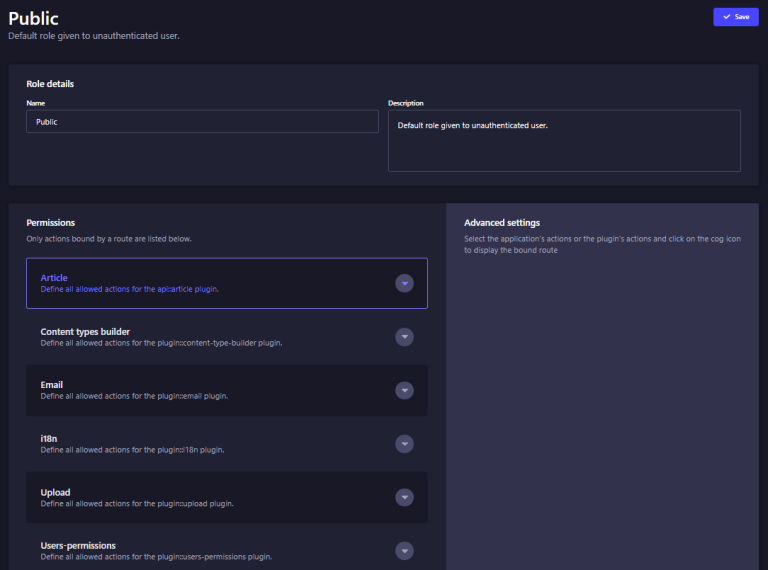
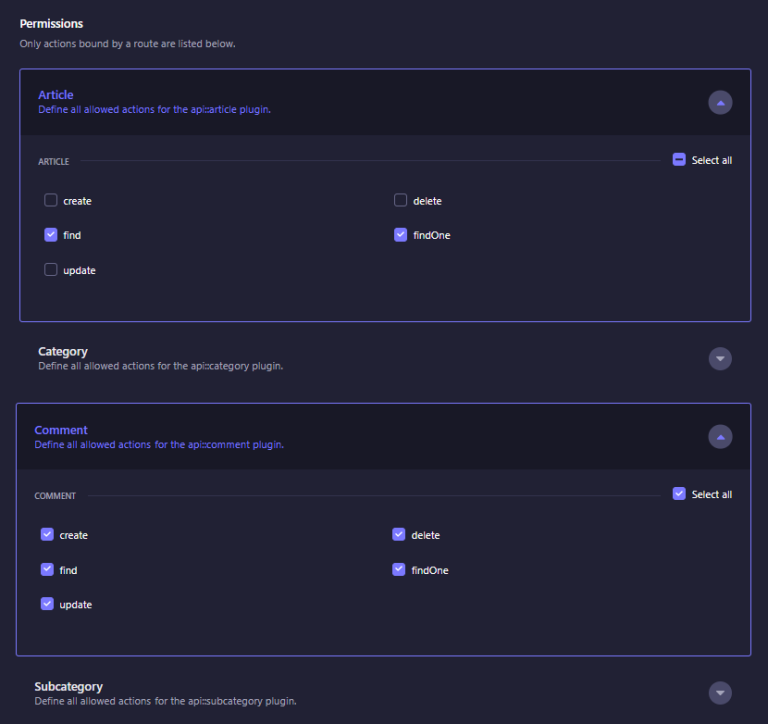
Open ‘Public‘ role, which is for all users accessing the site without login.
List of articles accessible for this role will be visible here.
By ticking “Find” and “FindOne”, we will ensure all users designated as public will only see the content of the article.
Content Interaction Using Postman
Our tutorial’s last destination is to call and interact with the article through the website frontend, so visitors can interact with it.
To start, let’s test the endpoint using Postman. Postman is an excellent tool you can use to test the REST API endpoint and multiple CRUD requests (Create, Read, Update, Delete) for free.
Open Postman, create a new “Collection”, and fill in the name. Let’s name it ‘Strapi‘.
Now, let’s create a new API request.
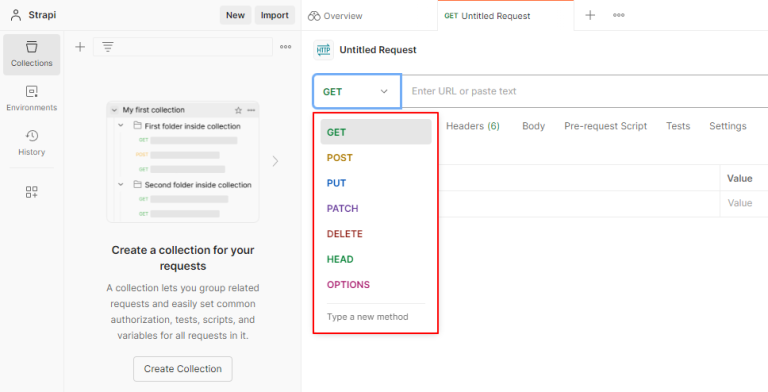
Make sure the API request is based on what test we need to do.
Data Display
▶ Multiple Data
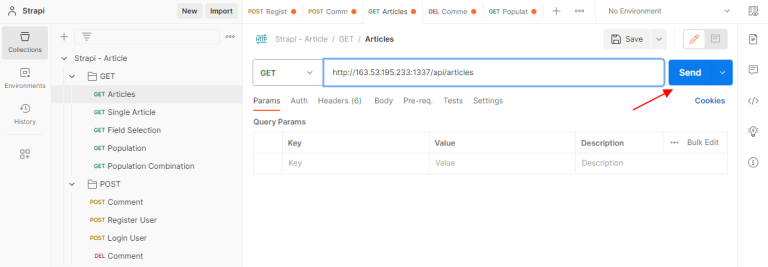
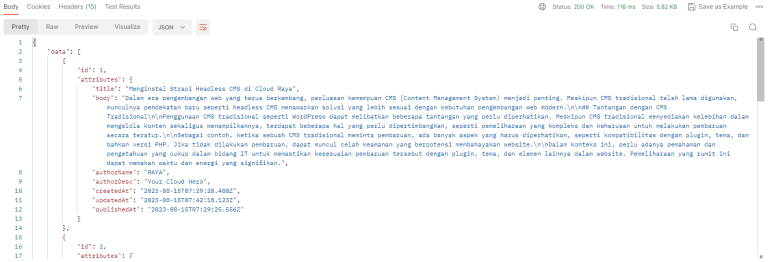
As the first example, we will use “Get Articles” using GET request.
The Request URL is based on the Strapi server endpoint + the URL content we want to access, as the following:
GET http://163.53.195.233:1337/api/articles
Click ‘Send‘.
You can see the output of the API response as the above.
▶ Single Data
To call single data, we can use the following endpoint:
GET http://163.53.195.233:1337/api/articles/1
By using the above endpoint, we will receive the article data with an ID “1”. Make sure to fill the correct ID to access the right article.
▶ Specific Field
To gather data from specific fields, change the endpoint URL by adding ‘fields‘ parameter. For example, to gather “title“, “body“, and “publishedAt” data, use the following endpoint:
GET http://163.53.195.233:1337/api/articles?fields=title&fields=body&fields=publishedAt
▶ Relation Between Content
It is better for an article to have as many categories as it can. To achieve this, we need to create relation between ‘Content-Type Article’ with ‘Content-Type Category.’
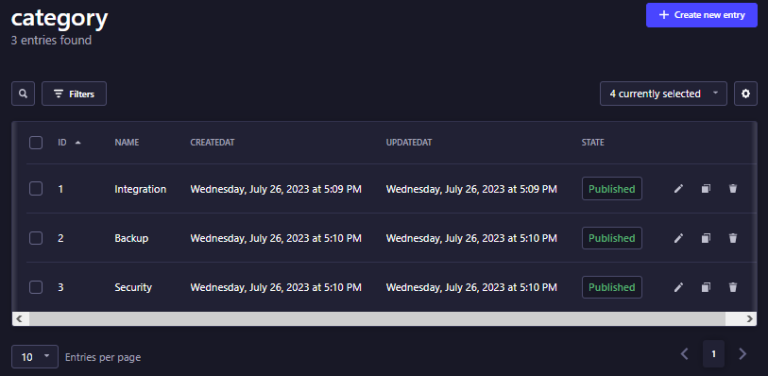
We need to create a new content-type which is ‘Category‘ with the appropriate content structure.
Now, we will fill the content throgh the ‘Content Manager.’
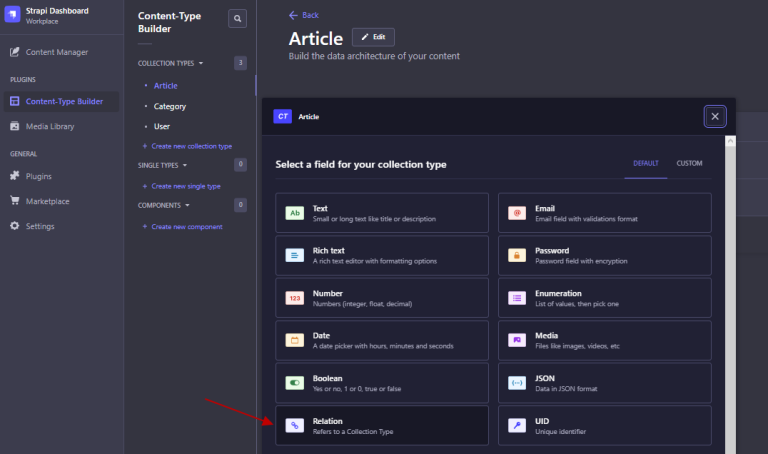
Setelah itu, kita masuk kembali ke After that, we will go back to ‘Content-Type Builder’, in the Article we choose ‘Add another field‘, and choose ‘Relation.’
We will use ‘Many to Many’ relation, so that each article can connect to many categories and vice versa.
Click ‘Finish‘ to apply the changes.
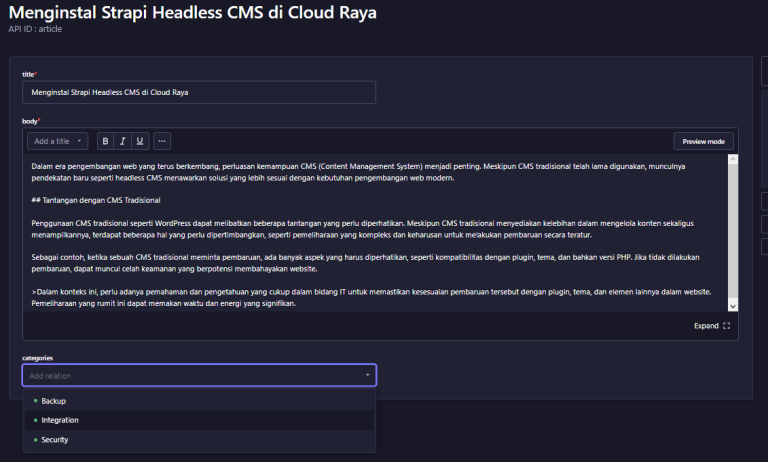
Now, let’s edit the article we have made previously.
New field will appear at the bottom of the page to choose the categories that you can connect it to the article as you need.
To expand the relation, you need to add it based on your need.
▶ Using Populate
By default, Strapi’s REST API does not allow populate in relation, media fields, component, or dynamic zone for performance reason.
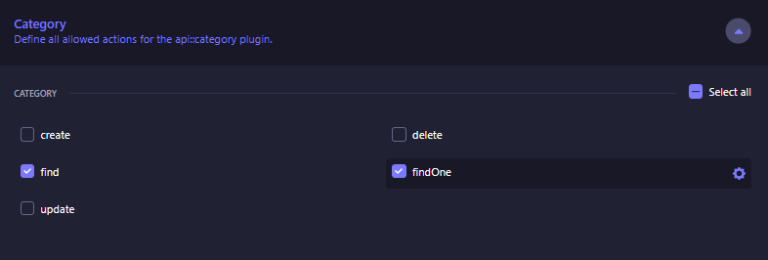
First, make sure you have open Public permissions for ‘Category’ type content like in the previous section.
To populate, we need to modify the endpoint URL.
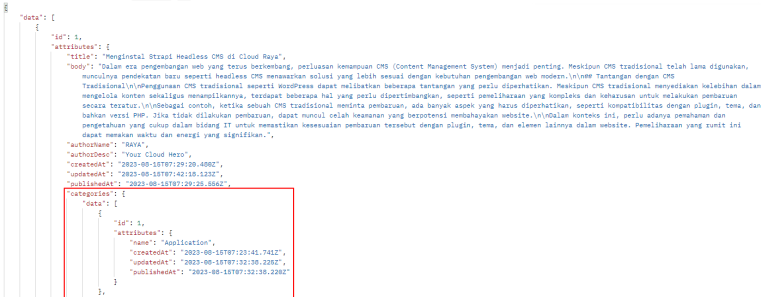
- To show data category connected to each article, use the following URL:
GET http://163.53.195.233:1337/api/articles?populate=categories
- If there are many relations in the contents and you want to populate it one level deep all of the relations, use the wildcard as follows:
GET http://163.53.195.233:1337/api/articles?populate=*
Strapi also support performing populate for deeper level. You can refer to the following documentation for more information.
Populate helps you to efficiently gathering data and maintain relations.
▶ Combine Population With Other Operator
In Strapi, we can combine the populate operation with other operator to obtain more specific data. This will allow us to filter the data we want to display based on what we need.
For example, if we want to display the “title”, “body”, and “publication date”, while also connected it to data category with only “category name”, we can use the following endpoint:
GET http://163.53.195.233:1337/api/articles?fields=title&fields=body&fields=publishedAt&populate[categories][fields]=name
With this endpoint, we will get filtered article data containing the desired category, and the data category will only show the “category name” column.
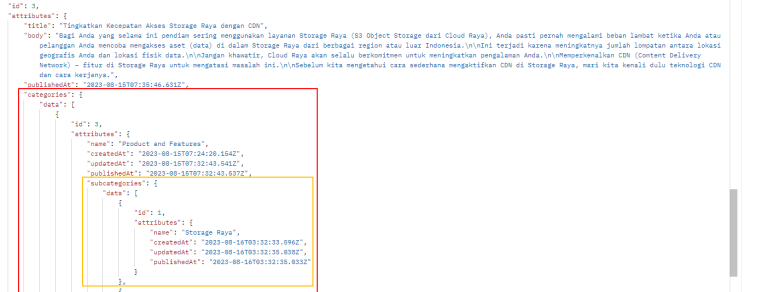
Also, we can add populate for a few levels deep with additional parameters. Such as, if we want to combine it with the second-level populate, we can use the following endpoint:
GET http://163.53.195.233:1337/api/articles?fields=title&fields=body&fields=publishedAt&populate[categories][populate][0]=subcategories
We can utilize the “✨Interactive Query Builder” tool from Strapi to generate a more complex URL query rather than manually write the code up.
Managing Data
It is better for only authorized users, based on the roles we discussed previously, to be able to insert data into the Strapi.
For example, we have created a Comment-Type “Comment“, where this tutorial have configure the role “Authenticated” as such. This tutorial do it as such since we only want authenticated user to be able to write comments.
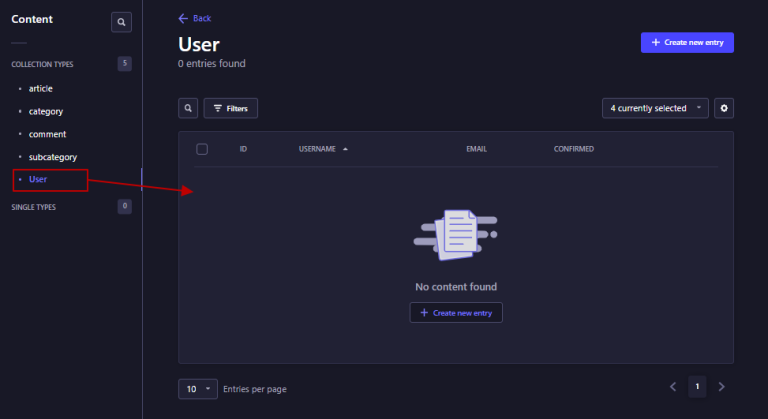
The user table is where you want to store the authenticated user data in our application. This table contains the username, email, and password, which is stored for authentication purposes.
▶ Registering Users
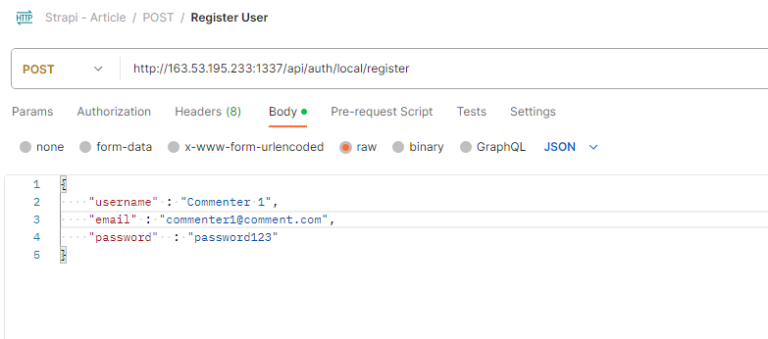
To register authenticated users, you can use the following endpoint:
POST http://163.53.195.233:1337/api/auth/local/register
Next, use the following data format in the Postman Request Body:
					{
    "username"  : "Commenter 1",
    "email"     : "commenter1@comment.com",
    "password"  : "password123"
}
In the POST request, we need to include the credential of the user such as the username, email, and password as the data input.
When successful, Strapi will encrypt the password and safe the new user data in the “User” table.
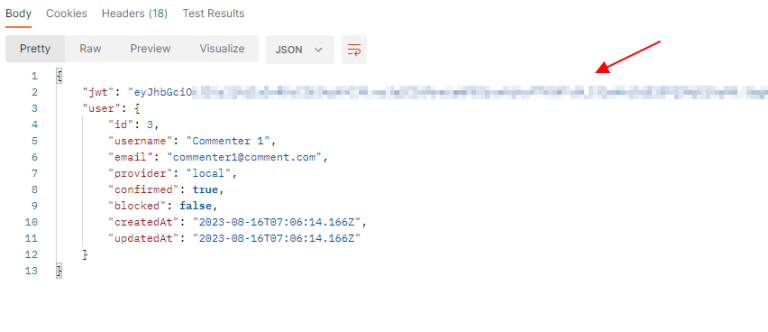
After the user is successfully stored in the “User” table, a JSON Web Token (JWT) will also be generated for the user.
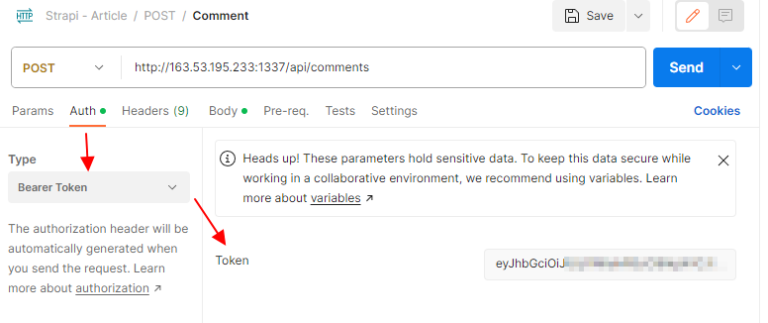
JWT needs to be stored as it is used to identify and authenticate the user for future API requests. JWT will become a part of the API request header as a Token Bearer for actions that require authentication.
▶ Add Data
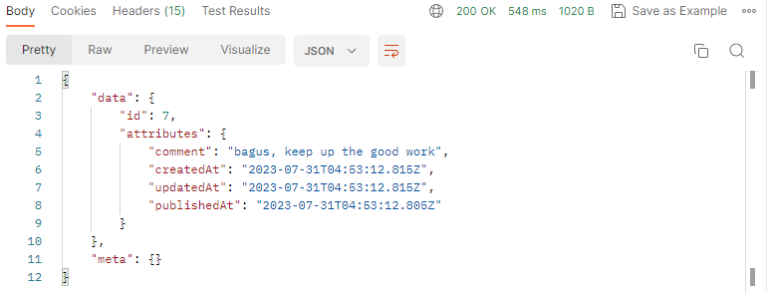
Let’s try adding comments in the article with the following endpoint:
POST http://163.53.195.233:1337/api/comments
Followed with the follwoing data format in the Request Body:
					{
    "data": {
        "comment"   : "bagus, keep up the good work",
        "article"   : 1
    }
}
Go to the ‘Auth‘ tab, and choose “Token Bearer” within the “Type” option and insert the JWT token in the empty field. Choose ‘Send‘ to complete the step.
We can see that a new comment has been added.
If you want to know more about how Strapi works, you can read it further in the following documentation:
For more specific information about CRUD activity that you can do with Strapi REST API, you can refer to the following documentation:
- CRUD with REST API Strapi: https://docs.strapi.io/dev-docs/api/rest/
Conclusion
In this tutorial, we have learned the steps to create and managed multiple content types using Strapi.
We also learned about Postman as a test tool to interact with Strapi REST API endpoint.
The next Strapi tutorial series will focus on how to implement the data from Strapi backend to the frontend using React.
If you haven’t yet familiarized yourself with Strapi, you can go to the previous tutorial where we discuss the basic.
For other tutorials regarding CloudRaya’s utilization, you can explore our Knowledge Base for more tutorials.
