Connect Windows Active Directory on Cloud Raya with Azure AD
Many organizations running in today’s enterprises are not simply migrating 100% of all user/group object data into the cloud. They’re still wanting to maintain some presence of Active Directory Domain Services (i.e. AD DS on-prem) so they can still support authentication to other on-prem based applications and services. This means you need to synchronize identities between Azure AD and Windows Active Directory. Azure AD Connect is the Microsoft solution that will get you there.
Azure AD Connect supports many topologies, including a single Active Directory, multiple Active Directories, and even multiple Office 365 tenants.
In this guide, we’re not going to cover every option for installation of Azure AD Connect. This is because there’s a variety of ways to configure it. But we will explain one of the easiest ways to do so.
Prepare the environment for Azure AD Connect
Before setting up the Azure AD connect, there are three major prerequisites that we need to setup:
- You need an Azure AD tenant. You get one with an Azure free trial.
- Setup your on-premises Active Directory Domain Controller VM in Cloudraya, the one which will connect with the Azure AD
- Have on-premises Active Directory schemas
For the complete Prerequisites, check out Official Azure AD Connect: Prerequisites from Microsoft Documentation
Setup a Windows VM in Cloudraya
First, we need to create a Windows VM in Cloudraya. Navigate to your Cloudraya Admin Panel and Add New VM. Make sure the VM is having this following specification so it can meet the minimum specification for Azure AD Connect:
- 2 CPU Core
- 20 GB of Storage
- 2 GB of RAM
With these specifications, the best VM package to pick is small-c2
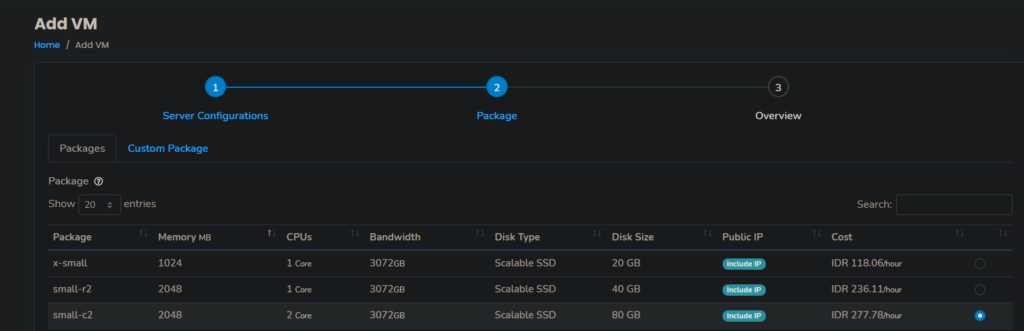
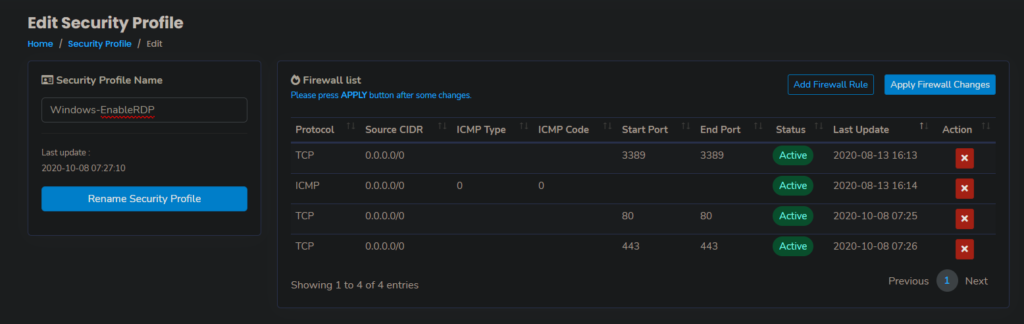
Also, don’t forget to set the Cloudraya Security Profile to allow RDP Port (default port: 3389)
After the VM has been created successfully, continue to access the VM via RDP
Setup the on-premises Active Directory and Active Directory Domain Controller
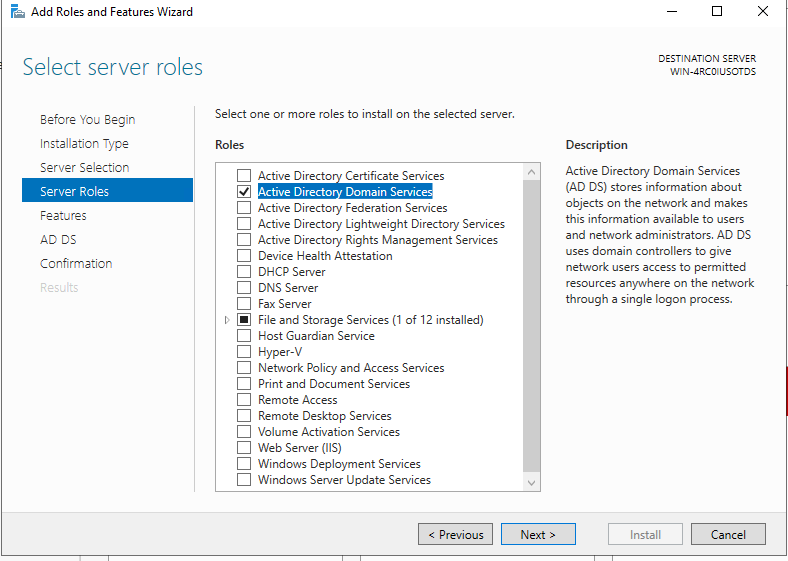
Before connecting our own Active Directory with Azure AD, we need to install an Active Directory Domain Controller role. It will act as Azure AD Connector.
Open Server Manager and click on Manage -> Add Roles and Features. On the Select Server Roles tab, check the Active Directory Domain Services button
Continue the configuration until the role has been installed successfully.
The next step is promoting the VM as an Active Directory Domain Controller. You can find the full steps on How to setup Active Directory Domain Service with Cloud Raya.
One thing you need to make sure is when configuring the domain name. For the sake of simplicity, you need to use Valid FQDN (Fully-Qualified Domain Name) and Valid TLD. For example, use .com, .net, .org and so on instead of .local, .staging and so forth.

After the VM has been promoted as a Domain Controller, your on-premises Active Directory is now ready to be connected with the Azure AD. Then, the next step is to prepare the Azure AD environment.
Setup Azure AD Environment
First, you need to have an Azure Account. As stated in the beginning of this article, you can get this account with free trial provided by Microsoft.
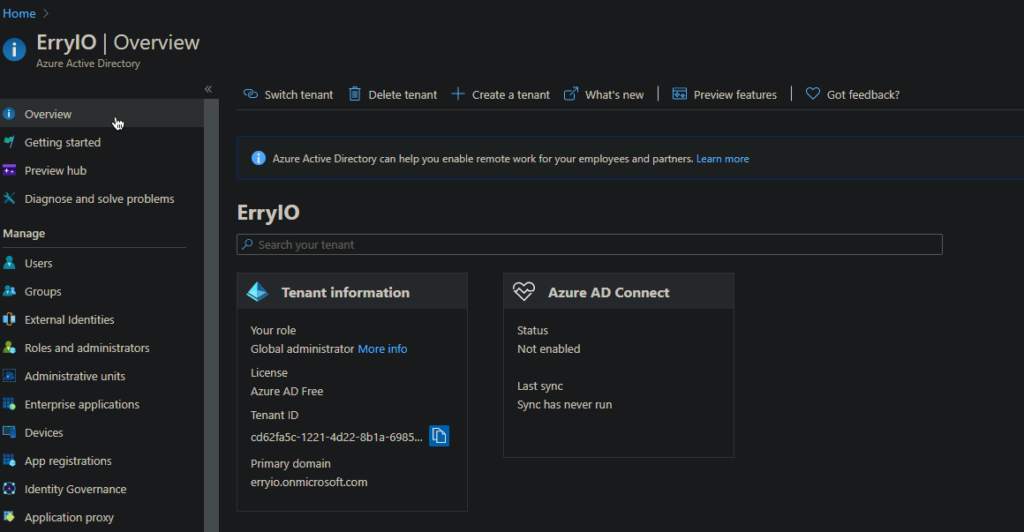
If you already have a working Azure account, open the Azure Portal. Then, navigate to the Azure Active Directory dashboard by searching it on the portal.
To connect to Azure AD with your on-premises active directory credentials, you need to add the matching domain on the Azure AD. This is why you need to use the Valid FQDN and Valid TLD on your on-premises AD. To do this, navigate to Custom Domain Blade and click on Add Custom Domain
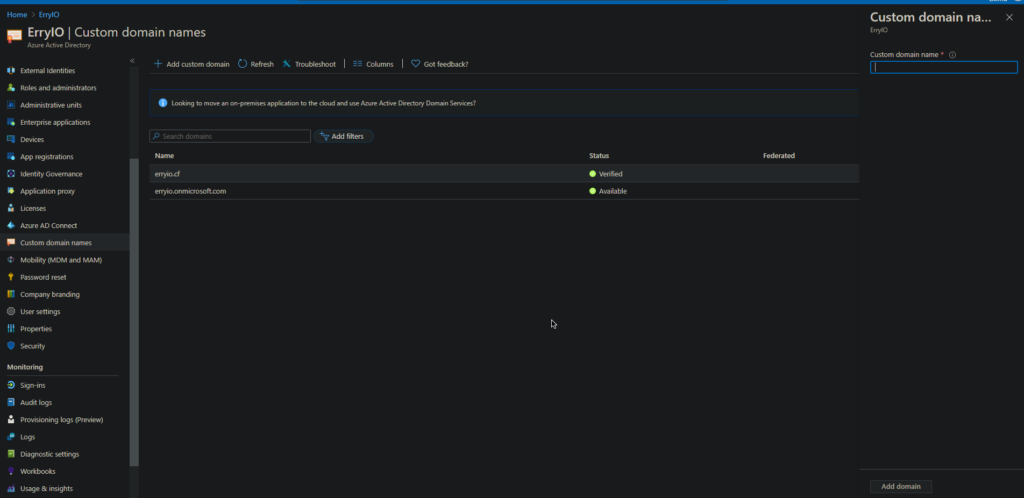
You also need the domain to be verified. After adding the custom domain name, Azure will ask you to add a new TXT DNS record on your domain. Thus, add the record on your Domain Name DNS management tool.

When the domain has been validated, your custom domain will be shown as Verified on the Custom Domain Name dashboard.
Install and Configure Azure AD Connect
Now the on-premises AD and Azure AD end has been configured. The next thing to do is to configure the Azure AD connect.
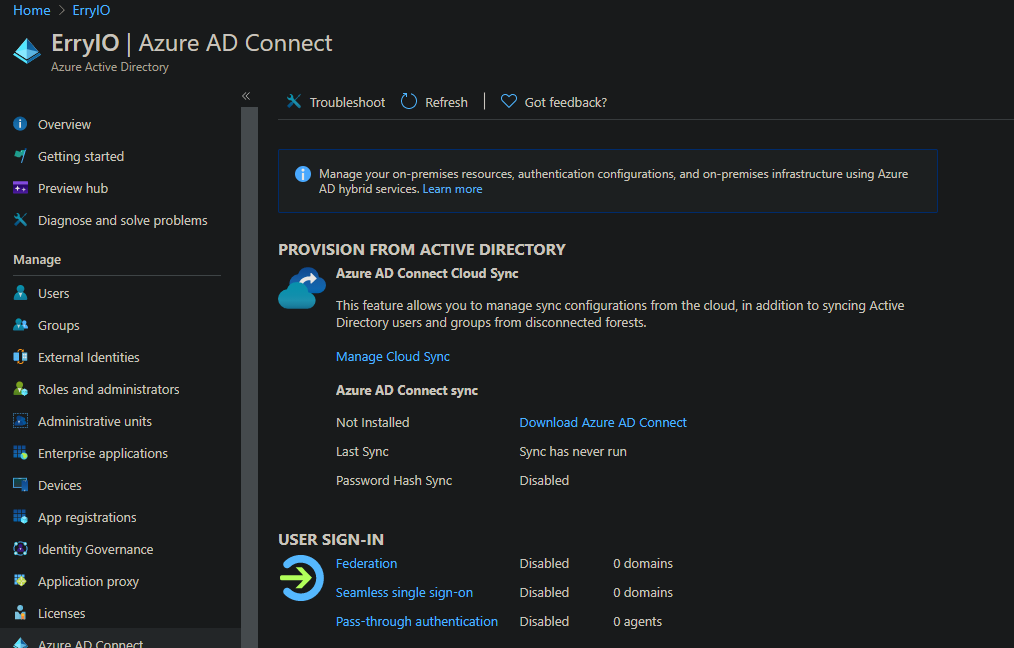
Download Azure AD Connect
Firstly, download Azure AD Connect application. The easiest way to download the app is by navigating to the Azure Active Directory dashboard. Then, click on the Azure AD Connect blade. You will see a link that leads to Azure AD Connect download page
Setup and Configuration
After the download has completed, we can continue with the Azure AD Connect setup and configuration. To do so, open the downloaded file and install.
After the installation, there will be new application on your desktop named “Azure AD Connect”, open the application.
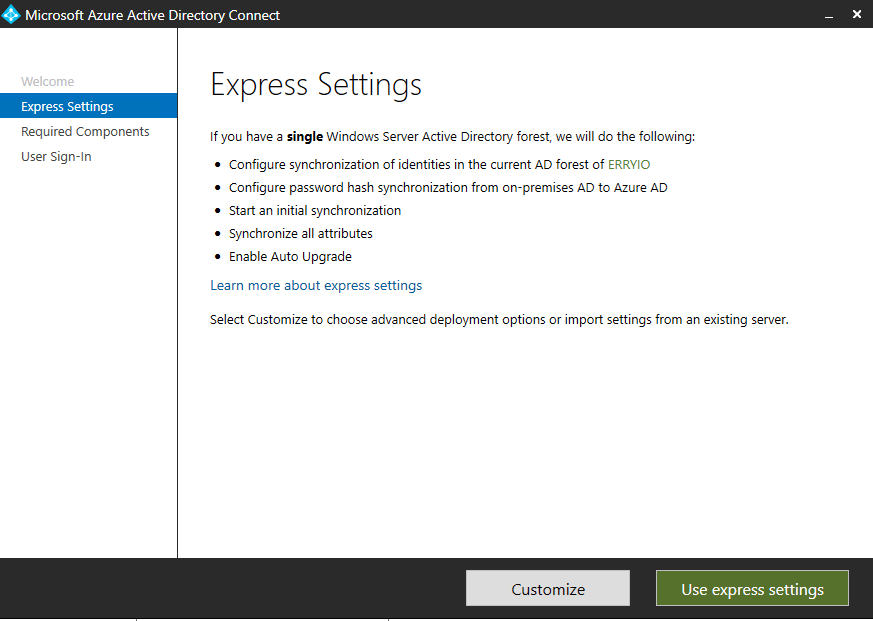
When we get into the installation method options of Azure AD Connect, we have two options:
- Express Settings
- Custom Installation
You may want to pick Express settings if your on-premises AD is using single-forest topology and are using Password Hash Synchronization for the authentication option. Otherwise, you may click on the Custom Installation. In this guide, we will pick a Customize option
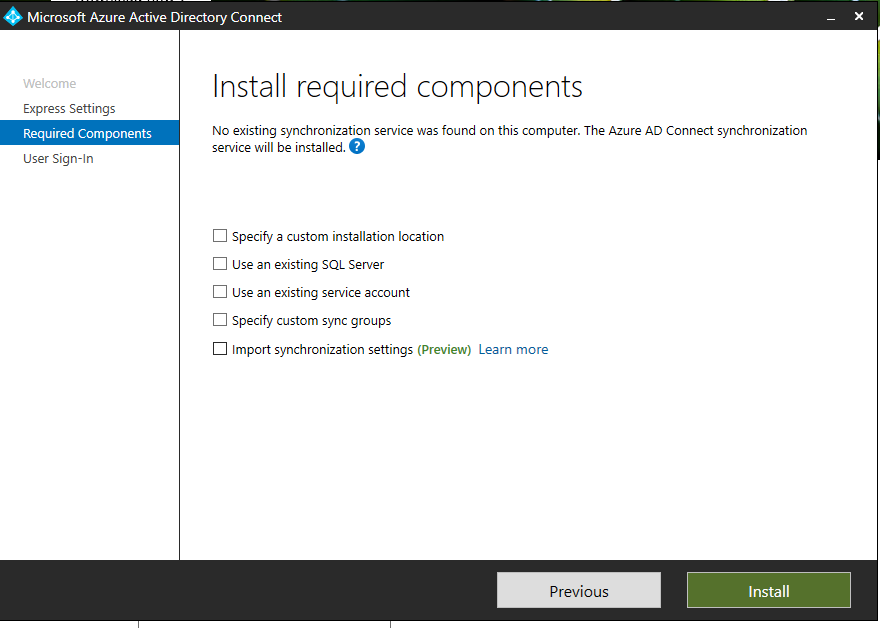
Upon clicking Customize button, installation wizard does a quick check to ensure no other synchronization services are running. Then, you can then specify any existing SQL Servers, service accounts, or synchronization groups.
Authentication
After you specify the required components and/or custom installation location, the wizard will continue with the authentication method selection.
Accordingly, there are three ways of authentication method to sign in:
- Password Hash Synchronization
- Pass-through authentication
- Federated authentication (using ADFS or Third-party applications)
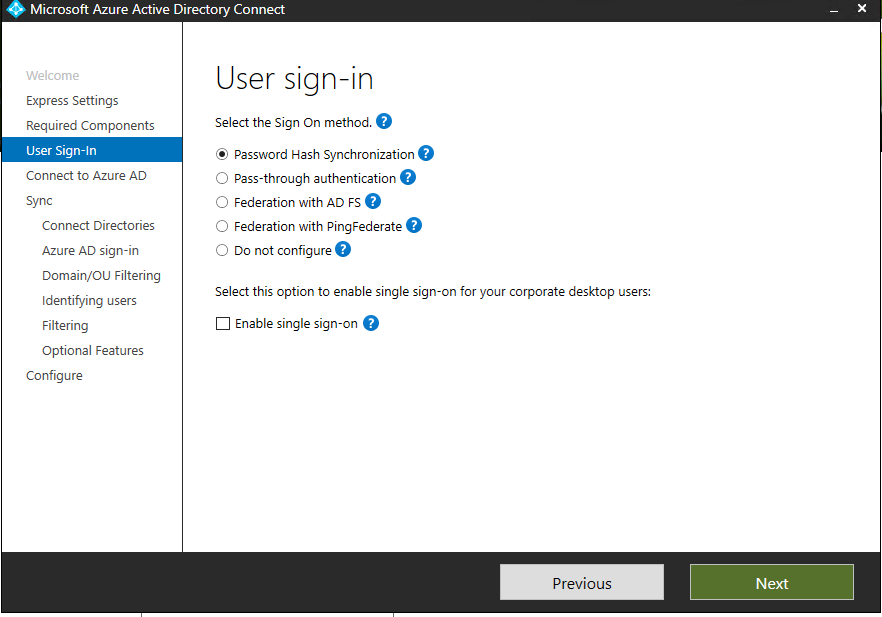
Password hash synchronization (PHS) – Password Hash Sync enables users to use the same username and password that they use on-premises. You don’t have to deploy any additional infrastructure besides Azure AD Connect.
Pass-through authentication (PTA) – This option is similar to password hash sync. However, it also provides a simple password validation using on-premises software agents for organizations with strong security and compliance policies.
Federated authentication – When you choose this authentication method, Azure AD will hand off the authentication process. This is to a separate trusted authentication system, such as AD FS or a third-party federation system, to validate the user’s sign-in. For simplicity sake, you can use PHS for the rest of this installation
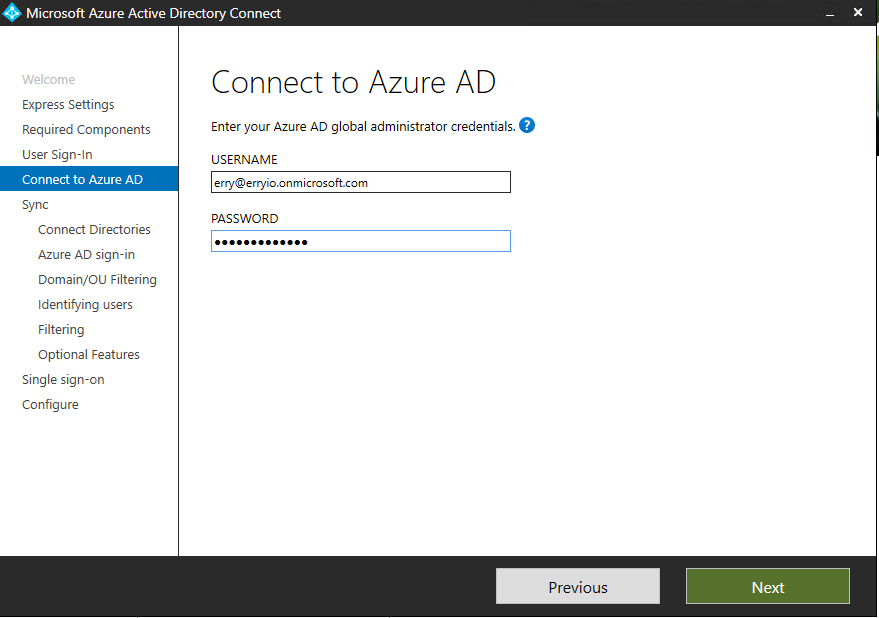
Connect to Azure AD
We are now ready to connect to Azure AD, we need an account with Global Administrator account. If you’re using Federation with ADFS, don’t use an account on the same domain you plan to enable for federation. A good way around this is to create that global admin account on the .onmicrosoft.com domain to facilitate this.
If you are entering a correct account, we can continue to integrate the on-premises forest first. Due to this, you need an Enterprise Admin account on the On-premises forest.
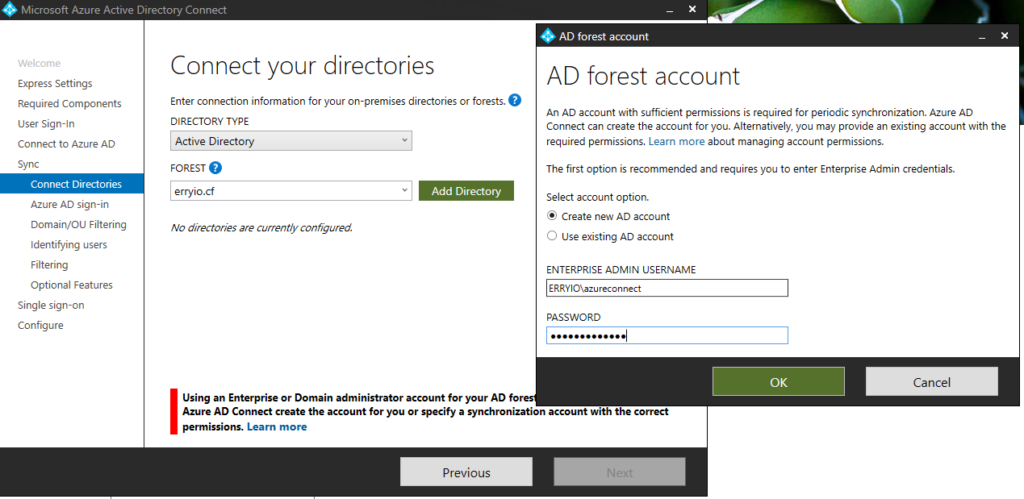
Now as you can see above, you can create a new account or use an existing account. If you opt to create a new account, you need to provide the enterprise admin credentials. This is to allow the wizard to provision a new account in Active Directory Directory Services with the appropriate permissions.
If you specify an existing account, specify the FQDN or NETBIOS name of the account (i.e. contoso.com\administrator or CONTOSO\Administrator). One thing to note about using an existing account is that it only needs default read permissions. However, some scenarios may require additional permissions. For those details, you can read the Azure AD Connect Accounts and Permissions for more information.
Verification and Synchronization
This next phase is about verification of the domains we’ve just connected. UserPrincipalName (or UPN) in Active Directory is the attribute users use to sign into Azure AD, Office 365, etc. Therefore, the domain (or UPN-suffix) should be verified before we synchronize any objects into Azure AD.
If you’re using Pass Through Authentication, you need to have at least one verified domain. This is in order to proceed through the remaining steps in the installation wizard. That is why we need to do the Custom Domain Verification on the beginning of this guide
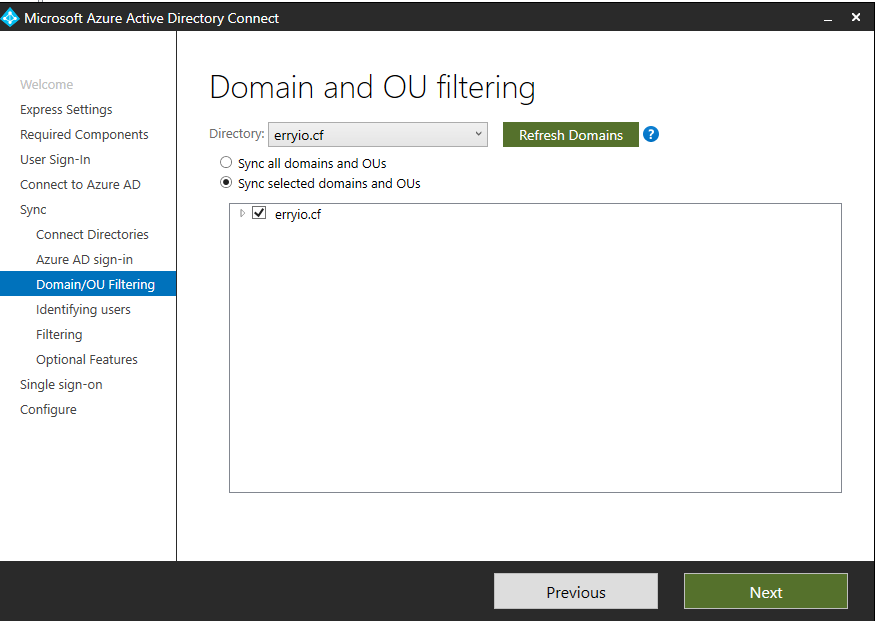
By default, Synchronize everything from the On-premises AD is the behavior upon getting to the next phase of the wizard. In Domain and Organizational Unit (OU) filtering, we can specify what we DO NOT want to synchronize to Azure AD.
This step is pretty straightforward. That being said, you might have conconcerns about which domains and or OUs you don’t want to synchronize. If so, you may review the domain-based filtering and OU-based filtering articles. You can easily find them on Microsoft’s doc library before you make any changes.
Identify Users
Next is how we identify users in Active Directory and how we want them represented in Azure AD. In some cases, you may have a user with multiple representations across multiple domains (i.e. an enterprise admin). You may also have the same thing for B2B, guest accounts, or mail enabled contacts in Active Directory.
Simply put, you need to uniquely identify your users to avoid duplicate entries in Azure AD. This step helps you define that and how you’d like to identify those users.
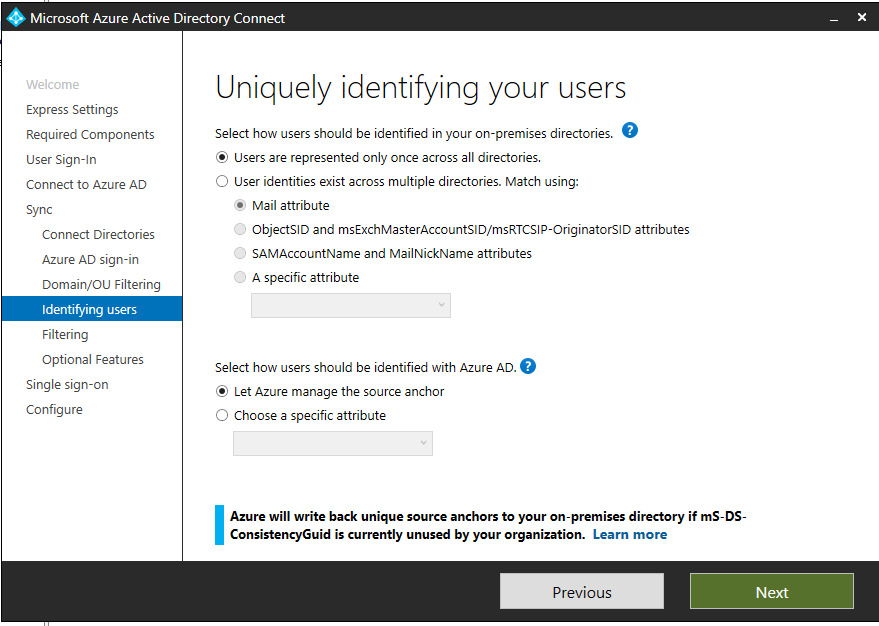
The options are pretty straight forward:
- Users are represented once across all forests – all users are individual objects in Azure AD.
- Mail attribute – This option will join users and contacts if their mail attribute has the same value in different forests. If you’ve used services like GALSync to create contacts, you’ll want to specify this option.
- ObjectSID and msExchangeMasterAccountSID/msRTCSIP-OriginatorSid – This option joins an enabled user in an account forest with a disabled user in a resource forest. In the Exchange realm of taxonomy, this is known simply as a linked mailbox. This option can also be leveraged if you only use Lync or Skype for Business and Exchange is not present in the forest.
- SAMAccountName and MailNickName – This leverages those attributes where its expected that the sign-in ID for the user can be found.
- Specific Attributes – You can select and define your own attribute. The only limitation here is this has been to be a searchable attribute across the Active Directory metaverse.
Filter Users and Devices
As we go into the next steps of this wizard, we need to look at the available filtering options. Some examples of this would be group-based filtering. This allows us to synchronize only a smaller subset of objects for a specific use. For example, pilot, proof of concept, test, etc.). Please note that this is only meant and intended for pilot type deployments instead of large scale production deployments.

Optional Features
As we go into the next step of the wizard, we talk about the use of optional features. Here we can add options like Exchange hybrid deployment, Password writeback, Group writeback, etc. to the mix.
The list of features each has their own description if you click the source link above. If you go through the wizard, you’ll see the ? next to each item. This will also provide you with that description of each feature as well.
I won’t belabor the details of each feature in this blog. But if you want to add additional features, you can simply set that. Then, it will allow you to provision/enable that feature in the wizard directly as a next step.
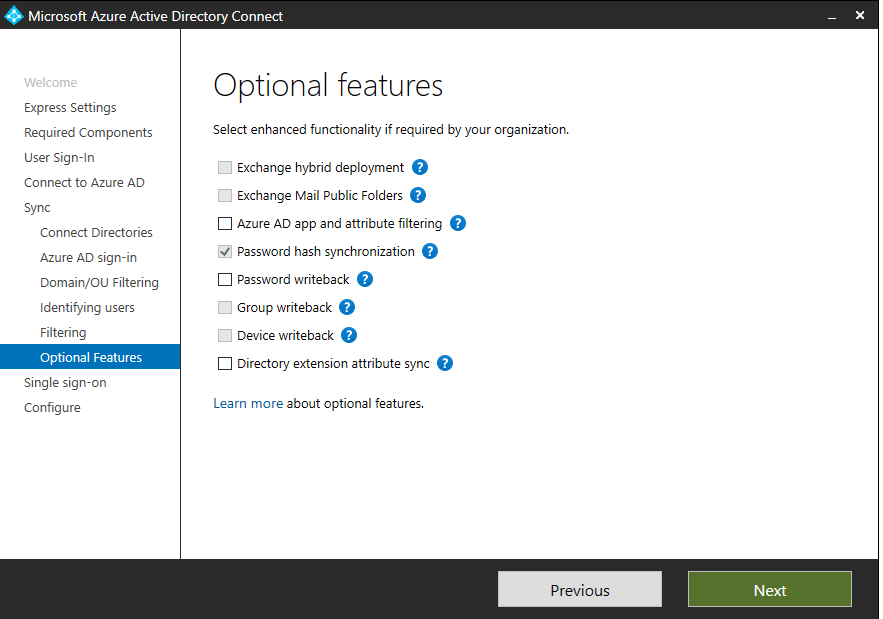
On this guide, we are not enabling anything beside the Password Hash Synchronization.
Regardless you’re using password synchronization or pass-through authentication, you simply need to ensure these two steps are completed:
- Create the necessary computer object account in your on-prem Active Directory
- Configure the intranet zone of the client machines to support SSO
Configure and Verify Everything
Once you hit the final steps in the wizard, you’ll simply need to configure and verify. You need to check whether you wish to start the synchronization process as soon as the wizard completes. Also, you can do this if you wish to enable Staging Mode. Accordingly, staging mode has some other steps. However, we will save them for another blog.
For now, we’ll synchronize (as we would if this were our first time running through the wizard) and proceed to the verification steps.
How would you know whether your Azure AD is connected to the On-premises AD? You can connect to the Azure AD Dashboard on the Azure portal.
After that, navigate to Users blade. If the synchronization has succeeded, you can find the users which on your on-premises being synchronized on the portal
Finally, it is ready!
At last, your on-premises directory is now synchronized with Azure AD. You can continue to connect your Azure application with your on-premises credential.