Products and Features
- Getting Started with CloudRaya Container Registry
- How to use Sudo on a CloudRaya Linux VM
- Keeping Your CloudRaya Linux VMs Up-to-Date
- Maximizing StorageRaya with Essential Practices
- Assign Multiple IP Addresses to Virtual Machine
- Generating a CloudRaya API key
- Simplify CloudRaya Management with API
- Deploying a Virtual Machine on CloudRaya
- Deploying a Kubernetes Cluster on KubeRaya
- Using StorageRaya – CloudRaya S3 Object Storage
- Opening Ping Access on Cloud Raya VM Public IP
- Maximize Your Storage Raya Access Speed with Content Delivery Network (CDN)
- How to Create Project Tag in Cloud Raya for More Organized VM Billing Report
- Exporting Cloud Raya VM to outer Cloud Raya's Infrastructure using Acronis Cyber Protect
- SSO Management on Cloud Raya
- Easy Steps to Enable VPC in Cloud Raya
- Using the SSH key Feature in Cloud Raya Dashboard
- Cloud Raya Load Balancer, Solution to Distribute Load Equally
- Create your own VPN server with DNS-Level AdBlocker using PiVPN
- Fix Broken LetsEncrypt SSL Certificate due to Expired Root CA Certificate
- How to Make a Snapshot and Configure VM Backup in Cloud Raya
- How to Request Services or Licenses Products
- Adding, Attaching, and Resize Root Storage Disk in Cloud Raya VPS
- Managing your DNS Zone with DNS Bucket in Cloud Raya
- Create VM, Custom Package, Reinstall VM, and Adjusting Security Profile
- How to backup Linux VM via Acronis in Cloud Raya
- How to Backup Desktop Linux and Windows via Acronis in Cloud Raya
- Backing-Up Cloud Raya Windows VM Using Acronis Cyber Protect
- Load Balancing in Cloud Raya
- Establishing a VPN in Cloud Raya
- Generating an API Token
- Deploying a Virtual Machine in Cloud Raya
- Show Remaining Articles ( 17 ) Collapse Articles
- How to backup Linux VM via Acronis in Cloud Raya
- How to Backup Desktop Linux and Windows via Acronis in Cloud Raya
- Maximizing StorageRaya with Essential Practices
- Using StorageRaya – CloudRaya S3 Object Storage
- Building a Static Website Using Storage Raya S3 Bucket
- Integrating S3 Storage Raya and Strapi for Asset Storage Optimization – Part 4
- Maximize Your Storage Raya Access Speed with Content Delivery Network (CDN)
- Managing Storage Raya from various tools and from various OS
- Binding NextCloud with CloudRaya S3 Object Storage as External Storage Mount
- How to use Sudo on a CloudRaya Linux VM
- Keeping Your CloudRaya Linux VMs Up-to-Date
- Implement Multi-Factor Authentication on CloudRaya Linux VM
- Assign Multiple IP Addresses to Virtual Machine
- Deploying a Virtual Machine on CloudRaya
- Configurating cPanel Using Ubuntu 20.04 on CloudRaya – Part 2
- Deploying cPanel Using Ubuntu 20.04 on CloudRaya - Part 1
- Exporting Cloud Raya VM to outer Cloud Raya's Infrastructure using Acronis Cyber Protect
- Using the SSH key Feature in Cloud Raya Dashboard
- Adding, Attaching, and Resize Root Storage Disk in Cloud Raya VPS
- Create VM, Custom Package, Reinstall VM, and Adjusting Security Profile
- How to backup Linux VM via Acronis in Cloud Raya
- Backing-Up Cloud Raya Windows VM Using Acronis Cyber Protect
- Deploying a Virtual Machine in Cloud Raya
Integration
- Implement Multi-Factor Authentication on CloudRaya Linux VM
- Accessing KubeRaya Cluster Using the Kubernetes Dashboard
- Building a Static Website Using Storage Raya S3 Bucket
- Integrating S3 Storage Raya and Strapi for Asset Storage Optimization – Part 4
- Integrating Strapi Content to Frontend React - Part 3
- Content Management with Strapi Headless CMS - Part 2
- Strapi Headless CMS Installation in CloudRaya - Part. 1
- Using SSH Key on CloudRaya VM with PuTTY
- Installing Multiple PHP Versions in One VM for More Flexible Web Development
- Replatforming Apps to K8s with RKE and GitLab CI
- OpenAI API Integration: Completions in PHP
- Building an Email Server on CloudRaya Using iRedMail
- Improving Email Delivery with Sendinblue SMTP Relay
- Building a Self Hosted Password Manager Using Passbolt
- How to Install Podman on Almalinux/Rocky Linux 9
- ElkarBackup: GUI Based backup Tools based on Rsync and Rsnapshot
- Improving Webserver Performance with SSL Termination on NGINX Load Balancer
- Using NGINX as an HTTP Load Balancer
- Automating Task with Cronjob
- Upgrade Zimbra and the OS Version
- Deploy Mailu on Rancher Kubernetes
- Export and Import Database in MySQL or MariaDB Using Mysqldump
- Backup & Sync Local and Remote Directories Using RSYNC
- Managing Storage Raya from various tools and from various OS
- Binding NextCloud with CloudRaya S3 Object Storage as External Storage Mount
- Simple monitoring and alerting with Monit on Ubuntu 22.04 LTS
- VS Code on your browser! How to install code-server on a VM
- Implementing Redis HA and Auto-Failover on Cloud Raya
- Using XFCE Desktop Environment on Cloud Raya VM
- Installing Python 3.7-3.9 on Ubuntu 22.04 Jammy LTS using PPA
- Implementing Continuous Integration with Gitlab CI and Continuous Delivery with Rancher Fleet
- Using Collabora Online on Cloud Raya NextCloud's VM
- Installing NextCloud in Cloud Raya- Detail Steps from the Beginning to the Very End
- Set Up High Availability PostgreSQL Cluster Using Patroni on Cloud Raya
- Set Up WAF KEMP in Cloud Raya Part 2
- Set Up WAF KEMP in Cloud Raya Part 1
- Using the SSH key Feature in Cloud Raya Dashboard
- Monitor Your Services Uptime Using Uptime Kuma
- Hosting Static Website with Hugo on Cloud Raya
- Kubernetes Ingress Controller using SSL in CloudRaya
- Reverse Proxy management using Nginx Proxy Manager
- Create your own VPN server with DNS-Level AdBlocker using PiVPN
- How to deploy Portainer on Linux to easily manage your docker containers
- High Availability Kubernetes Using RKE in Cloud Raya Part 3
- High Availability Kubernetes Using RKE in Cloud Raya Part 2
- High Availability Kubernetes Using RKE in Cloud Raya Part 1
- How to backup Linux VM via Acronis in Cloud Raya
- How to Backup Desktop Linux and Windows via Acronis in Cloud Raya
- Deploying Magento on Cloud Raya
- How to Install Nextcloud on Cloud Raya
- How to Install CWP in Cloud Raya
- How to Install Node.js and Launch Your First Node App
- How to install and secure MariaDB on Ubuntu 18.04 and 20.04 on Cloud Raya
- How to Install and Securing MongoDB on Ubuntu 18.04 and 20.04
- Classes: Post Installation on Ansible
- Classes: Install and Configure Ansible
- Classes: Introduction to Ansible for a robust Configuration Management
- How to Setup Active Directory Domain Service & DNS with Cloud Raya
- How to Host Your Own Docker Hub in Cloud Raya
- How to Setup Your Own Laravel with Nginx in Ubuntu 18.04
- How to Deploy Container in Cloud Raya using Docker
- Securing CentOS with iptables
- Install and Configure Squid Proxy in Ubuntu
- Installing Apache and Tomcat: A Quick Way
- Securing Ubuntu with UFW
- Install a Node.js and Launch a Node App on Ubuntu 18.04
- Installing LAMP in Ubuntu
- Installing LEMP Stack on Ubuntu 18.04
- Show Remaining Articles ( 53 ) Collapse Articles
- Articles coming soon
- Implement Multi-Factor Authentication on CloudRaya Linux VM
- Configurating cPanel Using Ubuntu 20.04 on CloudRaya – Part 2
- Deploying cPanel Using Ubuntu 20.04 on CloudRaya - Part 1
- Integrating S3 Storage Raya and Strapi for Asset Storage Optimization – Part 4
- Integrating Strapi Content to Frontend React - Part 3
- Content Management with Strapi Headless CMS - Part 2
- Strapi Headless CMS Installation in CloudRaya - Part. 1
- Using SSH Key on CloudRaya VM with PuTTY
- Building an Email Server on CloudRaya Using iRedMail
- Improving Email Delivery with Sendinblue SMTP Relay
- Building a Self Hosted Password Manager Using Passbolt
- ElkarBackup: GUI Based backup Tools based on Rsync and Rsnapshot
- Improving Webserver Performance with SSL Termination on NGINX Load Balancer
- Using NGINX as an HTTP Load Balancer
- Upgrade Zimbra and the OS Version
- Deploy Mailu on Rancher Kubernetes
- Managing Storage Raya from various tools and from various OS
- Binding NextCloud with CloudRaya S3 Object Storage as External Storage Mount
- Simple monitoring and alerting with Monit on Ubuntu 22.04 LTS
- VS Code on your browser! How to install code-server on a VM
- Implementing Redis HA and Auto-Failover on Cloud Raya
- Using XFCE Desktop Environment on Cloud Raya VM
- Implementing Continuous Integration with Gitlab CI and Continuous Delivery with Rancher Fleet
- Using Collabora Online on Cloud Raya NextCloud's VM
- Installing NextCloud in Cloud Raya- Detail Steps from the Beginning to the Very End
- Set Up WAF KEMP in Cloud Raya Part 2
- Set Up WAF KEMP in Cloud Raya Part 1
- Monitor Your Services Uptime Using Uptime Kuma
- Create your own VPN server with DNS-Level AdBlocker using PiVPN
- How to deploy Portainer on Linux to easily manage your docker containers
- High Availability Kubernetes Using RKE in Cloud Raya Part 3
- High Availability Kubernetes Using RKE in Cloud Raya Part 2
- High Availability Kubernetes Using RKE in Cloud Raya Part 1
- How to Install Nextcloud on Cloud Raya
- Classes: Post Installation on Ansible
- Classes: Install and Configure Ansible
- Classes: Introduction to Ansible for a robust Configuration Management
- Connect Windows Active Directory on Cloud Raya with Azure AD
- How to Host Your Own Docker Hub in Cloud Raya
- How to Deploy Container in Cloud Raya using Docker
- Show Remaining Articles ( 25 ) Collapse Articles
- Accessing KubeRaya Cluster Using the Kubernetes Dashboard
- Integrating S3 Storage Raya and Strapi for Asset Storage Optimization – Part 4
- Integrating Strapi Content to Frontend React - Part 3
- Content Management with Strapi Headless CMS - Part 2
- Strapi Headless CMS Installation in CloudRaya - Part. 1
- Creating Interactive Chatbot with OpenAI API in PHP
- Installing Multiple PHP Versions in One VM for More Flexible Web Development
- OpenAI API Integration: Completions in PHP
- Improving Webserver Performance with SSL Termination on NGINX Load Balancer
- Using NGINX as an HTTP Load Balancer
- Automating Task with Cronjob
- How to Deploy Django App on Cloud Raya VM Using Gunicorn, Supervisor, and Nginx
- How to Install Node.js and Launch Your First Node App
- How to Setup Your Own Laravel with Nginx in Ubuntu 18.04
- Install a Node.js and Launch a Node App on Ubuntu 18.04
- How to use Sudo on a CloudRaya Linux VM
- Keeping Your CloudRaya Linux VMs Up-to-Date
- Implement Multi-Factor Authentication on CloudRaya Linux VM
- Using SSH Key on CloudRaya VM with PuTTY
- Building a Self Hosted Password Manager Using Passbolt
- Improving Webserver Performance with SSL Termination on NGINX Load Balancer
- Export and Import Database in MySQL or MariaDB Using Mysqldump
- Backup & Sync Local and Remote Directories Using RSYNC
- How to Deploy Django App on Cloud Raya VM Using Gunicorn, Supervisor, and Nginx
- Set Up WAF KEMP in Cloud Raya Part 2
- Set Up WAF KEMP in Cloud Raya Part 1
- Using the SSH key Feature in Cloud Raya Dashboard
- How to backup Linux VM via Acronis in Cloud Raya
- How to Backup Desktop Linux and Windows via Acronis in Cloud Raya
- Securing CentOS with iptables
- Securing Ubuntu with UFW
- Show Remaining Articles ( 1 ) Collapse Articles
- Configurating cPanel Using Ubuntu 20.04 on CloudRaya – Part 2
- Deploying cPanel Using Ubuntu 20.04 on CloudRaya - Part 1
- Integrating S3 Storage Raya and Strapi for Asset Storage Optimization – Part 4
- Integrating Strapi Content to Frontend React - Part 3
- Content Management with Strapi Headless CMS - Part 2
- Strapi Headless CMS Installation in CloudRaya - Part. 1
- Creating Interactive Chatbot with OpenAI API in PHP
- Installing Multiple PHP Versions in One VM for More Flexible Web Development
- Building an Email Server on CloudRaya Using iRedMail
- Building a Self Hosted Password Manager Using Passbolt
- Improving Webserver Performance with SSL Termination on NGINX Load Balancer
- Using NGINX as an HTTP Load Balancer
- Installing Python 3.7-3.9 on Ubuntu 22.04 Jammy LTS using PPA
- Reverse Proxy management using Nginx Proxy Manager
- Install and Configure Squid Proxy in Ubuntu
- Installing Apache and Tomcat: A Quick Way
- Installing LAMP in Ubuntu
- Installing LEMP Stack on Ubuntu 18.04
- Show Remaining Articles ( 3 ) Collapse Articles
- Building a Static Website Using Storage Raya S3 Bucket
- Integrating S3 Storage Raya and Strapi for Asset Storage Optimization – Part 4
- Integrating Strapi Content to Frontend React - Part 3
- Content Management with Strapi Headless CMS - Part 2
- Strapi Headless CMS Installation in CloudRaya - Part. 1
- Creating Interactive Chatbot with OpenAI API in PHP
- Installing Multiple PHP Versions in One VM for More Flexible Web Development
- OpenAI API Integration: Completions in PHP
- Hosting Static Website with Hugo on Cloud Raya
- Deploying Magento on Cloud Raya
- How to Install CWP in Cloud Raya
- How to Setup Active Directory Domain Service & DNS with Cloud Raya
- Articles coming soon
Assign Multiple IP Addresses to Virtual Machine
Each CloudRaya Virtual Machine (VM) comes with one network interface (NIC) attached to it. This NIC can be assigned one or more public and private IP addresses.
Assigning multiple IP addresses to a Virtual Machine offers the following capabilities:
Increased Connectivity Options: Having multiple IP addresses allows for enhanced connectivity options, enabling the VM to communicate with various external services or devices.
Network Segmentation: You can use different IP addresses for distinct purposes, helping in organizing and segmenting your network traffic efficiently.
Improved Service Isolation: Assigning multiple IPs facilitates better isolation of services running on the VM, reducing potential conflicts and enhancing overall service stability.
It's important to note that while you can assign multiple private IP addresses to a CloudRaya VM, there is only one network interface (NIC) per VM.
For creating Private IPs, there is no limitation, and it depends on the number of VPC subnets you have. However, the restriction on creating Public IPs for translating these Private IPs is linked to your account limitations. To check your account limits, visit the following page: https://cp.cloudraya.com/profile
Adding New Public and Private IP to a Virtual Machine
You can add a private or a public IP to your existing VM by following these steps:
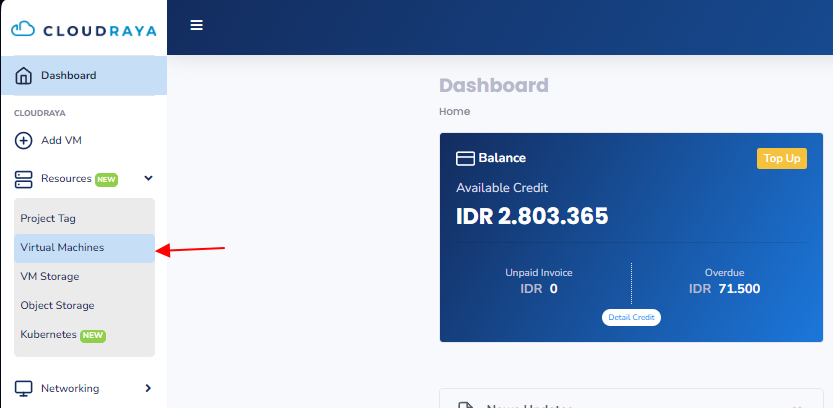
Once you are logged into the CloudRaya User panel, on the left of the dashboard, navigate to the ‘Resources‘ > ‘Virtual Machines‘ menu.
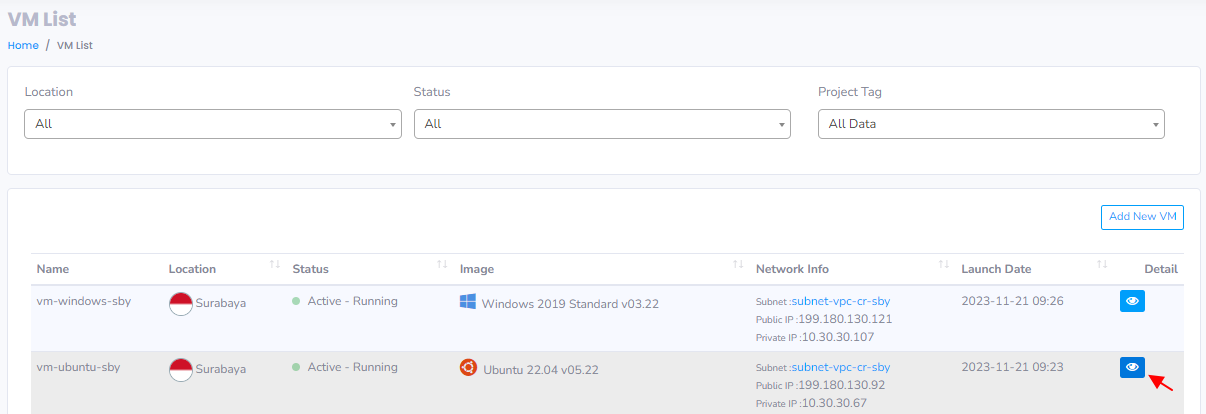
Access the details of the VM you want to add an IP to.
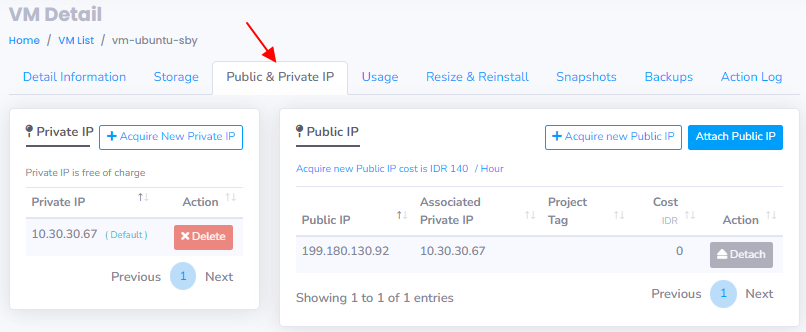
In the VM details page, select the ‘Public & Private IP’ tab.
Here, you’ll see details of the current Private and Public IPs your VM is using.
Add Private IP Address
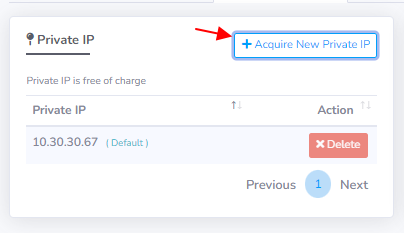
To add a new Private IP, click on “+ Acquire New Private IP.”
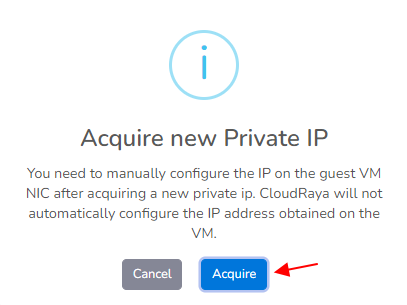
A confirmation button will appear. Even though you added the Private IP via the panel, you still need to configure it manually on the VM’s OS level. CloudRaya will not automatically configure the IP address obtained on the Virtual Machine.
If so, click “Acquire.”
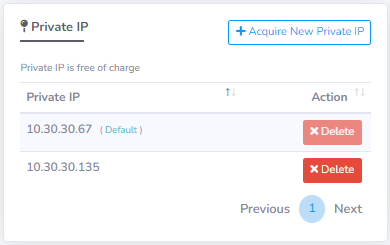
The new Private IP will appear in the list. Private IPs are free of charge.
Add Public IP Address
Optionally, you can add a new Public IP and link it to the previously added Private IP.

To add a new Public IP, click on “+ Acquire New Public IP.”
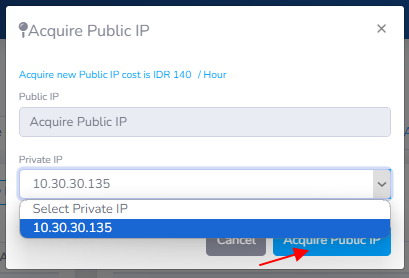
A dialog box will appear, allowing you to choose which Private IP to link with the new Public IP.
Select the Private IP you created and click “Acquire Public IP.”
Acquiring a new Public IP costs IDR 140 per hour.
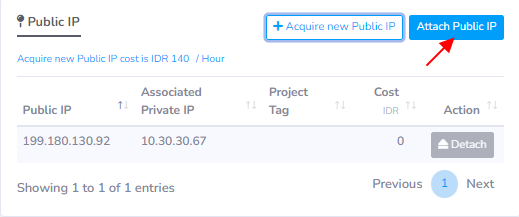
You can also add a Public IP you created earlier (if any) by clicking “Attach Public IP.”
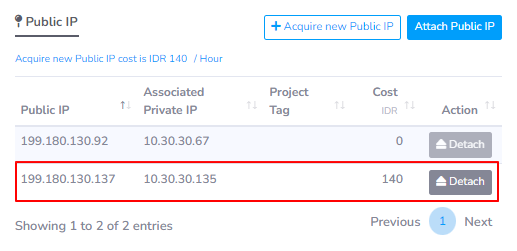
Once done, the new Public IP will appear in the list with associated Private IP information and hourly cost.
You can also detach the Public IP from its associated Private IP if needed.
Assign IP Addresses to a VM's Operating System
Access and Log into a Virtual Machine with Multiple Private IP Addresses. Manually include all private IP addresses, including the primary one, that you assigned to the VM. Follow the provided steps based on your VM’s operating system.
Linux (e.g., Ubuntu 18.04+)
Ubuntu 18.04 and newer versions now use netplan for handling the computer’s network settings. To find the most up-to-date information for your Linux system, check the latest documentation.
To open the netplanconfiguration file, use the following command:
sudo nano /etc/netplan/50-cloud-init.yaml
In your current configuration, add the following syntax to the network interface of your VM. In this example, my VM has the network interface ens3
				# This file is generated from information provided by the datasource.  Changes
# to it will not persist across an instance reboot.  To disable cloud-init's
# network configuration capabilities, write a file
# /etc/cloud/cloud.cfg.d/99-disable-network-config.cfg with the following:
# network: {config: disabled}
network:
    ethernets:
        ens3:
            dhcp4: true
            match:
                macaddress: 02:01:01:65:01:bc
            set-name: ens3
            addresses:
                - 10.30.30.67/24
                - 10.30.30.135/24
    version: 2
Adjust the Address values based on the private IP addresses of your virtual machines (VMs).
Once done, save and exit.
Preventing Cloud-init from Reverting Network Settings on Reboot
In the Netplan configuration above, there’s a comment indicating that the configuration file will revert to default settings after each VM reboot:
				# This file is generated from information provided by the datasource.
# Changes to it will not persist across an instance reboot.
This is the default behavior of cloud-init, which manages network configuration during the initial boot. When the VM reboots, cloud-init may reset the network configuration to the default values provided by the cloud service provider or other data sources.
To address this issue, you can follow these steps.
/etc/cloud/cloud.cfg.d/99-disable-network-config.cfg using the following command:
sudo nano /etc/cloud/cloud.cfg.d/99-disable-network-config.cfg
Then, add the following configuration:
network: {config: disabled}
This prevents cloud-init from changing the network configuration during reboot.
Once done, save and exit.
Test the changes with netplan try to confirm syntax:
netplan try
Assuming no issues with netplan try, apply the configuration changes:
sudo netplan apply
Verify the IP address is added to the network interface with the following command:
ip addr list ens3
You should see the added IP address in the list. Example:
				2: ens3: <BROADCAST,MULTICAST,UP,LOWER_UP> mtu 1500 qdisc fq_codel state UP group default qlen 1000
    link/ether 02:01:01:65:01:bc brd ff:ff:ff:ff:ff:ff
    altname enp0s3
    inet 10.30.30.67/24 metric 100 brd 10.30.30.255 scope global ens3
       valid_lft forever preferred_lft forever
    inet 10.30.30.135/24 brd 10.30.30.255 scope global secondary ens3
       valid_lft forever preferred_lft forever
    inet6 fe80::1:1ff:fe65:1bc/64 scope link
       valid_lft forever preferred_lft forever
Now, let’s try to reboot the VM, and we can see that the configuration remains unchanged and the IP address value stays the same as before.
				# This file is generated from information provided by the datasource.  Changes
# to it will not persist across an instance reboot.  To disable cloud-init's
# network configuration capabilities, write a file
# /etc/cloud/cloud.cfg.d/99-disable-network-config.cfg with the following:
# network: {config: disabled}
network:
    ethernets:
        ens3:
            dhcp4: true
            match:
                macaddress: 02:01:01:65:01:bc
            set-name: ens3
            addresses:
                - 10.30.30.67/24
                - 10.30.30.135/24
    version: 2
Validation
To make sure that your secondary IP configuration can connect to the internet using its public IP, you can use thi following simple command. Just replace the IP with the secondary private IP address you added to the CloudRaya VM network interface.
ping -I 10.30.30.135 cloudraya.com
				root@vm-ubuntu-sby:~# ping -I 10.30.30.135 cloudraya.com
PING cloudraya.com (163.53.194.50) from 10.30.30.135 : 56(84) bytes of data.
64 bytes from server103.wowrack.com (163.53.194.50): icmp_seq=1 ttl=58 time=4.25 ms
64 bytes from server103.wowrack.com (163.53.194.50): icmp_seq=2 ttl=58 time=4.43 ms
64 bytes from server103.wowrack.com (163.53.194.50): icmp_seq=3 ttl=58 time=4.64 ms
64 bytes from server103.wowrack.com (163.53.194.50): icmp_seq=4 ttl=58 time=6.15 ms
64 bytes from server103.wowrack.com (163.53.194.50): icmp_seq=5 ttl=58 time=5.01 ms
64 bytes from server103.wowrack.com (163.53.194.50): icmp_seq=6 ttl=58 time=4.10 ms
It’s noticed that the connection is now established using the newly added private IP.
Windows Server
After connecting to your Windows Server VM through RDP, follow these steps:
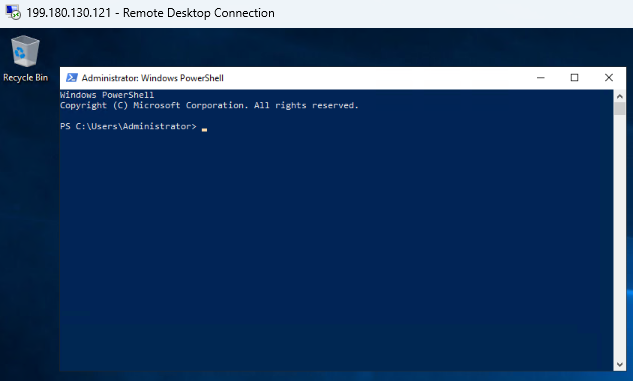
Open a Command Prompt or PowerShell.
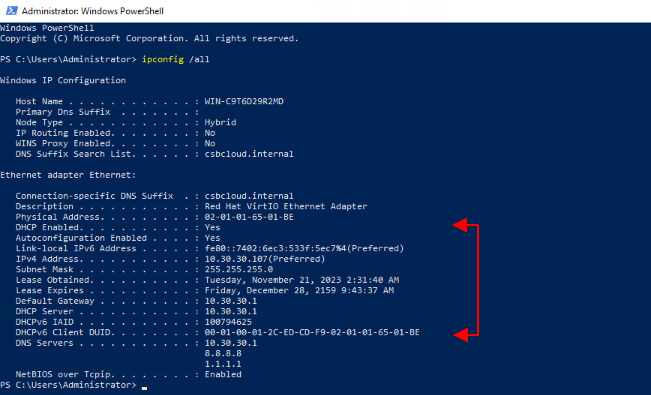
Type ipconfig /all in the command line. Look for the Primary private IP address assigned by DHCP.

Type ncpa.cpl in the command line to open the ‘Network Connections‘ configuration.
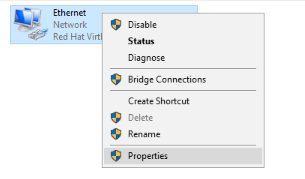
Open the ‘Properties‘ for the network adapter with the new IP addresses.
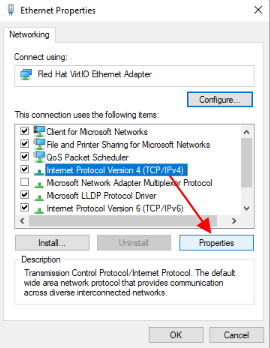
In the list, choose Internet Protocol Version 4 (TCP/IPv4), then click “Properties“.
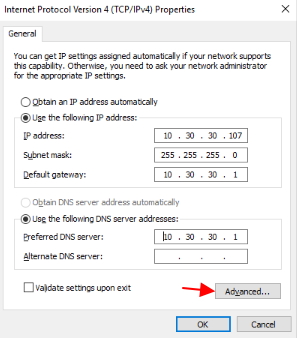
Select “Use the following IP address:” and enter the following values.
- IP address: Enter the main private IP address of the VM.
- Subnet mask: Enter a subnet mask that matches your IP address. To check the value, look at the output in
ncpa.cplas mentioned earlier. - Default gateway: The first IP address in the same subnet. To confirm the value, check the output in
ncpa.cplas mentioned earlier.
Select Use the following DNS server addresses:. Enter the following values.
- Preferred DNS server: Fill in your main DNS server. You can use the value from the Default Gateway IP.
Now, to add a new Private IP to our VM, click on the “Advanced” button.
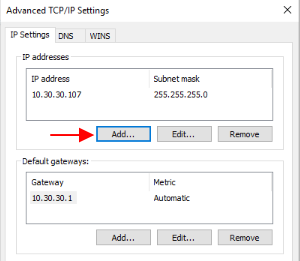
Then, click on “Add“.
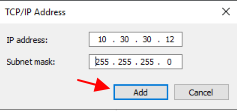
Type in the private IP address you added to the VM network interface. Enter the corresponding Subnet mask. Click “Add“.
Follow the same steps to add any extra private IP addresses to your VM network interface.
If so, click “OK” and “Close” to close the adapter settings. After that, your RDP connection will be re-established.
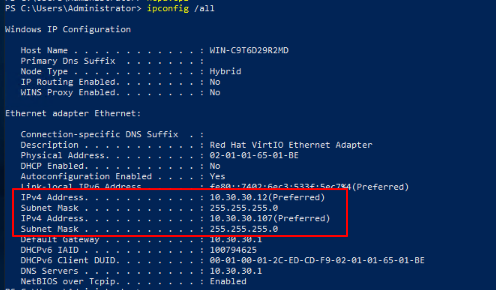
Open a command prompt or PowerShell. And type ipconfig /all again and press Enter.
Check that the primary and secondary private IP addresses are included in the configuration.
Validation
To make sure that your secondary IP configuration can connect to the internet using its public IP, you can use the following simple command. Just replace the IP with the secondary private IP address you added to the CloudRaya VM network interface.
ping -S 10.30.30.12 cloudraya.com
				PS C:\Users\Administrator> ping -S 10.30.30.12 cloudraya.com

Pinging cloudraya.com [163.53.194.50] from 10.30.30.12 with 32 bytes of data:
Reply from 163.53.194.50: bytes=32 time=3ms TTL=58
Reply from 163.53.194.50: bytes=32 time=4ms TTL=58
Reply from 163.53.194.50: bytes=32 time=4ms TTL=58
Reply from 163.53.194.50: bytes=32 time=4ms TTL=58

Ping statistics for 163.53.194.50:
    Packets: Sent = 4, Received = 4, Lost = 0 (0% loss),
Approximate round trip times in milli-seconds:
    Minimum = 3ms, Maximum = 4ms, Average = 3ms
It’s noticed that the connection is now established using the newly added private IP.