Managing Storage Raya from various tools and from various OS
In addition to using panels, according to our discussion in this article.
There are so many S3 Client applications that can be used, in this article we will discuss three ways to manage Storage Raya based on the tools and OS variants.
GUI S3 Client on Windows OS
There are several S3 client applications that offer S3 management using a GUI (Graphical User Interface). One of the most popular, easy-to-use, and definitely open-source is Cyberduck.
A brief explanation of Cyberduck
Cyberduck provides full operational convenience in connecting to Storage Raya. The Cyberduck application is not only used as an S3 client, but can also be a client for FTP, SFTP, WebDAV, Dropbox, Google Drive, and many others.
There are many things we can do in CyberDuck, including:
- Add & Remove buckets
- Upload, download, and sync files
- Integrating with other programs we use to edit files (depending on file extension, eg: .txt)
- Edit permissions (ACL) for each file, and folder, up to the bucket level
- Edit Metadata for each file
- Duplicate files, folders, up to bucket level
- Monitor our file transfer process
- Create bookmarks for our other storage accounts (if any) and reconnect without having to enter their credential details every time
And there are many other unique & advanced features that we can do, such as scheduling backups (using Duck CLI), and mounting the S3 into our Windows OS (using Mountain Duck).
Currently, Cyberduck is compatible with Windows OS and macOS.
How-To
The steps to install and operate CyberDuck are as follows:
Download Cyberduck at https://cyberduck.io and install it according to the Operating System you are using.
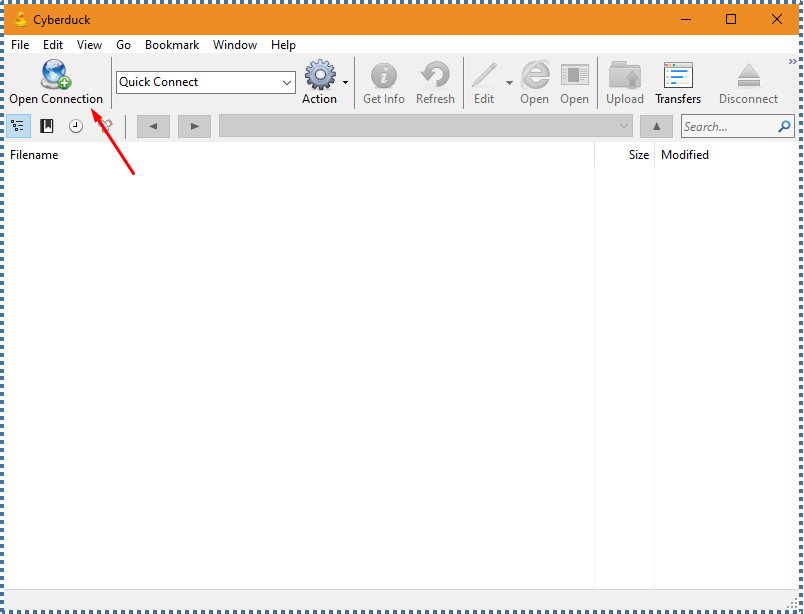
↳ If so, open the CyberDuck application. To start establishing a connection to Storage Raya, click on the Open Connection button.
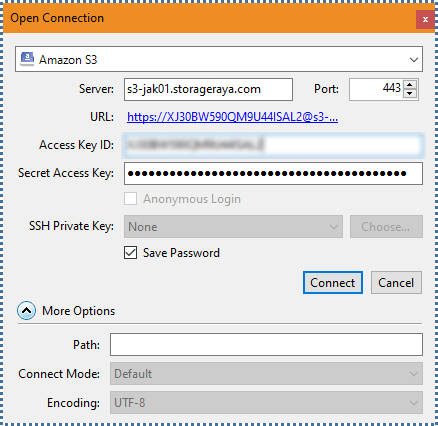
↳ In the dialog box that appears, fill in according to the example above. For “Access Key ID” and “Secret Access Key”, you can customize your own. If so, click Connect.
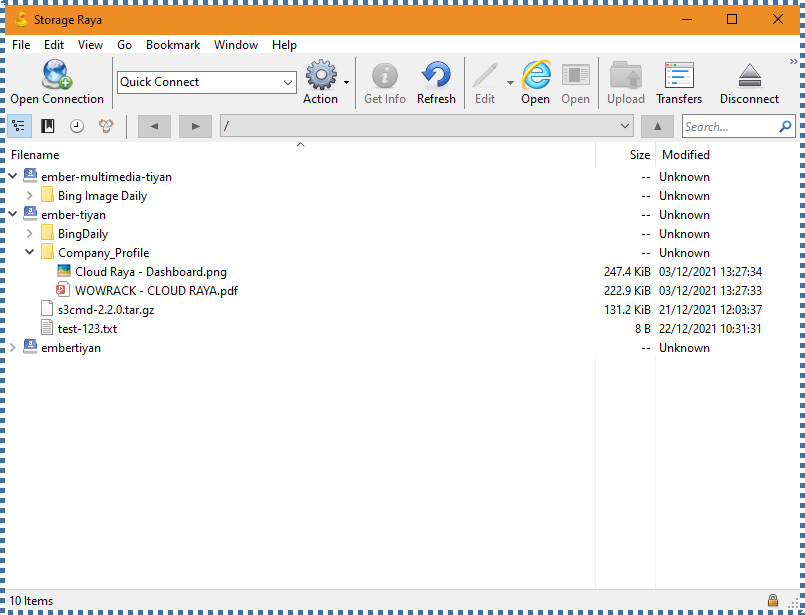
↳ If it is successful, then our Object Storage will be connected and display the buckets that we have. We can upload files into the Storage Raya service bucket by drag & drop the files that we want to upload.
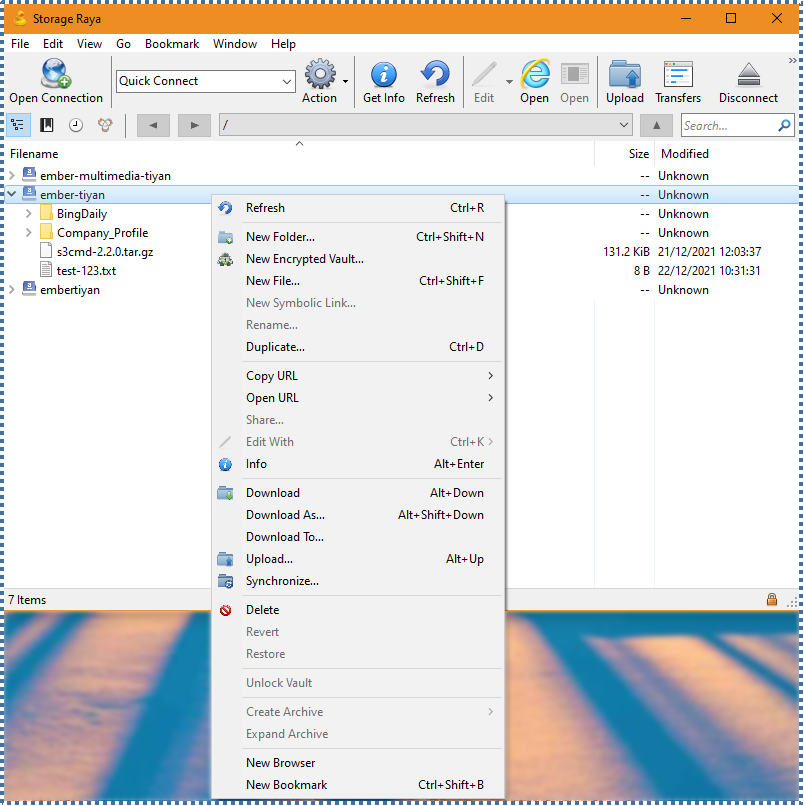
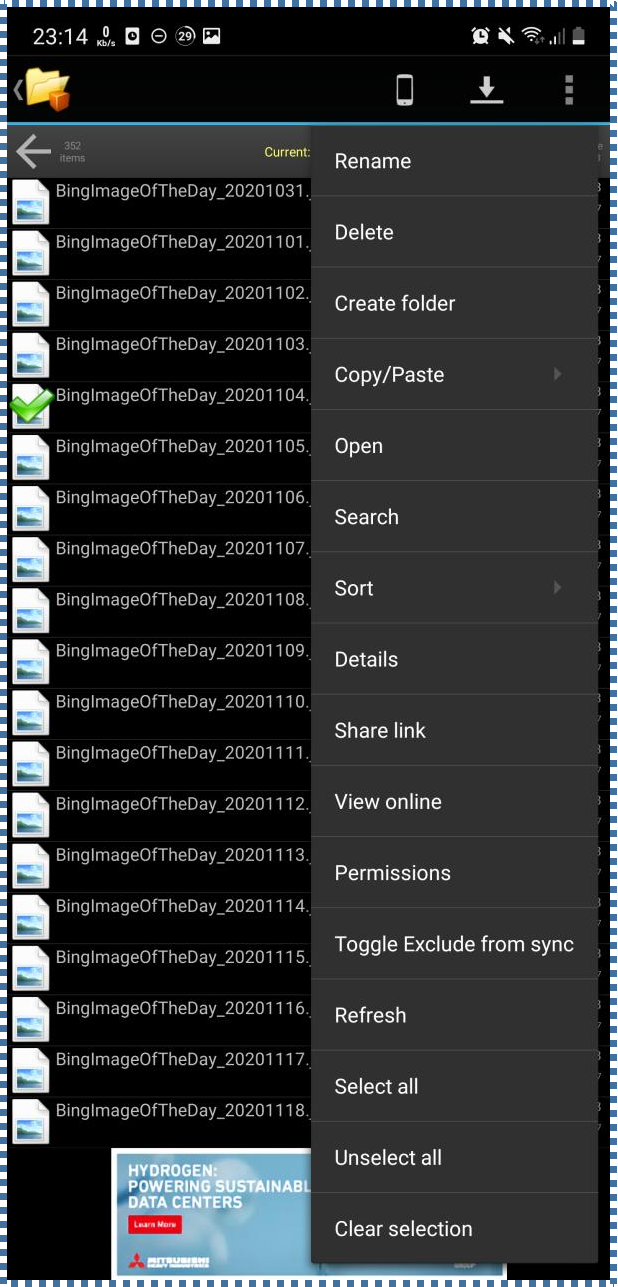
↳ Some features that we can do to our files, folders, or buckets.
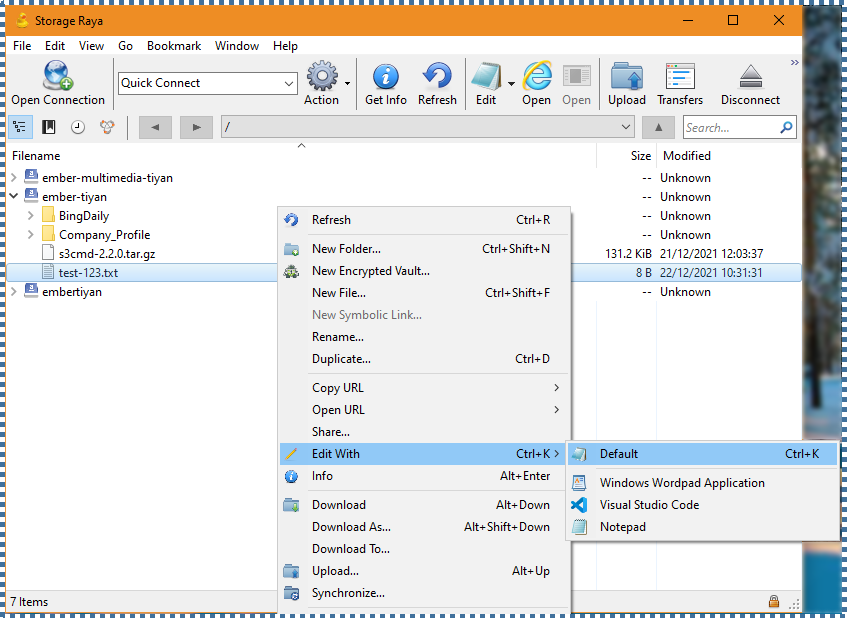
↳ Can edit files directly (on the go) without having to download the file first.
CLI S3 Client on Linux OS (Ubuntu)
Next, manage Storage Raya using the CLI (Command Line Interface). Like S3 tools that use a GUI basis, there are also many parties who develop CLI-based S3 tools. One of the most popular is the S3CMD tool.
A brief explanation of S3CMD
S3CMD is an Open Source tool that is free for both personal and commercial use. Today, most cloud/sysadmins use S3CMD to manage S3 buckets. S3CMD is written in Python.
S3CMD comes with many features and options, including:
- Over 60+ command-line options
- Encryption
- Incremental Backup
- S3 sync
- Support multipart uploads
- ACLs and metadata management
- Check the size of the S3 bucket, and many others
How-To
S3CMD repositories are by default installed for CentOS, RHEL, and Ubuntu Systems. In this tutorial, we will find out the simple steps to install S3CMD on Linux (Ubuntu) and operate S3CMD to manage Storage Raya.
Run the S3CMD installation using the following command:
# sudo apt-get install s3cmdIf so, now we configure S3CMD to be able to manage our StorageRaya buckets. Type the following command:
# s3cmd --configure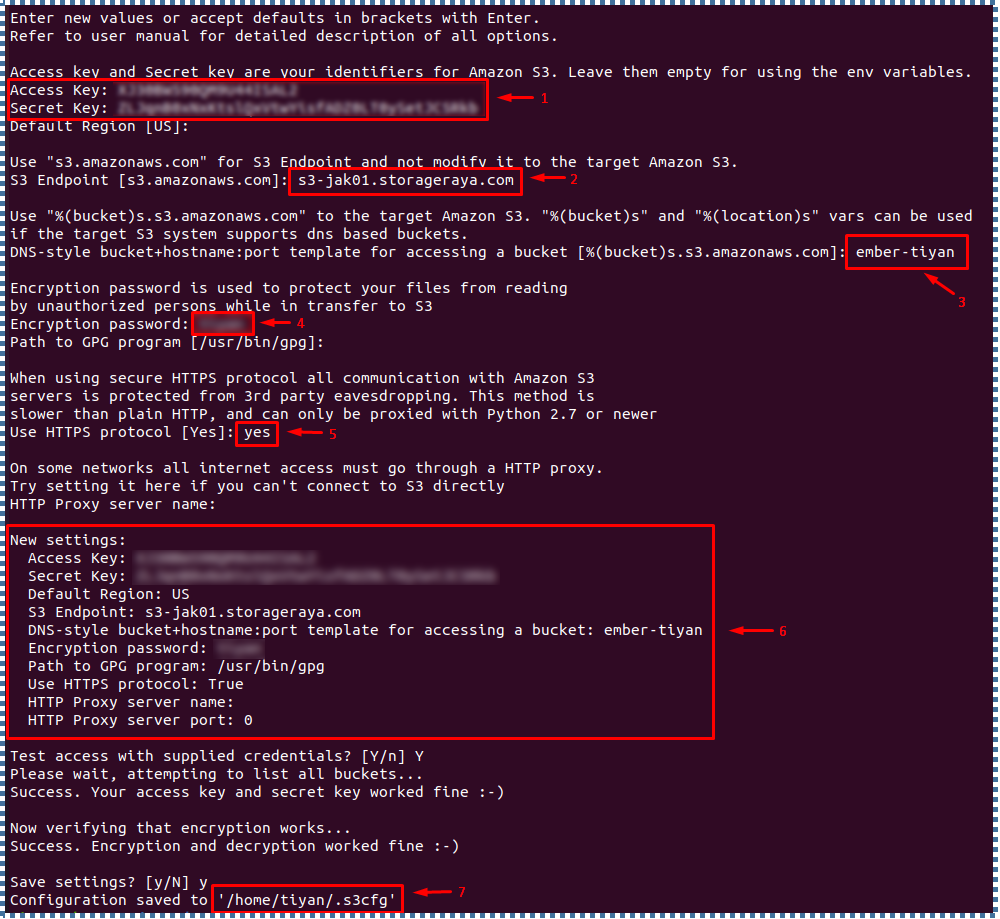
↳ There will be some perimeters that we have to fill. For one of them, we will need Storage Raya credentials (Access Key and Secret Key). You can adjust more or less like what I filled in the screenshot above.
Once the configuration is complete, let’s use the S3CMD command line to perform some activities on our StorageRaya service.
1. View all of our bucket lists
# s3cmd ls2. View the list of contents in our bucket
# s3cmd ls s3://bucket-name3. Create a new bucket
# s3cmd mb s3://new-bucket-name4. Upload files to the bucket (private)
# s3cmd put myfile.txt s3://my-bucket-name/myfile.txt5. Upload files to the bucket (public)
# s3cmd put --acl-public --guess-mime-type myfile.txt s3://my-bucket-name/myfile.txt6. Download files on the bucket
# s3cmd get s3://my-bucket-name/myfile.txt myfile.txt7. Delete files on the bucket
# s3cmd del s3://my-bucket-name/myfile.txt8. Delete the bucket
# s3cmd rb s3://my-bucket-name/9. Synchronize files on our local (source) with our S3 bucket (destination)
# s3cmd sync my-local-folder-path/ s3://my-bucket-name/10. Synchronize files on our S3 bucket (source) with our local (destination)
# s3cmd sync s3://my-bucket-name/ my-local-folder-path/11. Do a dry-run (doesn’t do the actual activities, but only displays information on what the process is going to do [download or upload] without actually doing it). In this tutorial, we will try the dry-run synchronization process.
# s3cmd --dry-run sync s3://my-bucket-name/ my-local-folder-path/Those are the most frequently used commands in S3CMD, where there are download, upload, delete, and sync. There are many more commands that we can explore and develop, one of which is by using scheduled sync combined with cron-jobs.
For other commands, you can explore in command help:
# s3cmd --helpMobile S3 Client on Android OS
The final method that we will discuss in this tutorial is to access and manage Storage Raya via Mobile S3 Client (Android). This method will be very suitable for those of us who want to synchronize and back up our archived data on a Mobile Phone.
The Android app that we use in this discussion is BucketAnywhere for S3. One of the reasons is that it is stable and there have been no problems or bugs that we have found.

A brief explanation of BucketAnywhere for S3
BucketAnywhere for S3 is a file manager for Android devices. This application allows us to manage multiple S3 buckets from an Object Storage service provider that is compliant with the S3 REST API, one of which is Storage Raya.
The features provided are quite complete and no less interesting than the two tools we discussed earlier, including:
- Upload, download, delete, rename, and copy files
- Edit permissions (ACL) of each file, up to bucket level
- Create bookmarks for our other S3 accounts (if any) and reconnect without having to enter their credential details (Server URL, Access Key ID, Secret Access Key)
- Support resume (continue) unfinished download process
- Server-side encryption support
- Support for sharing S3 files with a custom expiration date
If we need file synchronization features (remote/local mirrors, scheduling, and widgets) without ads, we can grab the Pro version for around $4.49.
How-To
The steps to install and operate BucketAnywhere are as follows:
Download BucketAnywhere on PlayStore, or via the following link.
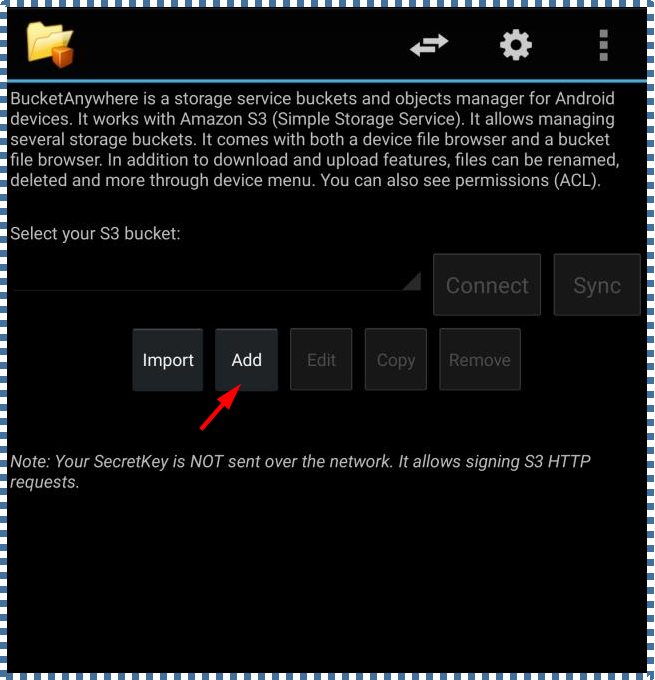
↳ The initial dashboard of BucketAnywhere is as follows. We can add a new connection by clicking Add.
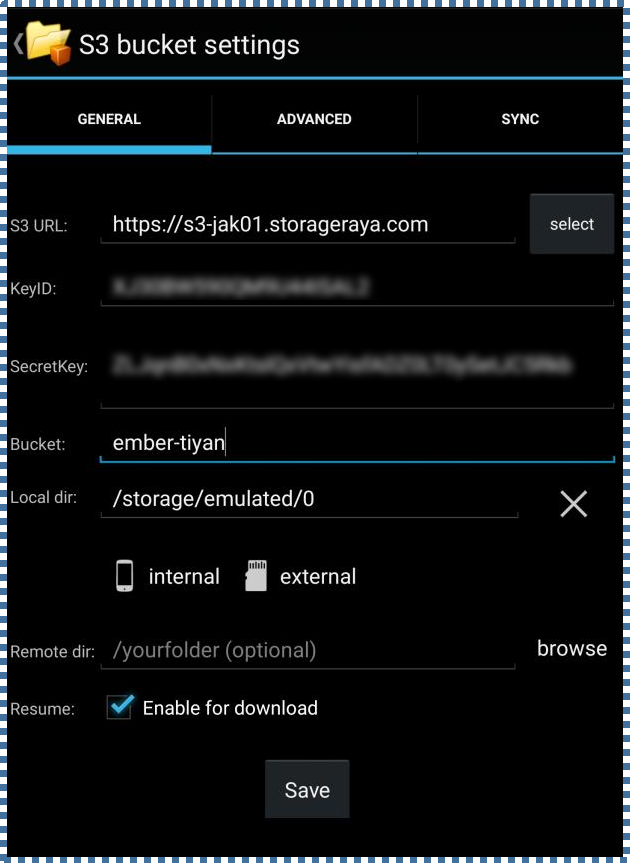
↳ We will be taken to a menu for our S3 Bucket settings. There are 3 tab menus that we can configure here. The main perimeter is in the General tab which you can fill in according to the screenshot above, or as follows:
- S3 URL: Fill in https://s3-jak01.storageraya.com
- KeyID : Fill in the KeyID you have in your account
- SecretKey : Fill in the SecretKey you have in your account
- Bucket : Fill in the name of your bucket in Storage Raya that you want to manage
- Local dir : The location on the mobile phone that you use to save files or sync with your Storage Raya bucket
- Resume: We can check if we want to resume the unfinished file download process from the bucket
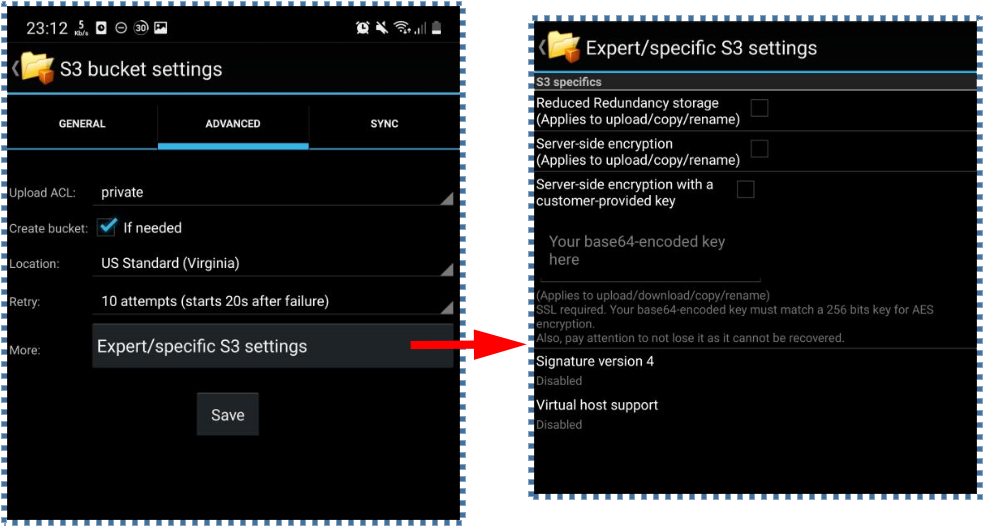
↳ The configuration on the Advanced menu is an advanced feature that you can adjust depending on your needs.
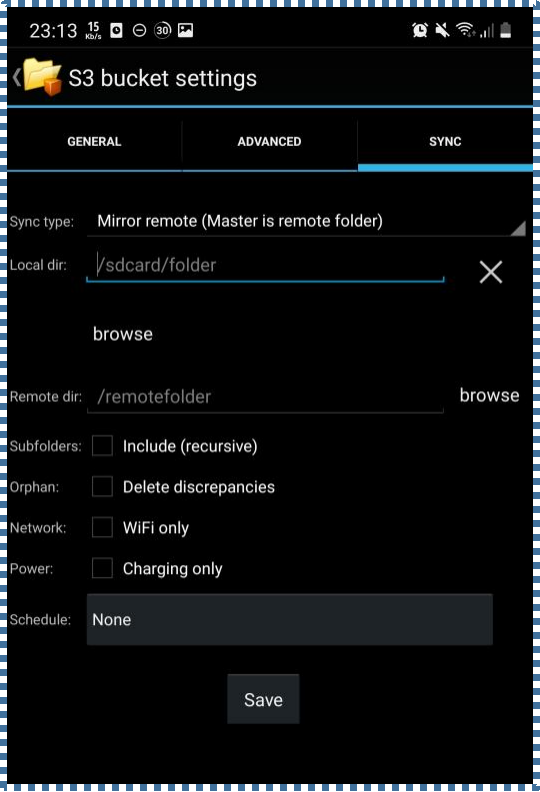
↳ You can use the Sync tab if you are using the Pro version. Where you can synchronize files (remote/local mirrors, scheduling, and widgets) in this menu. If so, you can click Save.

↳ Now connect your bucket by clicking Connect.

↳ Initial view when we successfully open our Bucket.
↳ The features we can do on our files.
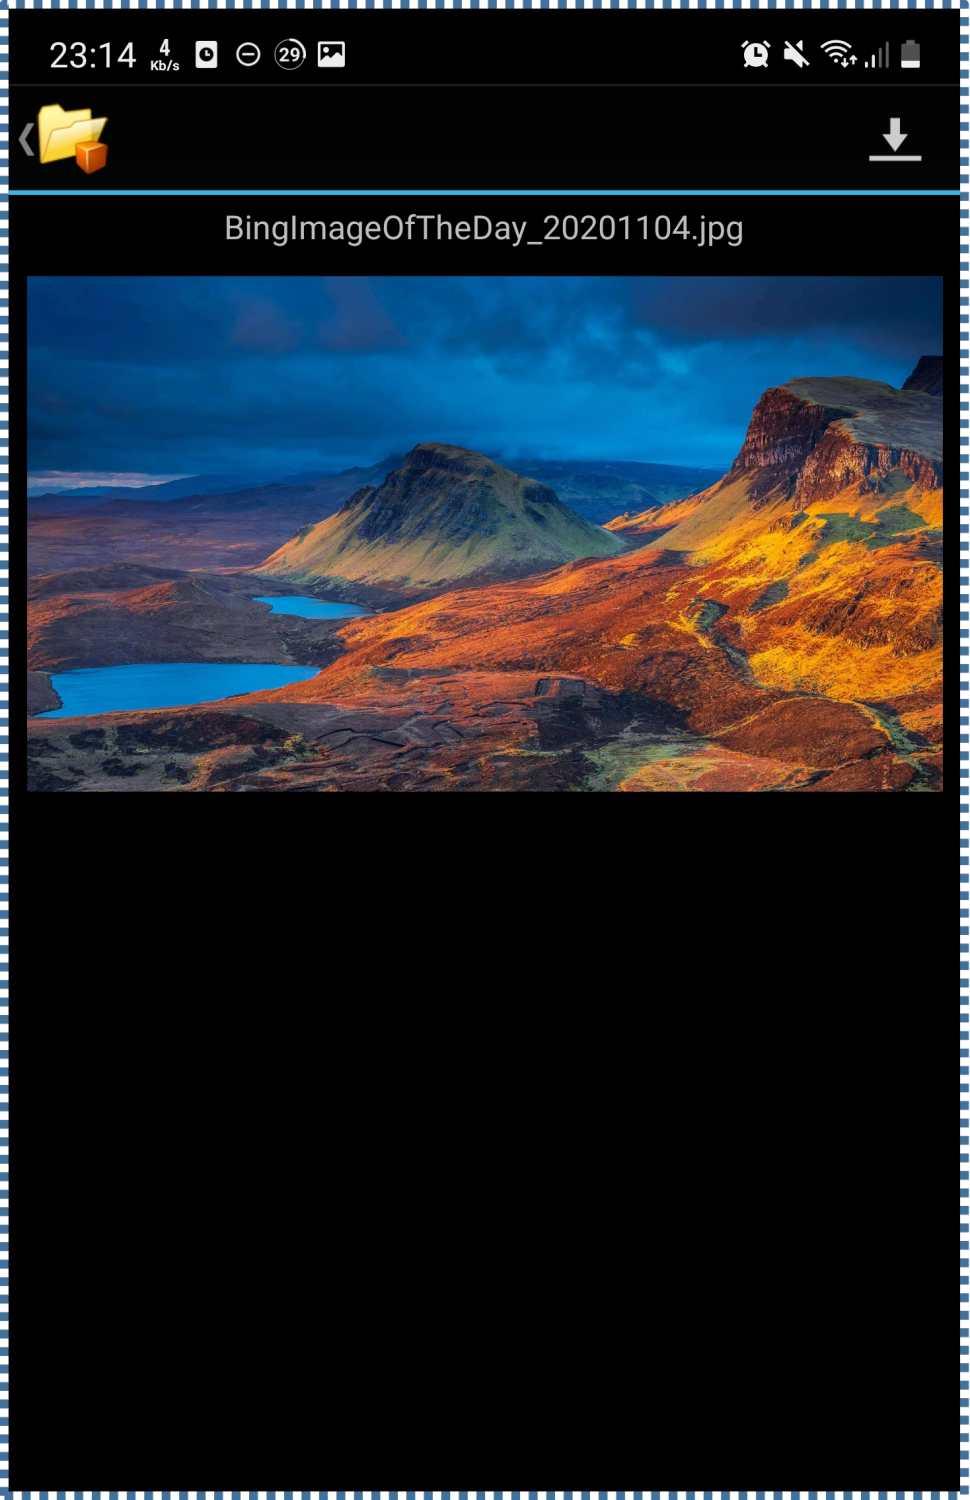
↳ The display when we open our file.
Conclusion
All in all, Storage Raya can be managed in various ways by using S3 Client Applications. This S3 Client Applications include GUI S3 Client on Windows OS by using Cyberduck, CLI S3 Client by using S3 CMD, and Mobile S3 Client on Android OS by using BucketAnywhere for S3. Each ways can be done easily without any hassle.
Find more of tutorials in Cloud Raya’s knowledge base. Or, you can video stream the tutorial in our youtube channel.