Improving Webserver Performance with SSL Termination on NGINX Load Balancer
Once we’ve learned about NGINX as a load balancer to distribute load among our webservers, the next critical factor is securing our web system. One of the most essential ways is by using the SSL or Secure Sockets Layer protocol.
SSL not only encrypts data transmitted between the webserver and the user but also provides authentication and data integrity to ensure that the data isn’t manipulated or altered during transit between the webserver and the user.
However, SSL can potentially slow down website performance, especially on webservers processing multiple requests at the same time. Therefore, SSL termination can be a solution to address this issue.
Let’s delve into SSL termination on the NGINX Load Balancer, why it’s important, how it works, and the implementation steps.
The Importance of SSL Termination on NGINX Load Balancer
Why is SSL termination on the NGINX Load Balancer so crucial? One of its benefits is that it can enhance our website’s performance.
In the case of NGINX LB without SSL termination and SSL certificates installed on the backend server, users will encrypt their requests before sending them to the NGINX LB. Then, the NGINX LB will forward these requests to the backend server without decrypting them, and the backend server will decrypt these requests before processing them.
When the backend server sends its response back to the client, the response will be encrypted by the backend server before being sent to the NGINX LB. Then, the NGINX LB will forward this response to the client without decrypting it, and the client will decrypt the response upon receiving it.
This scenario necessitates additional computational resources by the webserver and user devices. This process can be time-consuming and require significant computational resources, especially if the website receives many SSL/TLS connections simultaneously. In some cases, this impacts the website’s performance, slowing it down.
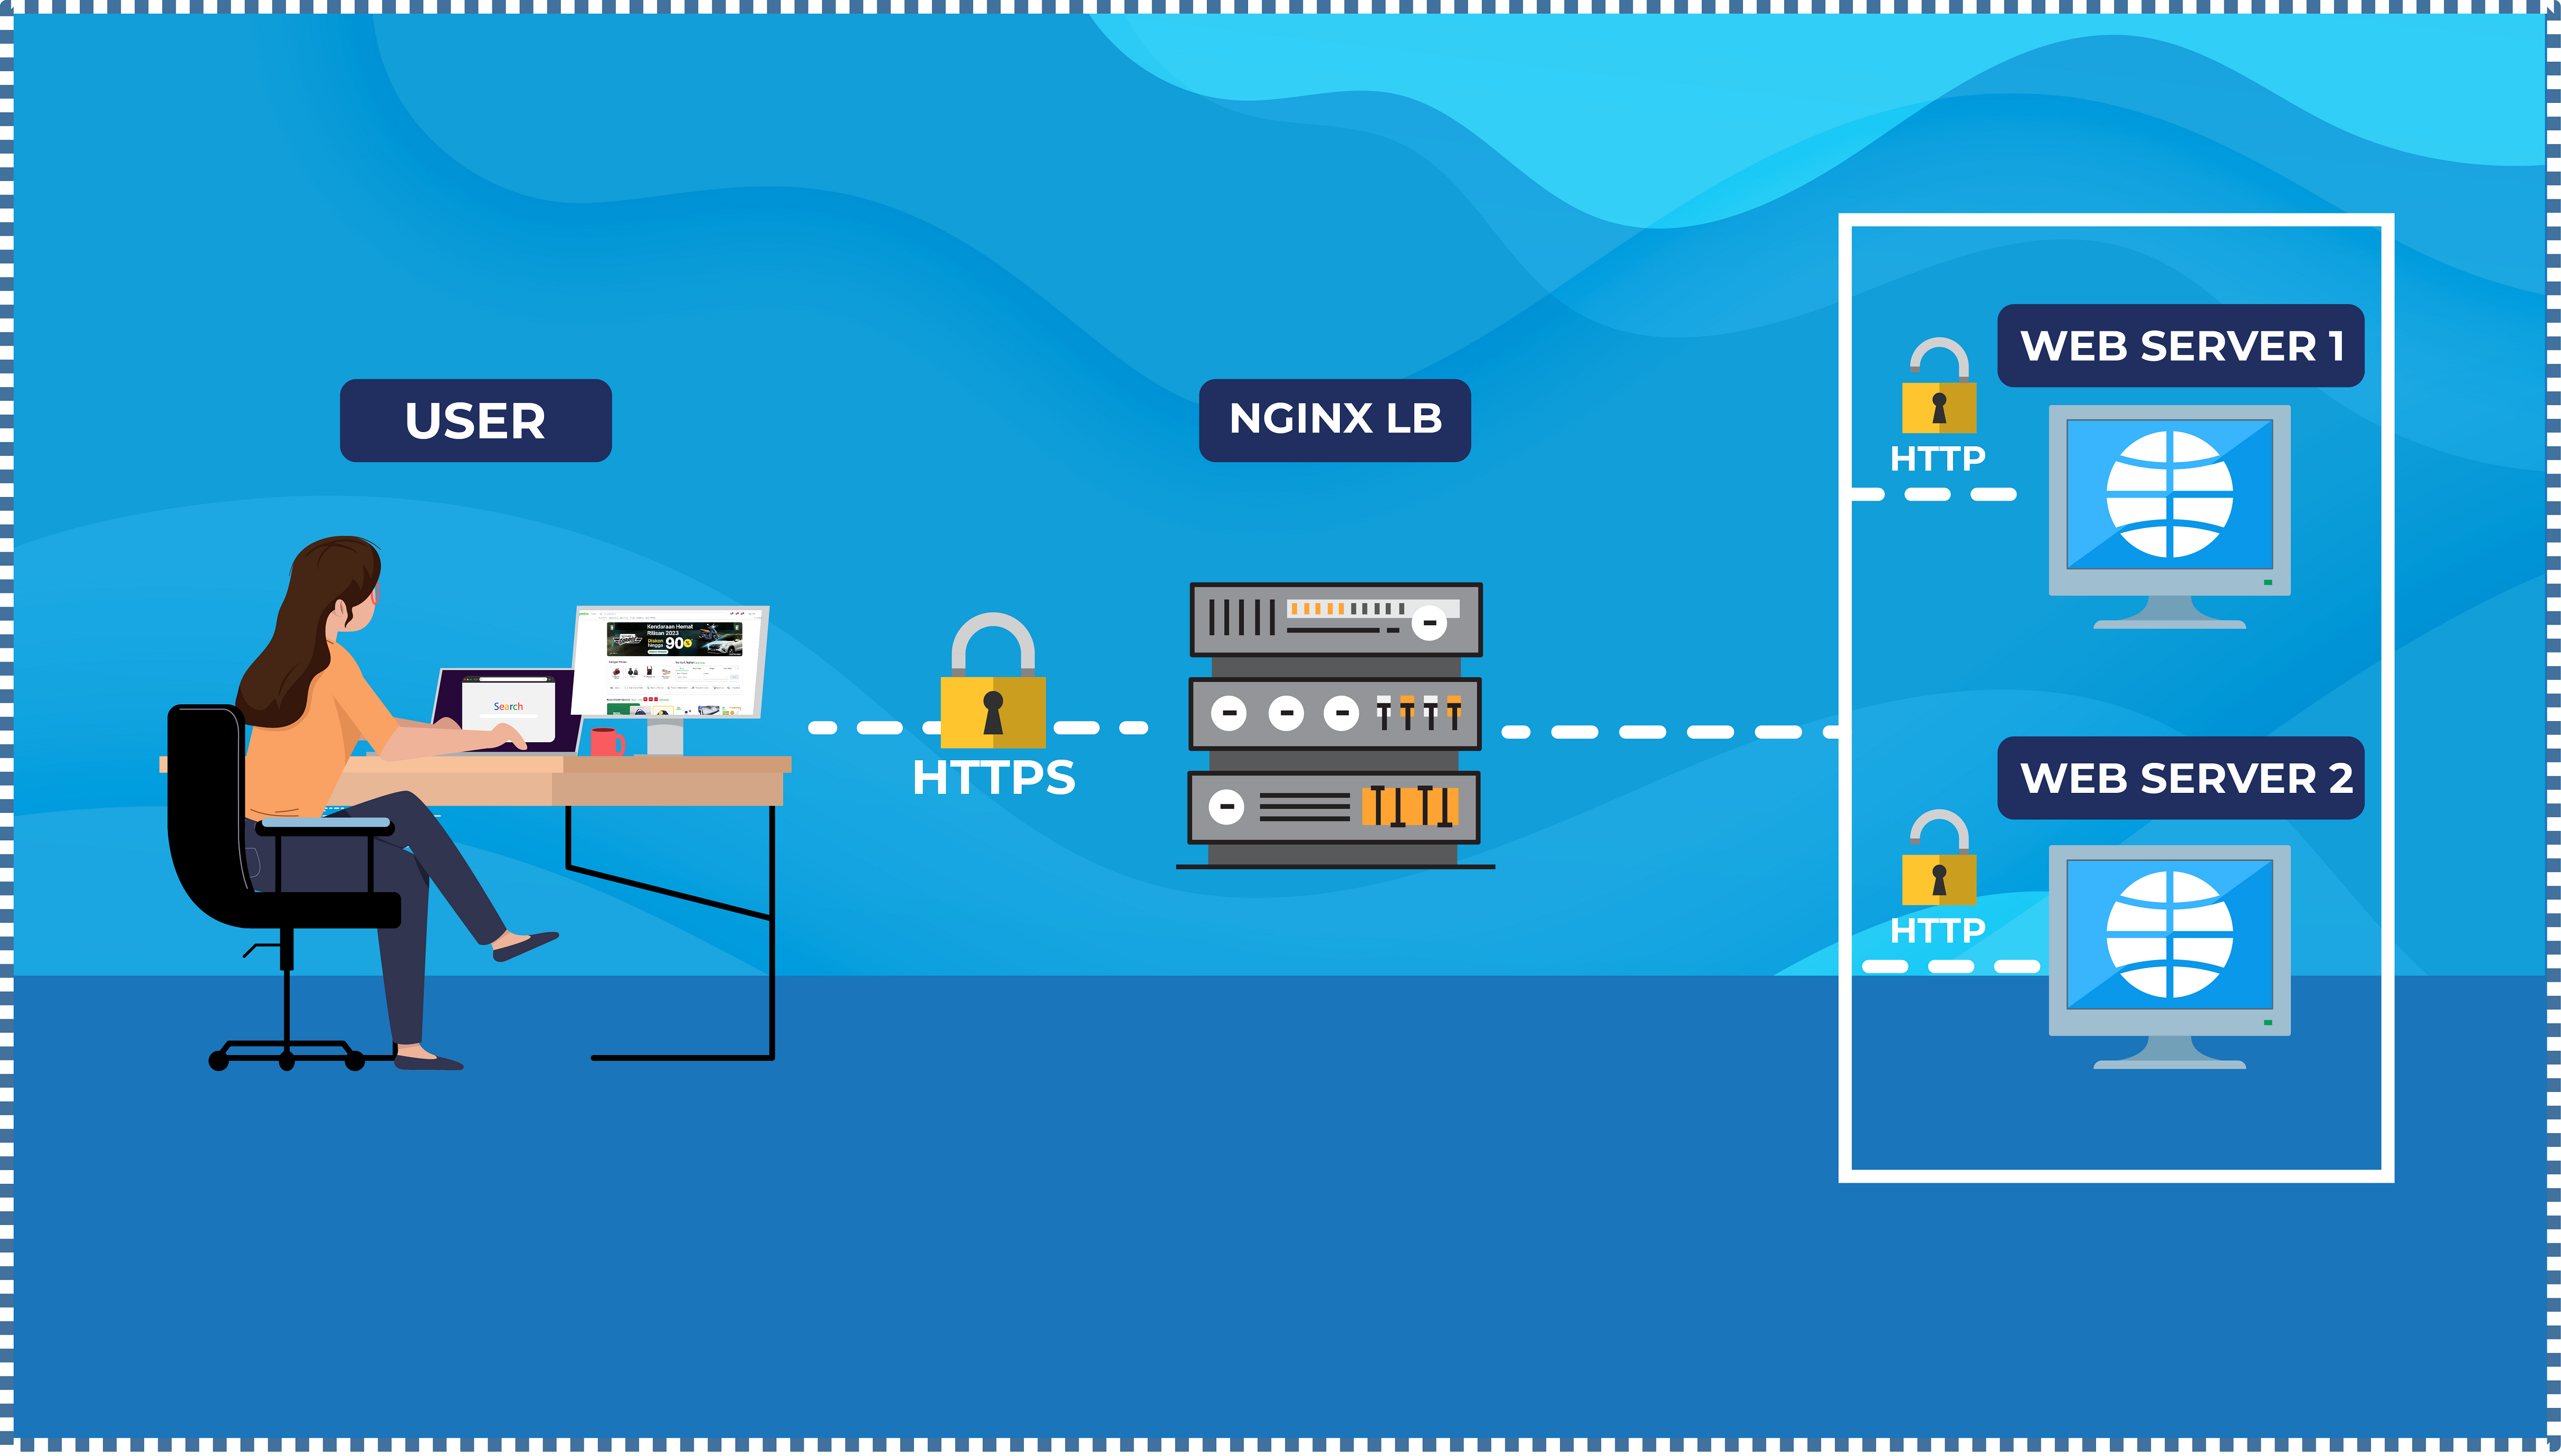
By implementing SSL termination on the NGINX LB, SSL/TLS connections from users to the backend server are terminated at the NGINX LB. In this case, the NGINX LB acts as a proxy server that receives SSL/TLS connections from users and performs encryption and decryption of data. After that, the data is sent to the backend server through a regular HTTP connection without additional encryption and decryption. Thus, the backend server only needs to handle lighter regular HTTP connections, reducing the workload on the backend server.
Additionally, SSL termination on the NGINX LB also simplifies SSL certificate management in complex load balancing architectures because administrators can manage certificates centrally and update certificates more easily.
Implementation Steps
To implement SSL termination on NGINX is relatively an easy process. The activities we’ll perform are as follows:
▶️ Setting Up NGINX
Ensure NGINX is installed on the VM intended to be used as a load balancer. Then, configure NGINX’s server block to determine the backend upstream to be included in the load balancer, as well as the type of load balancing method to be used.
If you’re not familiar with how to do this, you can access the following NGINX tutorial on setting it up as a load balancer here.
▶️ Creating SSL/TLS Certificate for NGINX LB
Next, we need to create and install an SSL/TLS certificate on the NGINX load balancer VM. There are two ways to obtain a certificate: purchasing from a certificate provider or creating one yourself. In this tutorial, we’ll use a free SSL/TLS certificate from Let’s Encrypt. Install certbot and the certbot plugin for NGINX on the Ubuntu repository using the following command:
# apt install certbot python3-certbot-nginx -y
Next, execute this command to obtain and install the SSL/TLS certificate on the NGINX LB:
    # certbot --nginx --redirect --hsts --staple-ocsp -d yourdomain.com
      --email your@email.com --agree-tos
Explanation of each syntax is as follows:
- certbot: client application for SSL/TLS certificate issuance provided by Let’s Encrypt.
- –nginx: option to configure the certificate with the NGINX web server.
- –redirect: configures the server to redirect from HTTP to HTTPS.
- –hsts: adds the HTTP Strict Transport Security header to force users to always connect to the site via HTTPS.
- –staple-ocsp: Enables OCSP stapling support to speed up certificate validation by web clients.
- -d followed by the domain name(s) we want to protect with SSL/TLS, can also be a list (comma-separated). We can add up to 100 domain names.
- –email: Email used for registration and recovery contact.
- –agree-tos: agrees to the terms and conditions of Let’s Encrypt.
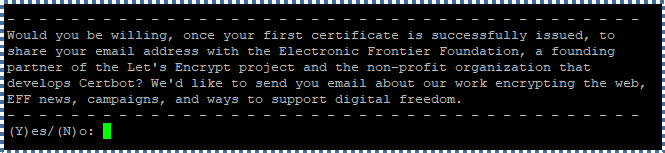
You’ll then be prompted whether to receive emails from EFF (Electronic Frontier Foundation). Choose Y or N.

The TLS certificate will be automatically obtained and configured for you, indicated by the message above.
▶️ Check NGINX Configuration after SSL/TLS Installation
After adding SSL/TLS, the server block configuration will look like this:

Further Activities
After successfully implementing SSL termination on the NGINX LB VM, here are some further activities to enhance the experience in its usage.
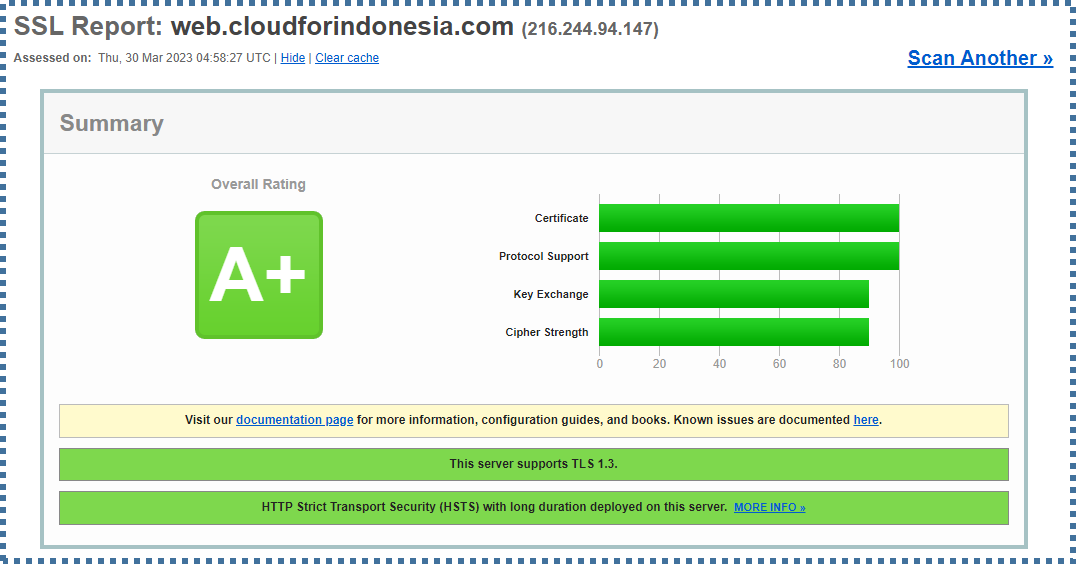
▶️ Test SSL/TLS Certificate
Visit ssllabs.com to test the certificate and SSL/TLS configuration. By enabling HSTS, we should be able to achieve an A+ rating.
▶️ Automatic SSL/TLS Certificate Renewal
To automatically update Let’s Encrypt certificates, we can utilize the cron tool to schedule it as desired. First, access and edit the crontab file using the following command: To automatically update Let’s Encrypt certificates, we can utilize the cron tool to schedule it as desired. First, access and edit the crontab file using the following command:
# crontab -e
Then, add the following cronjob line at the bottom of the crontab file.
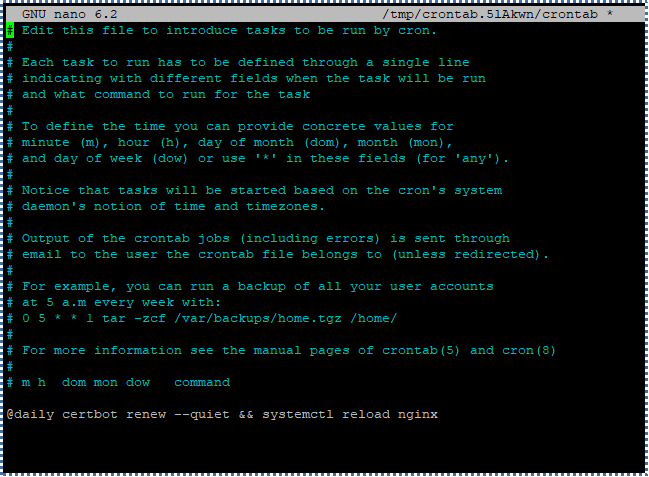
By doing this, we’ll schedule SSL/TLS certificate updates without displaying output messages every day at 00:00, then reload the NGINX configuration using the systemctl reload nginxcommand.
For those who aren’t familiar with cron and how to use it, I suggest checking out my tutorial on utilizing cron using the following link.
Conclusion
This concludes the tutorial on SSL termination using NGINX LB that I can share. By employing this technique, we can enhance the security of our website while maintaining its performance in serving its users.
Visit our other tutorials, including basic tutorials on NGINX LB and Cronjobs, which can help you better understand these topics on our knowledge base page. Alternatively, you can also visit the Cloud Raya YouTube channel.