Improving Email Delivery with Sendinblue SMTP Relay
HrIn the digital era, email has become one of the most widely used communication mediums by businesses and individuals. However, email delivery doesn’t always run smoothly due to limitations imposed by internet service providers or hosting services on port 25.
To address this issue, users can leverage SMTP relay services. SMTP Relay enables the sending of emails through an intermediary from a relay SMTP service provider’s server.
Although Cloud Raya, as a provider, doesn’t block port 25, users can still utilize SMTP relay services to speed up email delivery, enhancing the success rate of email delivery, avoiding emails ending up in spam folders, and obtaining statistical analysis regarding the emails sent. Typically, SMTP Relay service providers have a better reputation and offer features to inspect sent emails.
One popular SMTP relay provider is Sendinblue. This tutorial will explain how Cloud Raya users can utilize Sendinblue’s SMTP relay service to enhance the performance of their email activities.
Introduction to Sendinblue
Sendinblue is a digital marketing platform that offers various services, including email marketing, SMS marketing, CRM integration, marketing automation, and campaign analysis. One of Sendinblue’s flagship services is SMTP Relay.
Some features of Sendinblue that assist organizations in sending emails through SMTP relay include:
- The ability to send bulk emails quickly and easily
- Tracking email delivery statistics to monitor campaign performance
- Filtering spam and safeguarding the organization’s domain from blacklisting
- Options for sending emails through SMTP relay or API
Services and Interesting Aspects of Sendinblue
There are several Email Service Providers (ESPs) that can serve as hosts for relay services. Some charge a small fee, while others offer free quotas every month.
As explained on the plan-comparison page of Sendinblue, Sendinblue consists of several service types, with its free version being the Free Plan.
One interesting aspect of Sendinblue is its Free Plan, which allows you to send up to 300 emails per day for free once your account is verified.
Moreover, Sendinblue does not require you to enter credit card details when registering an account. I understand how difficult it can be when you don’t have a credit card.
You can also find the attractive essential features of each plan at the link I’ve provided.
Configuring Mail SMTP Relay with Sendinblue
Let’s understand together how to configure SMTP Relay through the Sendinblue panel and implement it in our email activities.
▶️ Register an Account on Sendinblue
Firstly, register your account on the following page and take a few steps to verify your account until your account is active like this.

▶️ Configure Domain and Senders
Afterward, adjustments need to be made to the Senders and Domain configurations.. Access the Senders, Domains & Dedicated IPs page.
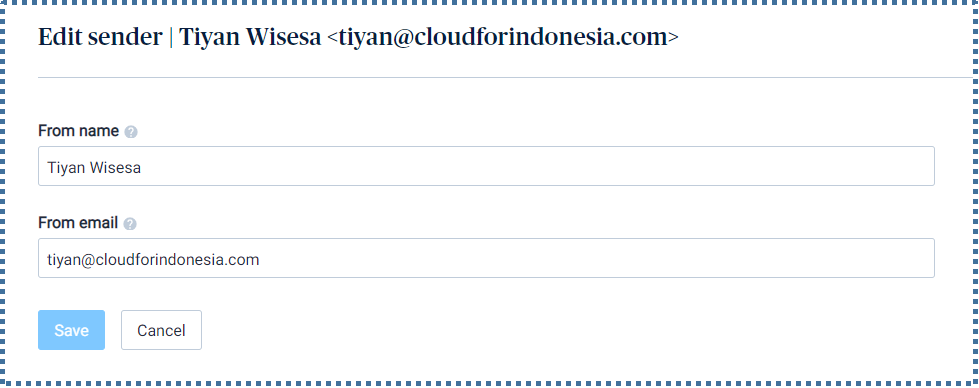
⏭️ Senders
Senders, or sender names, will be seen in the recipient’s inbox when receiving emails, making it easier for the email recipient to recognize you.
You can adjust this in the following fields.
⏭️ Domain
Domains indicate the origin of email sending. This information will be visible in the From: header. Add a domain by clicking the Add a domain button,
The Sendinblue configuration to be added to your domain’s DNS record will be displayed.
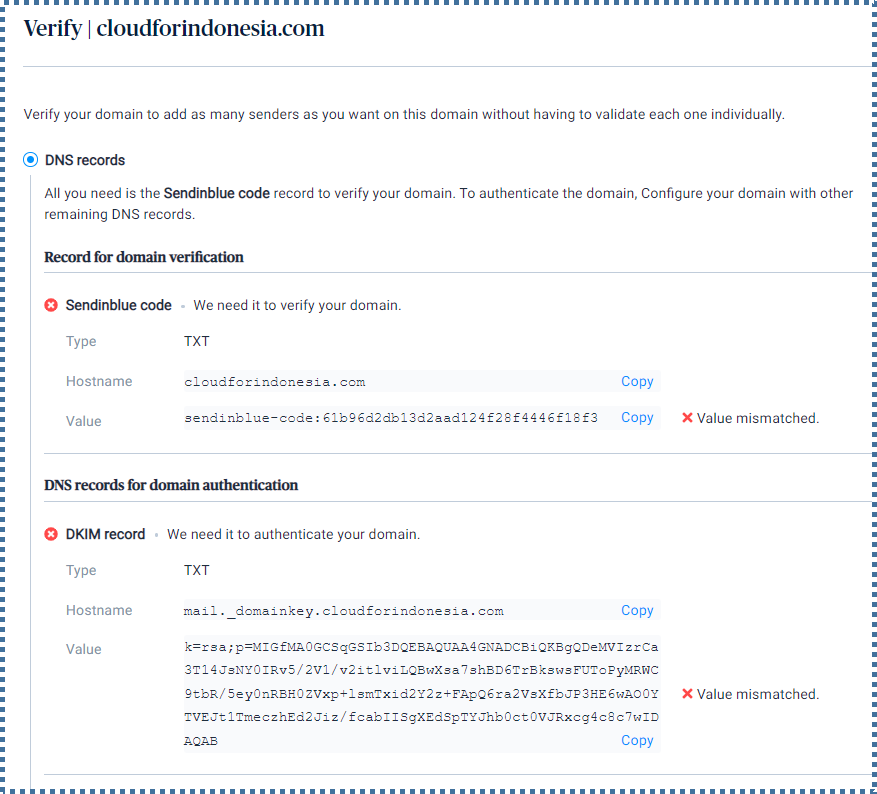
Enter the configuration into the DNS records of your domain. (This display will vary depending on the DNS records panel of your respective domain).
Then, return to the Sendinblue panel and click Verify & Authenticate to verify this configuration.

Verification will take different amounts of time depending on the propagation required by each DNS server worldwide.
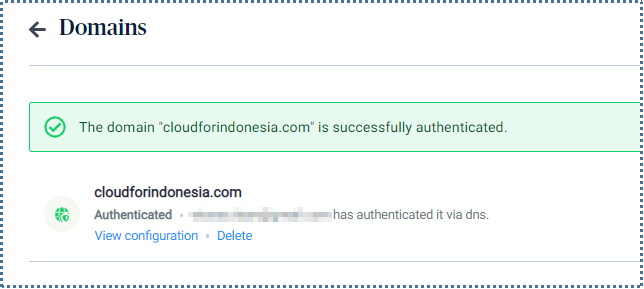
If the configuration is successful and verified, your domain will appear authenticated in Sendinblue.
▶️ Methods of Using Sendinblue Mail Relay
You can choose from 2 available options to use SMTP relay from Sendinblue depending on your needs.

First, by configuring SMTP relay on your mail server. Second, by configuring an API key on your application to allow the application to send emails.
⏭️ Using SMTP key
To apply SMTP relay provided by Sendinblue to our mail server, it’s a straightforward process. We just need to copy the configuration from this page and enter it into our mail server’s configuration.
To create a new SMTP key, click on Generate a new SMTP key
Now let’s implement it into our mail server. In this tutorial, I’ll be using the mail server from iRedMail.
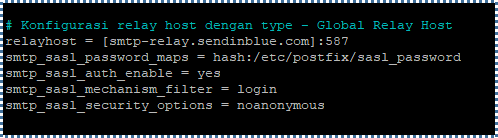
For the Global Relay Host configuration in iRedMail, we need to add the following line to the Postfix configuration file, in /etc/postfix/main.cf (Linux/OpenBSD).
# Configure relay host with type – Global Relay Host
relayhost = [nama host relay]:587
smtp_sasl_auth_enable = yes
smtp_sasl_password_maps = hash:/etc/postfix/sasl_passwd
smtp_sasl_security_options = noanonymous
smtp_sasl_mechanism_filter = login
Then, create a new configuration file to store the authentication details of the user and password from Sendinblue, in /etc/postfix/sasl_password
[nama host relay]:587 user:password
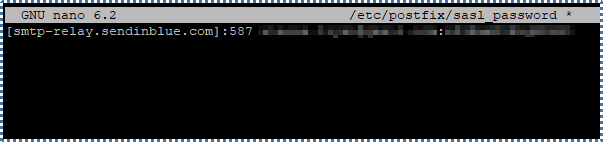
Once done, run postmap and restart the Postfix service to apply the changes.
postmap hash:/etc/postfix/sasl_password
service postfix restart
Now let’s try sending an email through iRedMail. If the configuration is successful, your email will be sent to the destination.
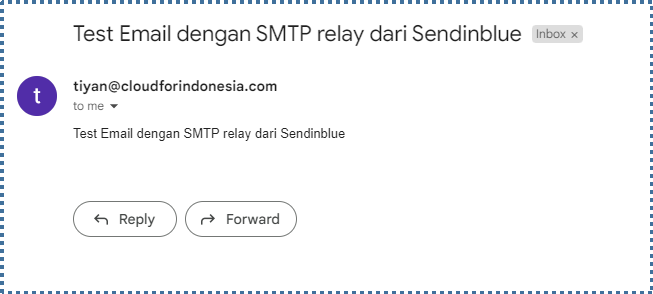
We can also monitor this sending log on the Sendinblue panel.

⏭️ Using API key
Next, applying the API key provided by Sendinblue to our application is also relatively easy.
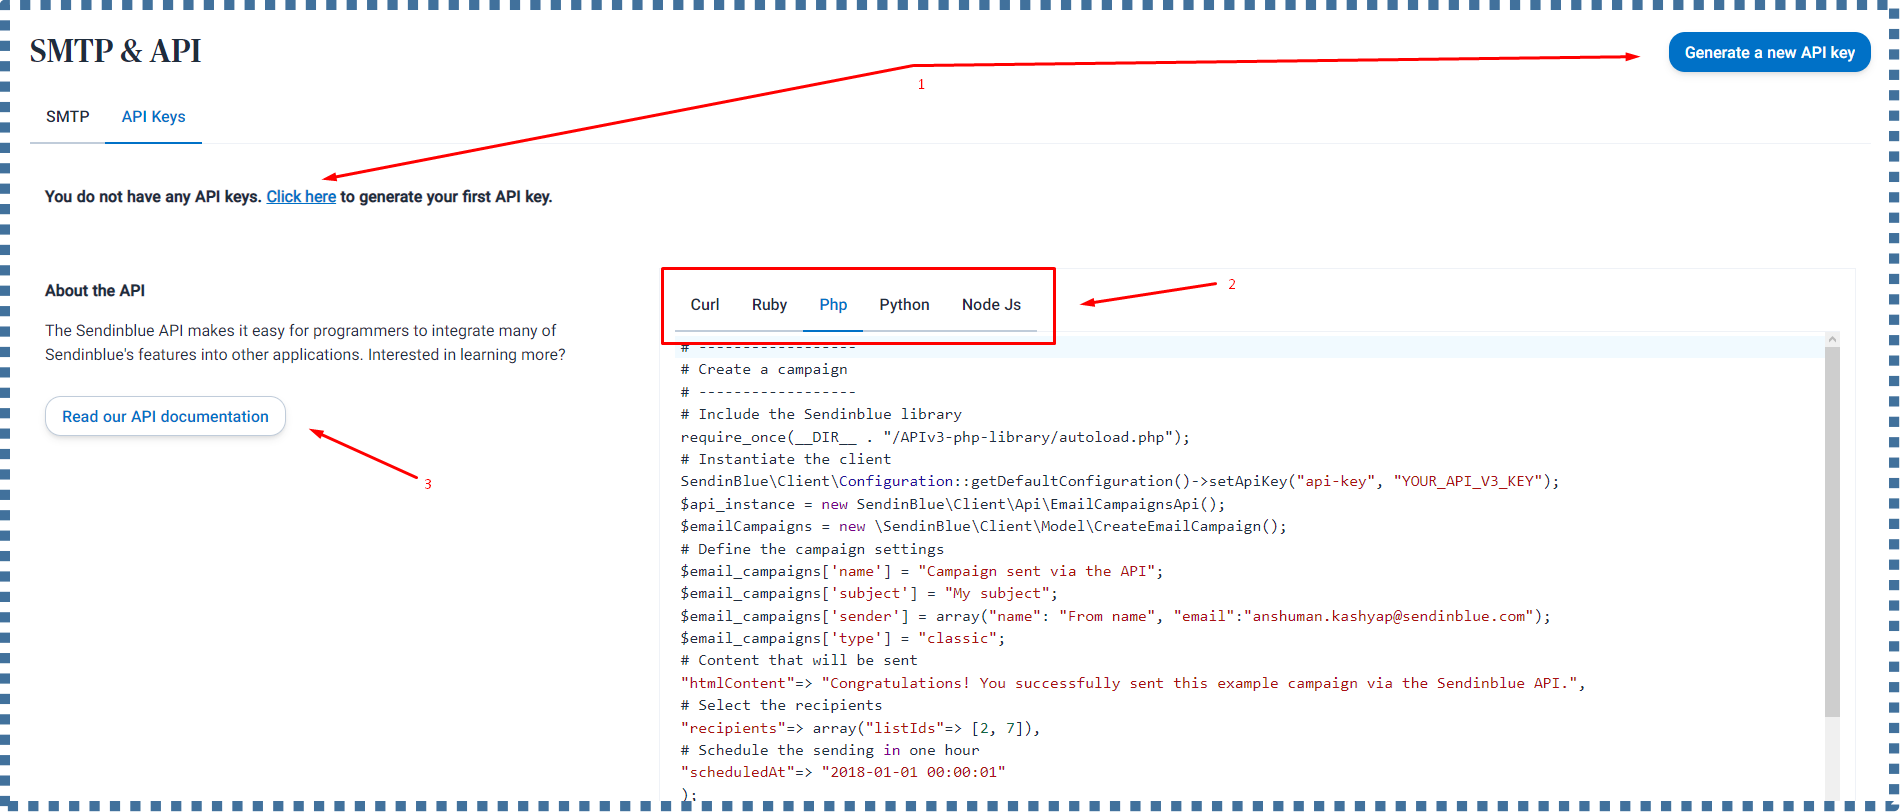
- The API key we have created will be displayed. This API Key will be used for authentication in the Sendinblue configuration.
- There’s also an example of configuration for transactional email that we can choose based on the type of application we have.
- KClick on Read our API documentation to read the Sendinblue API documentation.
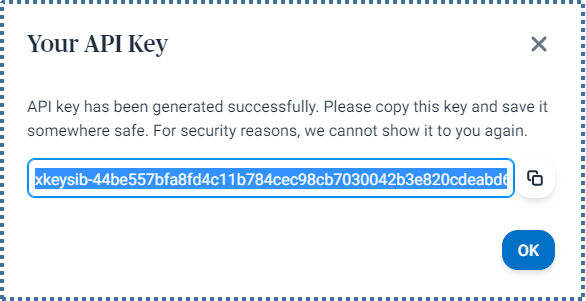
Now let’s create an API key by clicking Generate a new API key and enter the name of the key you wish to create.
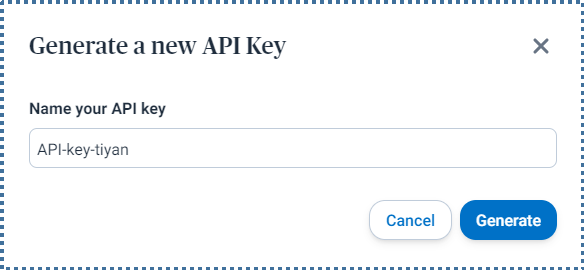
The API key will be generated, and please keep this key safe as it won’t be displayed again after this.
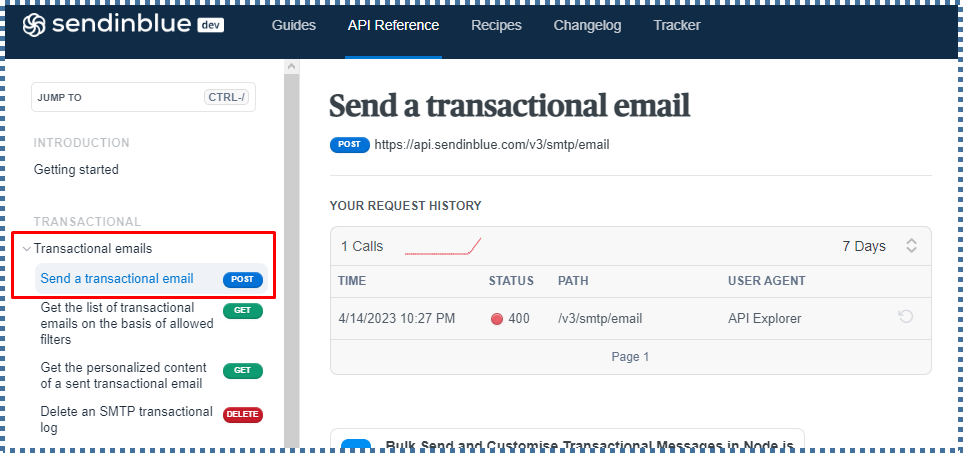
Now, to see in more detail some types of activities that can be performed on Sendinblue via the API, access the API Reference page. For an example related to sending emails, select the Send a transactional email menu.
However, make sure to install the required library first. To do this, access Sendinblue’s Github and choose the library that suits your application.
In this tutorial, I’ll demonstrate using the PHP library.

As per the following page, to integrate this library into our PHP project, the composer package tool is required for managing dependencies/packages.

If it’s not installed on your VM, install it with the following command.
apt install composer
Then, navigate to your website directory and run the following command to install the dependencies of the SendinBlue API SDK with version 8.x.x.
composer require sendinblue/api-v3-sdk “8.x.x”
Once done, a new folder named “vendor” will be created in your website directory.
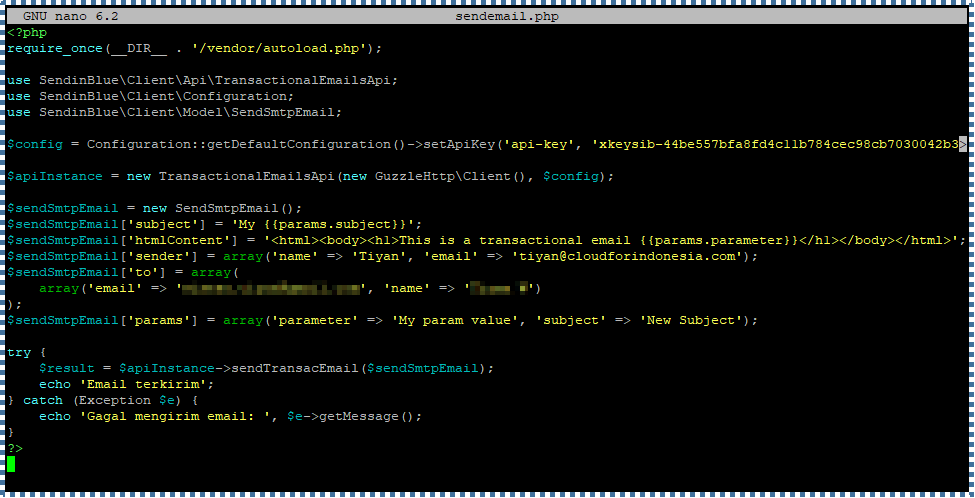
Now we can use the Sendinblue SDK to send transactional emails via the Sendinblue API. To begin, use the provided PHP template script. Customize the script according to your project’s goals and conditions.
Next, create an empty .php file to send emails.

We can follow and modify the script from Sendinblue so that it looks like the one below.
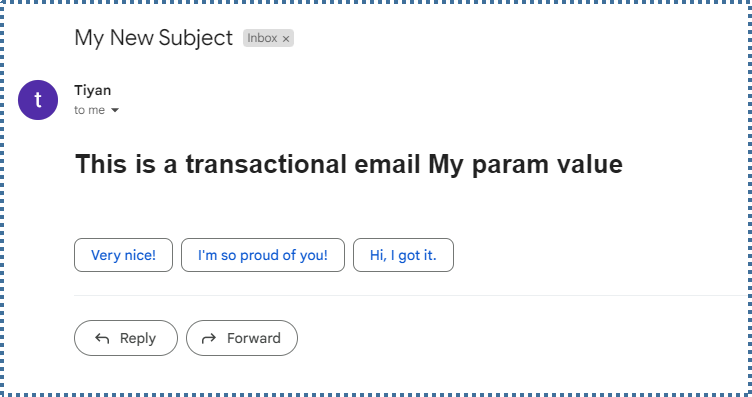
Then, run this page in your browser. If the PHP configuration and API key call are correct, a message confirming the email sent will be displayed.
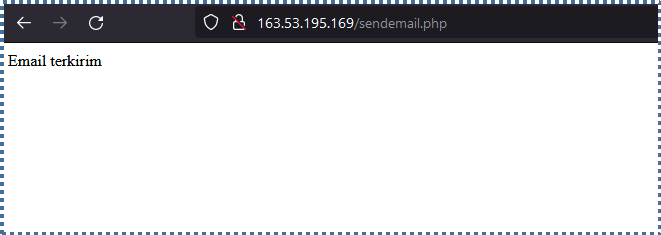
Check the destination inbox to ensure you have received the email.
This API key can be useful if you want to build a PHP project for sending invoice confirmation emails, password reset emails, and similar activities.”
Conclusion
In this discussion, we’ve collectively understood the concept of SMTP Relay and its advantages in sending emails. In addition, we suggest using Sendinblue as a SMTP Relay provider for sending emails with greater ease and security.
We hope this article has been helpful to you in choosing the right email delivery solution for your needs.
Discover more tips and tutorials on various technologies on our knowledge base page, or get the latest insights and information about technology on Cloud Raya’s blog. Prefer watching? We also provide comprehensive tutorial videos on our Youtube channel.