Fix Broken LetsEncrypt SSL Certificate due to Expired Root CA Certificate
After 30th September 2021, if you are owning a website or service that uses LetsEncrypt as its SSL Certificate issuer, your website may throw a certificate error when accessed. You are then taking a look at the expired date of the SSL Certificate and found actually still have time and it should not be throwing an expired error.

What is actually happening?
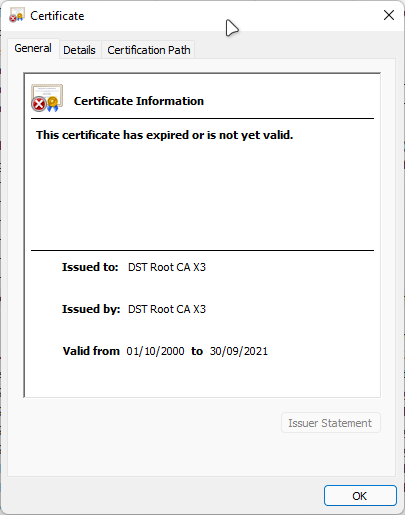
As we can see above, the Device certificate itself is not yet expired. However, there’s a chain above the device certificate that has already expired. That is the Certificate Authority (CA) certificate that is being used as a root chain of the LetsEncrypt certificate.
Root Chain? Certificate Authority? What is that?
That is a term used in Public Key Infrastructure (PKI), which will become another discussion. However, if you would like more detailed info, you can read the Wikipedia article on PKI (Public key infrastructure – Wikipedia) and this video published by Securemetric which explained what PKI is in a more detailed manner is (What is Public Key Infrastructure (PKI) by Securemetric – YouTube).
In simpler terms, all certificates that are used to deploy SSL on the Web are issued by a Certificate Authority, a trusted organisation recognised by your device/OS in the form of another SSL certificate. Every OS and device have their own set of preinstalled trusted CA Certificates.
Running below code in Ubuntu will list the trusted CA Certificates installed in the system:
awk -v cmd='openssl x509 -noout -subject' '
    /BEGIN/{close(cmd)};{print | cmd}' < /etc/ssl/certs/ca-certificates.crt
Or if you are using Windows, you can open Certificates Snap-in in mmc.exe and you will see Installed Trusted CA Certificates
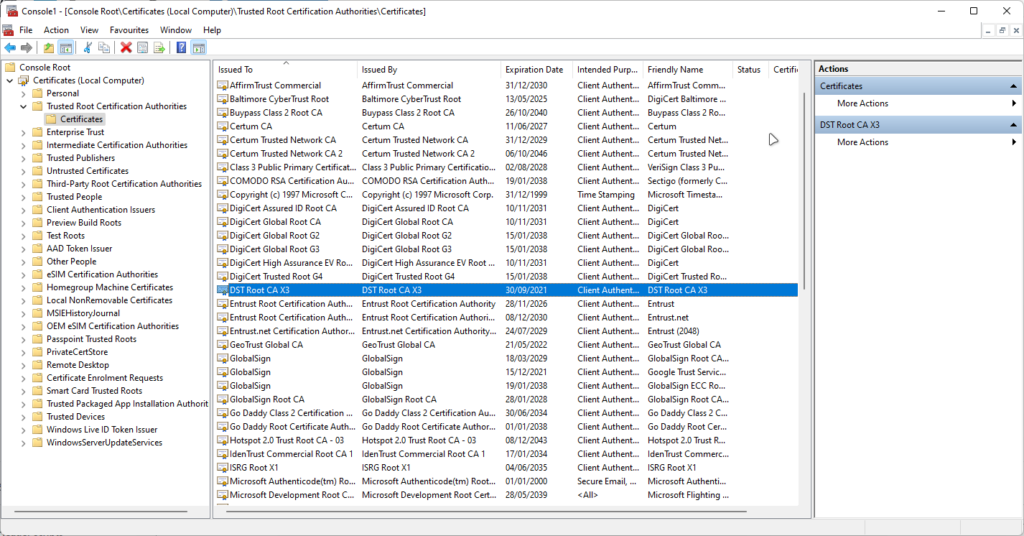
Same with device certificates, CA certificates have their own Expiration date. Even though they are usually longer (5-25 years validity)
On 30th September 2021, DST Root CA X3, which is the CA Certificate used by Let’s Encrypt, is expired. This is the source of the problem.
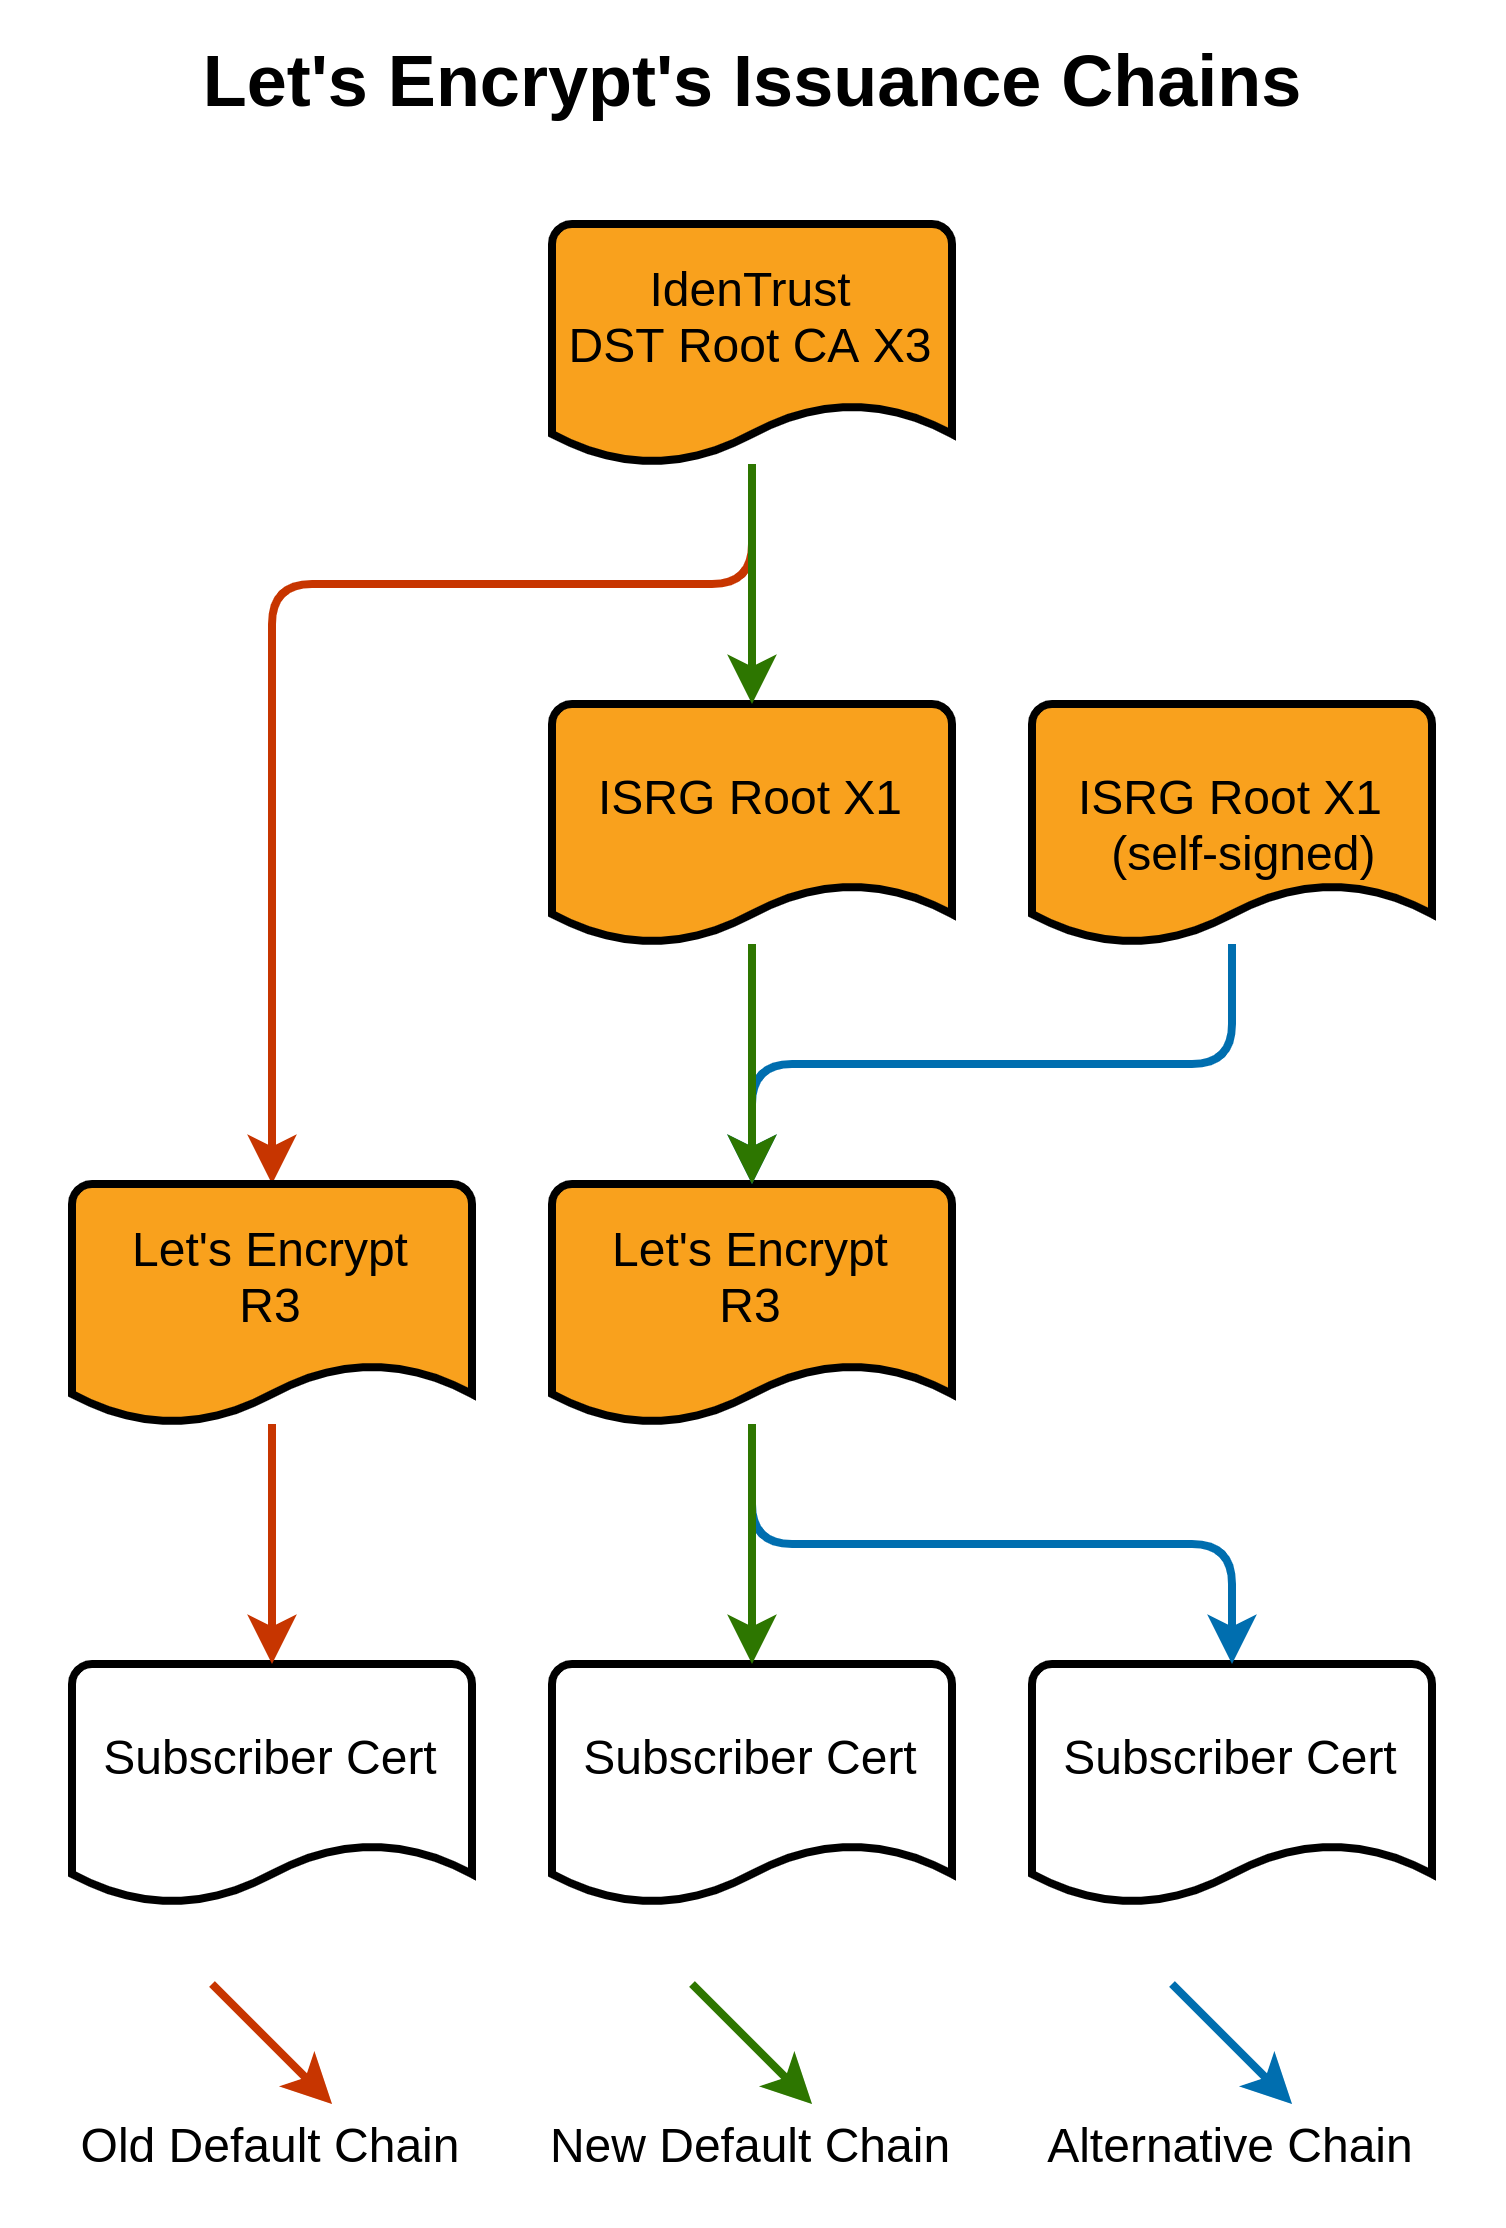
Let’s Encrypt had planned to move away from the DST CA root to their own root, ISRG Root X1, that expires on 4th June 2035. The problem was, only a few devices had received the necessary updates that include this new ISRG Root X1. If a vast selection of devices had not received an update to include this new root certificate, they simply won’t trust it.
The solution taken by Let’s Encrypt was a cross-signing certificate. Until DST CA X3 expire, they deploy certificates with a cross-sign. Visual representation for the chain issuance below
With this model, however, after IdenTrust DST Root CA X3 expires, some old devices will not trust Let’s Encrypt anymore. Based on Lets Encrypt Compatibility List, Certificate will not work on devices / OSes below:
- macOS < 10.12.1
- iOS < 10
- Mozilla Firefox < 50
- Ubuntu >= precise / 12.04 and < xenial / 16.04
- Debian >= squeeze / 6 and < jessie /8
- NSS >= v3.11.9 and < 3.26
- Amazon FireOS (Silk Browser) (version range unknown)
- Cyanogen > v10 (version that added ISRG Root X1 unknown)
- Jolla Sailfish OS > v1.1.2.16 (version that added ISRG Root X1 unknown)
- Kindle > v3.4.1 (version that added ISRG Root X1 unknown)
- Blackberry >= 10.3.3 (version that added ISRG Root X1 unknown)
- PS4 game console with firmware >= 5.00 (version that added ISRG Root X1 unknown)
- Blackberry < v10.3.3
- Android < v2.3.6
- Nintendo 3DS
- Windows XP prior to SP3cannot handle SHA-2 signed certificates
- Java 7 < 7u111
- Java 8 < 8u101
- Windows Live Mail (2012 mail client, not webmail)cannot handle certificates without a CRL
- PS3 game console
- PS4 game console with firmware < 5.00
Supported devices still having issue
On 30th September 2021, However, some supported OSes and devices still have errors with the Root certificate.
This is due to some devices still reading the Certificate chain root back to DST X3 and not ISRG X1. Even though a website is having a cross-signed. Thus, makes the system believe the root certificate is expired.
If we checked using the OpenSSL command, the header for the CA certificate would look like this

This will eventually be replaced by Let’s Encrypt. However, this issue will create more problems. We need to “force” to replace the Certificate.
Fixing the Chain
The first way to fix the chain is to “force renew” the device certificate.
If you are using certbot to deploy and renew the certificate, you can run the following code to “force renew”:
certbot run -a webroot -i <your webserver application> -d <domain name> --force-renewal


Example:
certbot run -a webroot -i nginx -d test.domain.com --force-renewal
Reboot your server and wait for a few moments.
Check again using the OpenSSL command, if root certificate has the following header, it means that it has been successfully replaced.

If not, you need to change the deployed certificate manually.
First, you need to download the ISRG Root X1 pem and copy the valid ISRG Root X1 certificate from Let’s Encrypt to a text file. Then open a notepad or another text editor. You will find the following content inside the .pem file:
-----BEGIN CERTIFICATE-----
MIIFazCCA1OgAwIBAgIRAIIQz7DSQONZRGPgu2OCiwAwDQYJKoZIhvcNAQELBQAw
TzELMAkGA1UEBhMCVVMxKTAnBgNVBAoTIEludGVybmV0IFNlY3VyaXR5IFJlc2Vh
cmNoIEdyb3VwMRUwEwYDVQQDEwxJU1JHIFJvb3QgWDEwHhcNMTUwNjA0MTEwNDM4
WhcNMzUwNjA0MTEwNDM4WjBPMQswCQYDVQQGEwJVUzEpMCcGA1UEChMgSW50ZXJu
ZXQgU2VjdXJpdHkgUmVzZWFyY2ggR3JvdXAxFTATBgNVBAMTDElTUkcgUm9vdCBY
MTCCAiIwDQYJKoZIhvcNAQEBBQADggIPADCCAgoCggIBAK3oJHP0FDfzm54rVygc
h77ct984kIxuPOZXoHj3dcKi/vVqbvYATyjb3miGbESTtrFj/RQSa78f0uoxmyF+
0TM8ukj13Xnfs7j/EvEhmkvBioZxaUpmZmyPfjxwv60pIgbz5MDmgK7iS4+3mX6U
A5/TR5d8mUgjU+g4rk8Kb4Mu0UlXjIB0ttov0DiNewNwIRt18jA8+o+u3dpjq+sW
T8KOEUt+zwvo/7V3LvSye0rgTBIlDHCNAymg4VMk7BPZ7hm/ELNKjD+Jo2FR3qyH
B5T0Y3HsLuJvW5iB4YlcNHlsdu87kGJ55tukmi8mxdAQ4Q7e2RCOFvu396j3x+UC
B5iPNgiV5+I3lg02dZ77DnKxHZu8A/lJBdiB3QW0KtZB6awBdpUKD9jf1b0SHzUv
KBds0pjBqAlkd25HN7rOrFleaJ1/ctaJxQZBKT5ZPt0m9STJEadao0xAH0ahmbWn
OlFuhjuefXKnEgV4We0+UXgVCwOPjdAvBbI+e0ocS3MFEvzG6uBQE3xDk3SzynTn
jh8BCNAw1FtxNrQHusEwMFxIt4I7mKZ9YIqioymCzLq9gwQbooMDQaHWBfEbwrbw
qHyGO0aoSCqI3Haadr8faqU9GY/rOPNk3sgrDQoo//fb4hVC1CLQJ13hef4Y53CI
rU7m2Ys6xt0nUW7/vGT1M0NPAgMBAAGjQjBAMA4GA1UdDwEB/wQEAwIBBjAPBgNV
HRMBAf8EBTADAQH/MB0GA1UdDgQWBBR5tFnme7bl5AFzgAiIyBpY9umbbjANBgkq
hkiG9w0BAQsFAAOCAgEAVR9YqbyyqFDQDLHYGmkgJykIrGF1XIpu+ILlaS/V9lZL
ubhzEFnTIZd+50xx+7LSYK05qAvqFyFWhfFQDlnrzuBZ6brJFe+GnY+EgPbk6ZGQ
3BebYhtF8GaV0nxvwuo77x/Py9auJ/GpsMiu/X1+mvoiBOv/2X/qkSsisRcOj/KK
NFtY2PwByVS5uCbMiogziUwthDyC3+6WVwW6LLv3xLfHTjuCvjHIInNzktHCgKQ5
ORAzI4JMPJ+GslWYHb4phowim57iaztXOoJwTdwJx4nLCgdNbOhdjsnvzqvHu7Ur
TkXWStAmzOVyyghqpZXjFaH3pO3JLF+l+/+sKAIuvtd7u+Nxe5AW0wdeRlN8NwdC
jNPElpzVmbUq4JUagEiuTDkHzsxHpFKVK7q4+63SM1N95R1NbdWhscdCb+ZAJzVc
oyi3B43njTOQ5yOf+1CceWxG1bQVs5ZufpsMljq4Ui0/1lvh+wjChP4kqKOJ2qxq
4RgqsahDYVvTH9w7jXbyLeiNdd8XM2w9U/t7y0Ff/9yi0GE44Za4rF2LN9d11TPA
mRGunUHBcnWEvgJBQl9nJEiU0Zsnvgc/ubhPgXRR4Xq37Z0j4r7g1SgEEzwxA57d
emyPxgcYxn/eR44/KJ4EBs+lVDR3veyJm+kXQ99b21/+jh5Xos1AnX5iItreGCc=
-----END CERTIFICATE-----
Then, open your web server via SSH, and navigate to the folder path in which you save the certificate chain file. If you are using certbot / Ubuntu, you should find the certificate in /etc/letsencrypt/live/your.domain.name.com/ (change your.domain.name.com to your own domain name). In this folder, there will be four .pem files. Open fullchain.pem using a text editor.
When you open the fullchain.pem certificate, you will notice that the file will be structured like following:
-----BEGIN CERTIFICATE-----
Base-64 Encoded Text #1
-----END CERTIFICATE-----
-----BEGIN CERTIFICATE-----
Base-64 Encoded Text #2
-----END CERTIFICATE-----
-----BEGIN CERTIFICATE-----
Base-64 Encoded Text #3
-----END CERTIFICATE-----
This means that this fullchain.pem consists of three different certificates. Device Certificate, Intermediate Certificate, and Root Certificate. Since you only need to change the Root Certificate, you will need to replace the last Base-64 Encoded Text with the certificate above. After you replace it, save the file, and then open chain.pem.
Just like a before, chain.pem consists of multiple certificates. However, it is only containing intermediate, and root certificates. you will need to replace the last Base-64 Encoded Text with the certificate above. After you replaced it, save the file. and restart the Web Server.
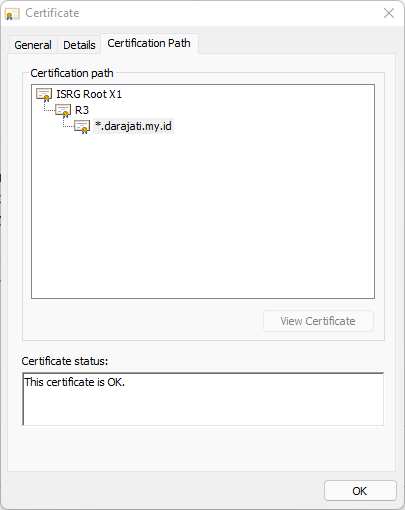
After a moment, you will see that your website is accessible, and if you check the certificate, it will use ISRG Root X1 as its root
Conclusion
Root certificate expiration really creates an impact on the internet. Big names and companies are also using it for their services. However, Let’s Encrypt also have their own solution for system administrators.
Find more practical article in Cloud Raya’s Knowledge base. Or better, you can sign up to Cloud Raya’s to find what you can do from our simple and multifunctional dashboard.
References:
https://letsencrypt.org/docs/dst-root-ca-x3-expiration-september-2021/
https://scotthelme.co.uk/tag/lets-encrypt/
https://en.wikipedia.org/wiki/Public_key_infrastructure