-
Products and Features
- Getting Started with CloudRaya Container Registry
- How to use Sudo on a CloudRaya Linux VM
- Keeping Your CloudRaya Linux VMs Up-to-Date
- Maximizing StorageRaya with Essential Practices
- Assign Multiple IP Addresses to Virtual Machine
- Generating a CloudRaya API key
- Simplify CloudRaya Management with API
- Deploying a Virtual Machine on CloudRaya
- Deploying a Kubernetes Cluster on KubeRaya
- Using StorageRaya – CloudRaya S3 Object Storage
- Opening Ping Access on Cloud Raya VM Public IP
- Maximize Your Storage Raya Access Speed with Content Delivery Network (CDN)
- How to Create Project Tag in Cloud Raya for More Organized VM Billing Report
- Exporting Cloud Raya VM to outer Cloud Raya's Infrastructure using Acronis Cyber Protect
- SSO Management on Cloud Raya
- Using the SSH key Feature in Cloud Raya Dashboard
- Cloud Raya Load Balancer, Solution to Distribute Load Equally
- Create your own VPN server with DNS-Level AdBlocker using PiVPN
- Fix Broken LetsEncrypt SSL Certificate due to Expired Root CA Certificate
- How to Make a Snapshot and Configure VM Backup in Cloud Raya
- How to Request Services or Licenses Products
- Adding, Attaching, and Resize Root Storage Disk in Cloud Raya VPS
- Managing your DNS Zone with DNS Bucket in Cloud Raya
- Create VM, Custom Package, Reinstall VM, and Adjusting Security Profile
- How to backup Linux VM via Acronis in Cloud Raya
- How to Backup Desktop Linux and Windows via Acronis in Cloud Raya
- Backing-Up Cloud Raya Windows VM Using Acronis Cyber Protect
- Load Balancing in Cloud Raya
- Establishing a VPN in Cloud Raya
- Generating an API Token
- Deploying a Virtual Machine in Cloud Raya
- Show Remaining Articles16 Collapse Articles
-
- How to backup Linux VM via Acronis in Cloud Raya
- How to Backup Desktop Linux and Windows via Acronis in Cloud Raya
-
- Maximizing StorageRaya with Essential Practices
- Using StorageRaya – CloudRaya S3 Object Storage
- Building a Static Website Using Storage Raya S3 Bucket
- Integrating S3 Storage Raya and Strapi for Asset Storage Optimization – Part 4
- Maximize Your Storage Raya Access Speed with Content Delivery Network (CDN)
- Managing Storage Raya from various tools and from various OS
- Binding NextCloud with CloudRaya S3 Object Storage as External Storage Mount
-
- How to use Sudo on a CloudRaya Linux VM
- Keeping Your CloudRaya Linux VMs Up-to-Date
- Implement Multi-Factor Authentication on CloudRaya Linux VM
- Assign Multiple IP Addresses to Virtual Machine
- Deploying a Virtual Machine on CloudRaya
- Configurating cPanel Using Ubuntu 20.04 on CloudRaya – Part 2
- Deploying cPanel Using Ubuntu 20.04 on CloudRaya - Part 1
- Exporting Cloud Raya VM to outer Cloud Raya's Infrastructure using Acronis Cyber Protect
- Using the SSH key Feature in Cloud Raya Dashboard
- Adding, Attaching, and Resize Root Storage Disk in Cloud Raya VPS
- Create VM, Custom Package, Reinstall VM, and Adjusting Security Profile
- How to backup Linux VM via Acronis in Cloud Raya
- Backing-Up Cloud Raya Windows VM Using Acronis Cyber Protect
- Deploying a Virtual Machine in Cloud Raya
-
Integration
- Implement Multi-Factor Authentication on CloudRaya Linux VM
- Accessing KubeRaya Cluster Using the Kubernetes Dashboard
- Building a Static Website Using Storage Raya S3 Bucket
- Integrating S3 Storage Raya and Strapi for Asset Storage Optimization – Part 4
- Integrating Strapi Content to Frontend React - Part 3
- Content Management with Strapi Headless CMS - Part 2
- Strapi Headless CMS Installation in CloudRaya - Part. 1
- Using SSH Key on CloudRaya VM with PuTTY
- Installing Multiple PHP Versions in One VM for More Flexible Web Development
- Replatforming Apps to K8s with RKE and GitLab CI
- OpenAI API Integration: Completions in PHP
- Building an Email Server on CloudRaya Using iRedMail
- Improving Email Delivery with Sendinblue SMTP Relay
- Building a Self Hosted Password Manager Using Passbolt
- How to Install Podman on Almalinux/Rocky Linux 9
- ElkarBackup: GUI Based backup Tools based on Rsync and Rsnapshot
- Improving Webserver Performance with SSL Termination on NGINX Load Balancer
- Using NGINX as an HTTP Load Balancer
- Automating Task with Cronjob
- Upgrade Zimbra and the OS Version
- Deploy Mailu on Rancher Kubernetes
- Export and Import Database in MySQL or MariaDB Using Mysqldump
- Backup & Sync Local and Remote Directories Using RSYNC
- Managing Storage Raya from various tools and from various OS
- Binding NextCloud with CloudRaya S3 Object Storage as External Storage Mount
- Simple monitoring and alerting with Monit on Ubuntu 22.04 LTS
- VS Code on your browser! How to install code-server on a VM
- Implementing Redis HA and Auto-Failover on Cloud Raya
- Using XFCE Desktop Environment on Cloud Raya VM
- Installing Python 3.7-3.9 on Ubuntu 22.04 Jammy LTS using PPA
- Implementing Continuous Integration with Gitlab CI and Continuous Delivery with Rancher Fleet
- Using Collabora Online on Cloud Raya NextCloud's VM
- Installing NextCloud in Cloud Raya- Detail Steps from the Beginning to the Very End
- Set Up High Availability PostgreSQL Cluster Using Patroni on Cloud Raya
- Set Up WAF KEMP in Cloud Raya Part 2
- Set Up WAF KEMP in Cloud Raya Part 1
- Using the SSH key Feature in Cloud Raya Dashboard
- Monitor Your Services Uptime Using Uptime Kuma
- Hosting Static Website with Hugo on Cloud Raya
- Kubernetes Ingress Controller using SSL in CloudRaya
- Reverse Proxy management using Nginx Proxy Manager
- Create your own VPN server with DNS-Level AdBlocker using PiVPN
- How to deploy Portainer on Linux to easily manage your docker containers
- High Availability Kubernetes Using RKE in Cloud Raya Part 3
- High Availability Kubernetes Using RKE in Cloud Raya Part 2
- High Availability Kubernetes Using RKE in Cloud Raya Part 1
- How to backup Linux VM via Acronis in Cloud Raya
- How to Backup Desktop Linux and Windows via Acronis in Cloud Raya
- Deploying Magento on Cloud Raya
- How to Install Nextcloud on Cloud Raya
- How to Install CWP in Cloud Raya
- How to Install Node.js and Launch Your First Node App
- How to install and secure MariaDB on Ubuntu 18.04 and 20.04 on Cloud Raya
- How to Install and Securing MongoDB on Ubuntu 18.04 and 20.04
- Classes: Post Installation on Ansible
- Classes: Install and Configure Ansible
- Classes: Introduction to Ansible for a robust Configuration Management
- How to Setup Active Directory Domain Service & DNS with Cloud Raya
- How to Host Your Own Docker Hub in Cloud Raya
- How to Setup Your Own Laravel with Nginx in Ubuntu 18.04
- How to Deploy Container in Cloud Raya using Docker
- Securing CentOS with iptables
- Install and Configure Squid Proxy in Ubuntu
- Installing Apache and Tomcat: A Quick Way
- Securing Ubuntu with UFW
- Install a Node.js and Launch a Node App on Ubuntu 18.04
- Installing LAMP in Ubuntu
- Installing LEMP Stack on Ubuntu 18.04
- Show Remaining Articles53 Collapse Articles
-
- Articles coming soon
-
- Implement Multi-Factor Authentication on CloudRaya Linux VM
- Configurating cPanel Using Ubuntu 20.04 on CloudRaya – Part 2
- Deploying cPanel Using Ubuntu 20.04 on CloudRaya - Part 1
- Integrating S3 Storage Raya and Strapi for Asset Storage Optimization – Part 4
- Integrating Strapi Content to Frontend React - Part 3
- Content Management with Strapi Headless CMS - Part 2
- Strapi Headless CMS Installation in CloudRaya - Part. 1
- Using SSH Key on CloudRaya VM with PuTTY
- Building an Email Server on CloudRaya Using iRedMail
- Improving Email Delivery with Sendinblue SMTP Relay
- Building a Self Hosted Password Manager Using Passbolt
- ElkarBackup: GUI Based backup Tools based on Rsync and Rsnapshot
- Improving Webserver Performance with SSL Termination on NGINX Load Balancer
- Using NGINX as an HTTP Load Balancer
- Upgrade Zimbra and the OS Version
- Deploy Mailu on Rancher Kubernetes
- Managing Storage Raya from various tools and from various OS
- Binding NextCloud with CloudRaya S3 Object Storage as External Storage Mount
- Simple monitoring and alerting with Monit on Ubuntu 22.04 LTS
- VS Code on your browser! How to install code-server on a VM
- Implementing Redis HA and Auto-Failover on Cloud Raya
- Using XFCE Desktop Environment on Cloud Raya VM
- Implementing Continuous Integration with Gitlab CI and Continuous Delivery with Rancher Fleet
- Using Collabora Online on Cloud Raya NextCloud's VM
- Installing NextCloud in Cloud Raya- Detail Steps from the Beginning to the Very End
- Set Up WAF KEMP in Cloud Raya Part 2
- Set Up WAF KEMP in Cloud Raya Part 1
- Monitor Your Services Uptime Using Uptime Kuma
- Create your own VPN server with DNS-Level AdBlocker using PiVPN
- How to deploy Portainer on Linux to easily manage your docker containers
- High Availability Kubernetes Using RKE in Cloud Raya Part 3
- High Availability Kubernetes Using RKE in Cloud Raya Part 2
- High Availability Kubernetes Using RKE in Cloud Raya Part 1
- How to Install Nextcloud on Cloud Raya
- Classes: Post Installation on Ansible
- Classes: Install and Configure Ansible
- Classes: Introduction to Ansible for a robust Configuration Management
- Connect Windows Active Directory on Cloud Raya with Azure AD
- How to Host Your Own Docker Hub in Cloud Raya
- How to Deploy Container in Cloud Raya using Docker
- Show Remaining Articles25 Collapse Articles
-
- Accessing KubeRaya Cluster Using the Kubernetes Dashboard
- Integrating S3 Storage Raya and Strapi for Asset Storage Optimization – Part 4
- Integrating Strapi Content to Frontend React - Part 3
- Content Management with Strapi Headless CMS - Part 2
- Strapi Headless CMS Installation in CloudRaya - Part. 1
- Creating Interactive Chatbot with OpenAI API in PHP
- Installing Multiple PHP Versions in One VM for More Flexible Web Development
- OpenAI API Integration: Completions in PHP
- Improving Webserver Performance with SSL Termination on NGINX Load Balancer
- Using NGINX as an HTTP Load Balancer
- Automating Task with Cronjob
- How to Deploy Django App on Cloud Raya VM Using Gunicorn, Supervisor, and Nginx
- How to Install Node.js and Launch Your First Node App
- How to Setup Your Own Laravel with Nginx in Ubuntu 18.04
- Install a Node.js and Launch a Node App on Ubuntu 18.04
-
- How to use Sudo on a CloudRaya Linux VM
- Keeping Your CloudRaya Linux VMs Up-to-Date
- Implement Multi-Factor Authentication on CloudRaya Linux VM
- Using SSH Key on CloudRaya VM with PuTTY
- Building a Self Hosted Password Manager Using Passbolt
- Improving Webserver Performance with SSL Termination on NGINX Load Balancer
- Export and Import Database in MySQL or MariaDB Using Mysqldump
- Backup & Sync Local and Remote Directories Using RSYNC
- How to Deploy Django App on Cloud Raya VM Using Gunicorn, Supervisor, and Nginx
- Set Up WAF KEMP in Cloud Raya Part 2
- Set Up WAF KEMP in Cloud Raya Part 1
- Using the SSH key Feature in Cloud Raya Dashboard
- How to backup Linux VM via Acronis in Cloud Raya
- How to Backup Desktop Linux and Windows via Acronis in Cloud Raya
- Securing CentOS with iptables
- Securing Ubuntu with UFW
- Show Remaining Articles1 Collapse Articles
-
- Configurating cPanel Using Ubuntu 20.04 on CloudRaya – Part 2
- Deploying cPanel Using Ubuntu 20.04 on CloudRaya - Part 1
- Integrating S3 Storage Raya and Strapi for Asset Storage Optimization – Part 4
- Integrating Strapi Content to Frontend React - Part 3
- Content Management with Strapi Headless CMS - Part 2
- Strapi Headless CMS Installation in CloudRaya - Part. 1
- Creating Interactive Chatbot with OpenAI API in PHP
- Installing Multiple PHP Versions in One VM for More Flexible Web Development
- Building an Email Server on CloudRaya Using iRedMail
- Building a Self Hosted Password Manager Using Passbolt
- Improving Webserver Performance with SSL Termination on NGINX Load Balancer
- Using NGINX as an HTTP Load Balancer
- Installing Python 3.7-3.9 on Ubuntu 22.04 Jammy LTS using PPA
- Reverse Proxy management using Nginx Proxy Manager
- Install and Configure Squid Proxy in Ubuntu
- Installing Apache and Tomcat: A Quick Way
- Installing LAMP in Ubuntu
- Installing LEMP Stack on Ubuntu 18.04
- Show Remaining Articles3 Collapse Articles
-
- Building a Static Website Using Storage Raya S3 Bucket
- Integrating S3 Storage Raya and Strapi for Asset Storage Optimization – Part 4
- Integrating Strapi Content to Frontend React - Part 3
- Content Management with Strapi Headless CMS - Part 2
- Strapi Headless CMS Installation in CloudRaya - Part. 1
- Creating Interactive Chatbot with OpenAI API in PHP
- Installing Multiple PHP Versions in One VM for More Flexible Web Development
- OpenAI API Integration: Completions in PHP
- Hosting Static Website with Hugo on Cloud Raya
- Deploying Magento on Cloud Raya
- How to Install CWP in Cloud Raya
- How to Setup Active Directory Domain Service & DNS with Cloud Raya
-
- Articles coming soon
Maximizing StorageRaya with Essential Practices
StorageRaya is CloudRaya’s S3 Object Storage service that can be used for a wide range of storage needs, from simple to advanced scenarios. This guide outlines effective practices for uploading files to StorageRaya, enhancing the storage and essential delivery of your valuable data.
Prerequisites
Prepare your environment:
Set up StorageRaya: Deploy your StorageRaya instance.
It is essential to note your StorageRaya credential so you can access the instance using an S3 client.Install an S3 client tool: Choose and install an S3 client tool, such as Cyberduck, s3cmd, or else, on your computer.
This guide uses Cyberduck, but the steps are generally applicable to all S3 client tools.
Configuring Upload File Metadata
File metadata provides essential information about a file, including its type, validity, and descriptions. This data enables modern browsers to interpret and render files accurately. Common metadata attributes include filename, format, ownership, and timestamps.
To ensure seamless file delivery and enhanced functionality, configure the metadata for each uploaded file. This process involves defining the necessary metadata attributes and ensuring they are accurately associated with the respective files. By properly configuring file metadata, you can optimize file accessibility for users employing modern web browsers.
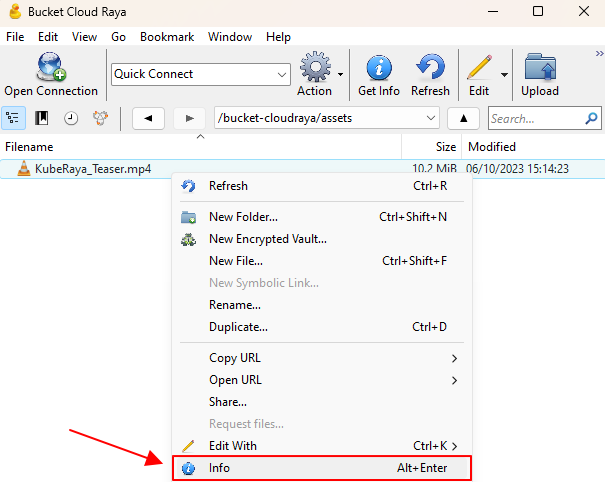
In the Cyberduck window, locate the file you want to modify and right-click on it, and choose the “Info” option.
A pop-up window will appear displaying detailed information about the file.
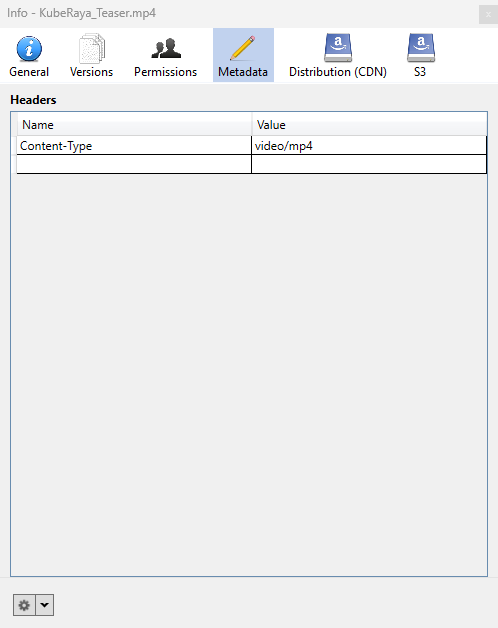
Along the top menu bar, click on the “Metadata” tab.
In the bottom left corner, locate the “b” icon resembling a gear. Click on it.
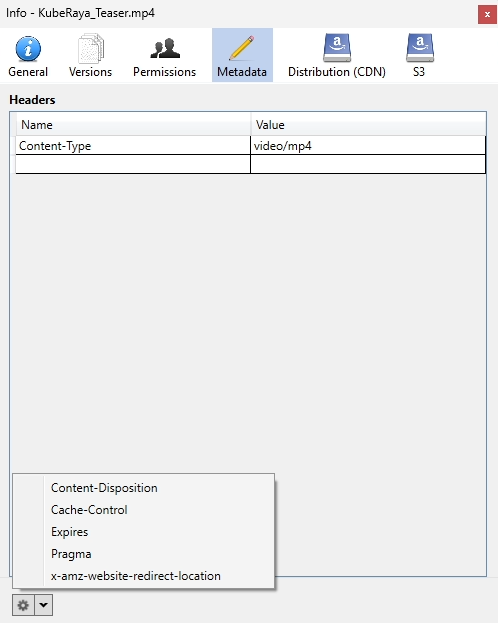
A list of available metadata attributes will be displayed. Select the attribute you want to add.
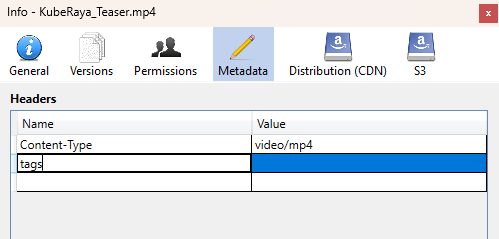
Alternatively, you can specify custom metadata according to your preferences.
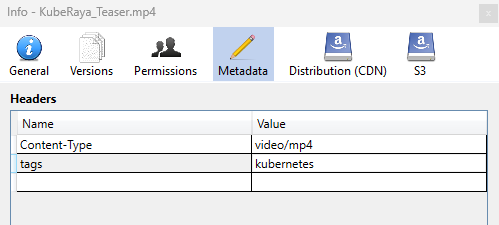
Enter the desired value for the selected metadata attribute. Once you’re satisfied with the changes, press ENTER.
Enabling File Caching
To improve loading times for media files like images, it is essential to enable caching when serving them from your Object Storage to your website. Caching enables the object to remain in the client’s browser cache before being revalidated with your Object Storage. To enhance resource speed, follow these instructions to apply caching:
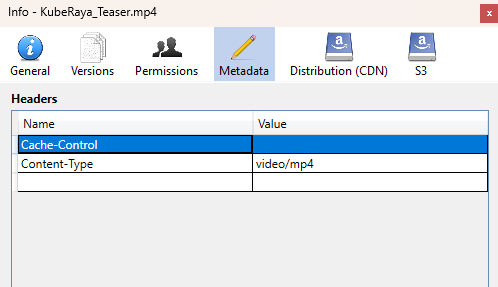
Access the file’s metadata attributes and add a new Cache-Control attribute.
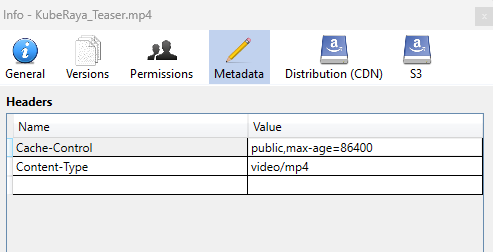
Enter max-age= in the Value field, followed by your desired caching duration. For instance, max-age=86400 sets the caching period to 24 hours. With the public declaration, all caching servers, including private ones, and client browsers can cache the resource. To save the changes, press ENTER.
Common Values:
- public: Cache can be stored on the client side and shared among various users.
- private: Cache should only be stored on the client side and must not be cached by proxies.
- no-cache: Cache must always be accompanied by verification to the server before use.
- max-age=<seconds>: Specifies how long a response can be cached, measured in seconds.
Controlling File Access with Permissions
Tailor file permissions to regulate how users engage with and utilize your object storage data based on your target audience.

On your file ‘Info‘, locate and click “Permissions” on the main navigation bar.
Manage your preferred access level and permissions here.
Although by default, CloudRaya has already provided default permissions as mentioned above.
Available Permission Levels
FULL_CONTROL: Grants read and write privileges to the file for any user with the public link.
READ: Grants read access to the file for all users with the public link.
WRITE: Grants write privileges to the file for all users with the public link.
Safeguarding Access with CORS
To safeguard access to your uploaded Object Storage files, implement Cross-Origin Resource Sharing (CORS) policies to define the origin addresses authorized to access specific files. Follow these steps to enable CORS:
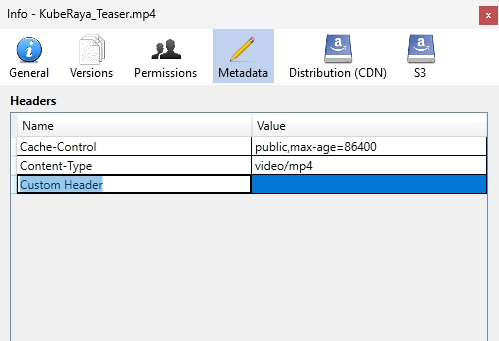
Access the file’s metadata attributes and add a new custom header.
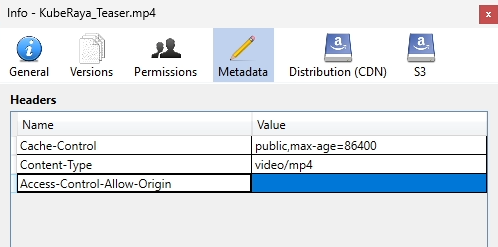
In the ‘Name‘ field, type Access-Control-Allow-Origin.
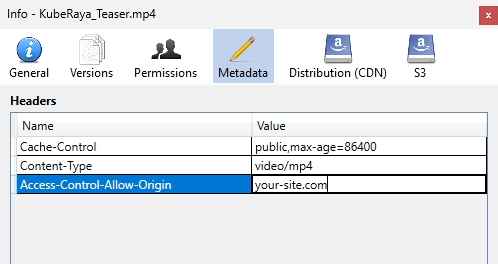
Double-click to edit the Value field, and type your authorized address or domain name. To save the changes, press ENTER.
While the Access-Control-Allow-Origin header is important for controlling access to resources via JavaScript on the client side, accessing a resource directly via a browser's address bar or a hyperlink may not be subject to CORS restrictions.
Configuring Browser Behavior for File Handling
By default, when you share files from CloudRaya Object Storage, browsers automatically download them. To display files instead of downloading them, enable the Content-Disposition header.
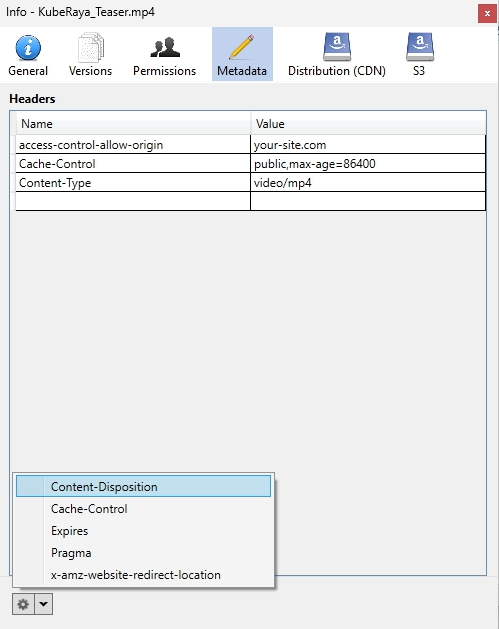
Access the file’s metadata attributes and add a new Content-Disposition attribute.
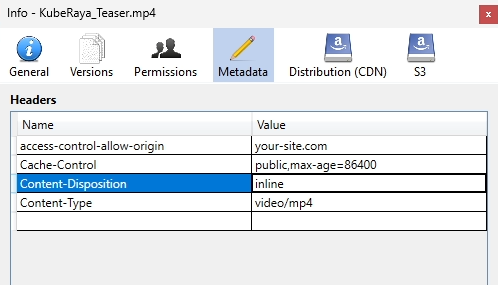
In the Value field, change the value from attachment to inline to enable file preview. To save the changes, press ENTER.
Understanding Content-Disposition Values
attachment: The default behavior, which instructs the browser to download the file.
inline: Allows the browser to display the file instead of downloading it. Users can still manually download the file if they choose.
This setting is particularly useful for media files like images, as it lets users view them without having to download them first.
Multiple Connections for File Transfers
Some S3 clients, such as Cyberduck, often come with built-in support for multi-connection functionality. This functionality becomes particularly beneficial when managing the transfer of sizable files, whether during downloading or uploading processes. It enables the splitting of a file transfer into multiple segments, allowing for simultaneous transfers and the subsequent assembly of the complete file upon completion.
To enable multiple connections in Cyberduck, go to the Preferences menu.
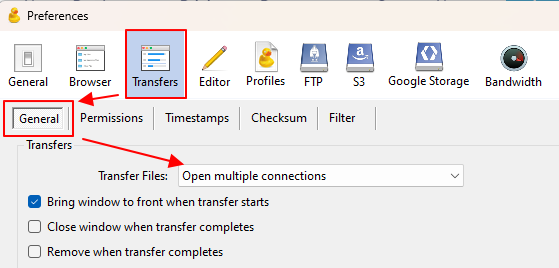
Within the Transfers tab and under the General subtab, select ‘Open Multiple Connections.‘
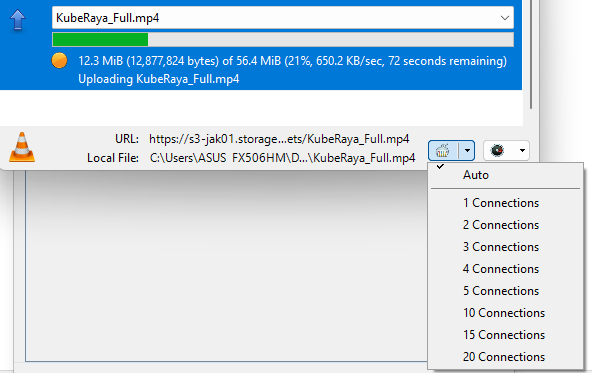
The maximum number of connections to open is limited with the control in the lower right of the Transfers window.
Conclusion
You’ve gained insights into essential set up, configuring metadata, enabling caching, managing permissions, implementing CORS, and optimizing file handling. For more tutorials on maximizing CloudRaya usage, please visit our Knowledge Base or our YouTube channel.