-
Products and Features
- Getting Started with CloudRaya Container Registry
- How to use Sudo on a CloudRaya Linux VM
- Keeping Your CloudRaya Linux VMs Up-to-Date
- Maximizing StorageRaya with Essential Practices
- Assign Multiple IP Addresses to Virtual Machine
- Generating a CloudRaya API key
- Simplify CloudRaya Management with API
- Deploying a Virtual Machine on CloudRaya
- Deploying a Kubernetes Cluster on KubeRaya
- Using StorageRaya – CloudRaya S3 Object Storage
- Opening Ping Access on Cloud Raya VM Public IP
- Maximize Your Storage Raya Access Speed with Content Delivery Network (CDN)
- How to Create Project Tag in Cloud Raya for More Organized VM Billing Report
- Exporting Cloud Raya VM to outer Cloud Raya's Infrastructure using Acronis Cyber Protect
- SSO Management on Cloud Raya
- Using the SSH key Feature in Cloud Raya Dashboard
- Cloud Raya Load Balancer, Solution to Distribute Load Equally
- Create your own VPN server with DNS-Level AdBlocker using PiVPN
- Fix Broken LetsEncrypt SSL Certificate due to Expired Root CA Certificate
- How to Make a Snapshot and Configure VM Backup in Cloud Raya
- How to Request Services or Licenses Products
- Adding, Attaching, and Resize Root Storage Disk in Cloud Raya VPS
- Managing your DNS Zone with DNS Bucket in Cloud Raya
- Create VM, Custom Package, Reinstall VM, and Adjusting Security Profile
- How to backup Linux VM via Acronis in Cloud Raya
- How to Backup Desktop Linux and Windows via Acronis in Cloud Raya
- Backing-Up Cloud Raya Windows VM Using Acronis Cyber Protect
- Load Balancing in Cloud Raya
- Establishing a VPN in Cloud Raya
- Generating an API Token
- Deploying a Virtual Machine in Cloud Raya
- Show Remaining Articles16 Collapse Articles
-
- How to backup Linux VM via Acronis in Cloud Raya
- How to Backup Desktop Linux and Windows via Acronis in Cloud Raya
-
- Maximizing StorageRaya with Essential Practices
- Using StorageRaya – CloudRaya S3 Object Storage
- Building a Static Website Using Storage Raya S3 Bucket
- Integrating S3 Storage Raya and Strapi for Asset Storage Optimization – Part 4
- Maximize Your Storage Raya Access Speed with Content Delivery Network (CDN)
- Managing Storage Raya from various tools and from various OS
- Binding NextCloud with CloudRaya S3 Object Storage as External Storage Mount
-
- How to use Sudo on a CloudRaya Linux VM
- Keeping Your CloudRaya Linux VMs Up-to-Date
- Implement Multi-Factor Authentication on CloudRaya Linux VM
- Assign Multiple IP Addresses to Virtual Machine
- Deploying a Virtual Machine on CloudRaya
- Configurating cPanel Using Ubuntu 20.04 on CloudRaya – Part 2
- Deploying cPanel Using Ubuntu 20.04 on CloudRaya - Part 1
- Exporting Cloud Raya VM to outer Cloud Raya's Infrastructure using Acronis Cyber Protect
- Using the SSH key Feature in Cloud Raya Dashboard
- Adding, Attaching, and Resize Root Storage Disk in Cloud Raya VPS
- Create VM, Custom Package, Reinstall VM, and Adjusting Security Profile
- How to backup Linux VM via Acronis in Cloud Raya
- Backing-Up Cloud Raya Windows VM Using Acronis Cyber Protect
- Deploying a Virtual Machine in Cloud Raya
-
Integration
- Implement Multi-Factor Authentication on CloudRaya Linux VM
- Accessing KubeRaya Cluster Using the Kubernetes Dashboard
- Building a Static Website Using Storage Raya S3 Bucket
- Integrating S3 Storage Raya and Strapi for Asset Storage Optimization – Part 4
- Integrating Strapi Content to Frontend React - Part 3
- Content Management with Strapi Headless CMS - Part 2
- Strapi Headless CMS Installation in CloudRaya - Part. 1
- Using SSH Key on CloudRaya VM with PuTTY
- Installing Multiple PHP Versions in One VM for More Flexible Web Development
- Replatforming Apps to K8s with RKE and GitLab CI
- OpenAI API Integration: Completions in PHP
- Building an Email Server on CloudRaya Using iRedMail
- Improving Email Delivery with Sendinblue SMTP Relay
- Building a Self Hosted Password Manager Using Passbolt
- How to Install Podman on Almalinux/Rocky Linux 9
- ElkarBackup: GUI Based backup Tools based on Rsync and Rsnapshot
- Improving Webserver Performance with SSL Termination on NGINX Load Balancer
- Using NGINX as an HTTP Load Balancer
- Automating Task with Cronjob
- Upgrade Zimbra and the OS Version
- Deploy Mailu on Rancher Kubernetes
- Export and Import Database in MySQL or MariaDB Using Mysqldump
- Backup & Sync Local and Remote Directories Using RSYNC
- Managing Storage Raya from various tools and from various OS
- Binding NextCloud with CloudRaya S3 Object Storage as External Storage Mount
- Simple monitoring and alerting with Monit on Ubuntu 22.04 LTS
- VS Code on your browser! How to install code-server on a VM
- Implementing Redis HA and Auto-Failover on Cloud Raya
- Using XFCE Desktop Environment on Cloud Raya VM
- Installing Python 3.7-3.9 on Ubuntu 22.04 Jammy LTS using PPA
- Implementing Continuous Integration with Gitlab CI and Continuous Delivery with Rancher Fleet
- Using Collabora Online on Cloud Raya NextCloud's VM
- Installing NextCloud in Cloud Raya- Detail Steps from the Beginning to the Very End
- Set Up High Availability PostgreSQL Cluster Using Patroni on Cloud Raya
- Set Up WAF KEMP in Cloud Raya Part 2
- Set Up WAF KEMP in Cloud Raya Part 1
- Using the SSH key Feature in Cloud Raya Dashboard
- Monitor Your Services Uptime Using Uptime Kuma
- Hosting Static Website with Hugo on Cloud Raya
- Kubernetes Ingress Controller using SSL in CloudRaya
- Reverse Proxy management using Nginx Proxy Manager
- Create your own VPN server with DNS-Level AdBlocker using PiVPN
- How to deploy Portainer on Linux to easily manage your docker containers
- High Availability Kubernetes Using RKE in Cloud Raya Part 3
- High Availability Kubernetes Using RKE in Cloud Raya Part 2
- High Availability Kubernetes Using RKE in Cloud Raya Part 1
- How to backup Linux VM via Acronis in Cloud Raya
- How to Backup Desktop Linux and Windows via Acronis in Cloud Raya
- Deploying Magento on Cloud Raya
- How to Install Nextcloud on Cloud Raya
- How to Install CWP in Cloud Raya
- How to Install Node.js and Launch Your First Node App
- How to install and secure MariaDB on Ubuntu 18.04 and 20.04 on Cloud Raya
- How to Install and Securing MongoDB on Ubuntu 18.04 and 20.04
- Classes: Post Installation on Ansible
- Classes: Install and Configure Ansible
- Classes: Introduction to Ansible for a robust Configuration Management
- How to Setup Active Directory Domain Service & DNS with Cloud Raya
- How to Host Your Own Docker Hub in Cloud Raya
- How to Setup Your Own Laravel with Nginx in Ubuntu 18.04
- How to Deploy Container in Cloud Raya using Docker
- Securing CentOS with iptables
- Install and Configure Squid Proxy in Ubuntu
- Installing Apache and Tomcat: A Quick Way
- Securing Ubuntu with UFW
- Install a Node.js and Launch a Node App on Ubuntu 18.04
- Installing LAMP in Ubuntu
- Installing LEMP Stack on Ubuntu 18.04
- Show Remaining Articles53 Collapse Articles
-
- Articles coming soon
-
- Implement Multi-Factor Authentication on CloudRaya Linux VM
- Configurating cPanel Using Ubuntu 20.04 on CloudRaya – Part 2
- Deploying cPanel Using Ubuntu 20.04 on CloudRaya - Part 1
- Integrating S3 Storage Raya and Strapi for Asset Storage Optimization – Part 4
- Integrating Strapi Content to Frontend React - Part 3
- Content Management with Strapi Headless CMS - Part 2
- Strapi Headless CMS Installation in CloudRaya - Part. 1
- Using SSH Key on CloudRaya VM with PuTTY
- Building an Email Server on CloudRaya Using iRedMail
- Improving Email Delivery with Sendinblue SMTP Relay
- Building a Self Hosted Password Manager Using Passbolt
- ElkarBackup: GUI Based backup Tools based on Rsync and Rsnapshot
- Improving Webserver Performance with SSL Termination on NGINX Load Balancer
- Using NGINX as an HTTP Load Balancer
- Upgrade Zimbra and the OS Version
- Deploy Mailu on Rancher Kubernetes
- Managing Storage Raya from various tools and from various OS
- Binding NextCloud with CloudRaya S3 Object Storage as External Storage Mount
- Simple monitoring and alerting with Monit on Ubuntu 22.04 LTS
- VS Code on your browser! How to install code-server on a VM
- Implementing Redis HA and Auto-Failover on Cloud Raya
- Using XFCE Desktop Environment on Cloud Raya VM
- Implementing Continuous Integration with Gitlab CI and Continuous Delivery with Rancher Fleet
- Using Collabora Online on Cloud Raya NextCloud's VM
- Installing NextCloud in Cloud Raya- Detail Steps from the Beginning to the Very End
- Set Up WAF KEMP in Cloud Raya Part 2
- Set Up WAF KEMP in Cloud Raya Part 1
- Monitor Your Services Uptime Using Uptime Kuma
- Create your own VPN server with DNS-Level AdBlocker using PiVPN
- How to deploy Portainer on Linux to easily manage your docker containers
- High Availability Kubernetes Using RKE in Cloud Raya Part 3
- High Availability Kubernetes Using RKE in Cloud Raya Part 2
- High Availability Kubernetes Using RKE in Cloud Raya Part 1
- How to Install Nextcloud on Cloud Raya
- Classes: Post Installation on Ansible
- Classes: Install and Configure Ansible
- Classes: Introduction to Ansible for a robust Configuration Management
- Connect Windows Active Directory on Cloud Raya with Azure AD
- How to Host Your Own Docker Hub in Cloud Raya
- How to Deploy Container in Cloud Raya using Docker
- Show Remaining Articles25 Collapse Articles
-
- Accessing KubeRaya Cluster Using the Kubernetes Dashboard
- Integrating S3 Storage Raya and Strapi for Asset Storage Optimization – Part 4
- Integrating Strapi Content to Frontend React - Part 3
- Content Management with Strapi Headless CMS - Part 2
- Strapi Headless CMS Installation in CloudRaya - Part. 1
- Creating Interactive Chatbot with OpenAI API in PHP
- Installing Multiple PHP Versions in One VM for More Flexible Web Development
- OpenAI API Integration: Completions in PHP
- Improving Webserver Performance with SSL Termination on NGINX Load Balancer
- Using NGINX as an HTTP Load Balancer
- Automating Task with Cronjob
- How to Deploy Django App on Cloud Raya VM Using Gunicorn, Supervisor, and Nginx
- How to Install Node.js and Launch Your First Node App
- How to Setup Your Own Laravel with Nginx in Ubuntu 18.04
- Install a Node.js and Launch a Node App on Ubuntu 18.04
-
- How to use Sudo on a CloudRaya Linux VM
- Keeping Your CloudRaya Linux VMs Up-to-Date
- Implement Multi-Factor Authentication on CloudRaya Linux VM
- Using SSH Key on CloudRaya VM with PuTTY
- Building a Self Hosted Password Manager Using Passbolt
- Improving Webserver Performance with SSL Termination on NGINX Load Balancer
- Export and Import Database in MySQL or MariaDB Using Mysqldump
- Backup & Sync Local and Remote Directories Using RSYNC
- How to Deploy Django App on Cloud Raya VM Using Gunicorn, Supervisor, and Nginx
- Set Up WAF KEMP in Cloud Raya Part 2
- Set Up WAF KEMP in Cloud Raya Part 1
- Using the SSH key Feature in Cloud Raya Dashboard
- How to backup Linux VM via Acronis in Cloud Raya
- How to Backup Desktop Linux and Windows via Acronis in Cloud Raya
- Securing CentOS with iptables
- Securing Ubuntu with UFW
- Show Remaining Articles1 Collapse Articles
-
- Configurating cPanel Using Ubuntu 20.04 on CloudRaya – Part 2
- Deploying cPanel Using Ubuntu 20.04 on CloudRaya - Part 1
- Integrating S3 Storage Raya and Strapi for Asset Storage Optimization – Part 4
- Integrating Strapi Content to Frontend React - Part 3
- Content Management with Strapi Headless CMS - Part 2
- Strapi Headless CMS Installation in CloudRaya - Part. 1
- Creating Interactive Chatbot with OpenAI API in PHP
- Installing Multiple PHP Versions in One VM for More Flexible Web Development
- Building an Email Server on CloudRaya Using iRedMail
- Building a Self Hosted Password Manager Using Passbolt
- Improving Webserver Performance with SSL Termination on NGINX Load Balancer
- Using NGINX as an HTTP Load Balancer
- Installing Python 3.7-3.9 on Ubuntu 22.04 Jammy LTS using PPA
- Reverse Proxy management using Nginx Proxy Manager
- Install and Configure Squid Proxy in Ubuntu
- Installing Apache and Tomcat: A Quick Way
- Installing LAMP in Ubuntu
- Installing LEMP Stack on Ubuntu 18.04
- Show Remaining Articles3 Collapse Articles
-
- Building a Static Website Using Storage Raya S3 Bucket
- Integrating S3 Storage Raya and Strapi for Asset Storage Optimization – Part 4
- Integrating Strapi Content to Frontend React - Part 3
- Content Management with Strapi Headless CMS - Part 2
- Strapi Headless CMS Installation in CloudRaya - Part. 1
- Creating Interactive Chatbot with OpenAI API in PHP
- Installing Multiple PHP Versions in One VM for More Flexible Web Development
- OpenAI API Integration: Completions in PHP
- Hosting Static Website with Hugo on Cloud Raya
- Deploying Magento on Cloud Raya
- How to Install CWP in Cloud Raya
- How to Setup Active Directory Domain Service & DNS with Cloud Raya
-
- Articles coming soon
Implement Multi-Factor Authentication on CloudRaya Linux VM
SSH authentication typically employs passwords, but most SSH security guidelines recommend using an SSH key instead. While an SSH key offers enhanced security, it still falls under the umbrella of single-factor authentication. Just like when someone tries to guess your password, there’s also a risk that your SSH key might be stolen. This could be a threat to the security of your remote systems.
This guide will show you how to add an extra layer of security to your SSH logins using Multi-Factor Authentication (MFA). We will use SSH key and VM password, along with OATH-TOTP app. So logging into your VM will need three steps, making it safer than just using a password or SSH key. We’ll also explore some handy tips.
Prerequisites
To follow this guide, make sure you have a Linux cloud server up and running. Additionally, you’ll need:
- A Linux VM that’s up-to-date.
- A Linux VM with a standard user account that can use sudo.
- An SSH key configured on the VM.
- A smartphone or tablet with an OATH-TOTP app installed, such as Google Authenticator, Microsoft Authenticator, Authy, or FreeOTP.
Install Google Authenticator PAM
In this step, we’ll set up Google’s PAM for authentication. PAM, short for Pluggable Authentication Module, is a system used on Linux to verify a user’s identity.
Login to your Linux server as a non-root user with sudo access. Follow the instructions based on your Linux distribution to install the Google Authenticator PAM module.
Ubuntu, Debian, and other apt-based Distributions
Install with apt.
$ sudo apt-get install libpam-google-authenticator
Fedora
Install with yum.
$ sudo yum install google-authenticator
CentOS, Rocky Linux, Alma Linux and Other RHEL-Compatible Distributions
Install the EPEL Repository.
$ sudo yum install epel-release
Install with yum.
$ sudo yum install google-authenticator
Setup the Google Authenticator
Notes: Each user connecting to the server needs to perform these steps individually.
$ google-authenticator
You can run the setup interactively with the command as shown above. Alternatively, you can use these options to make it simpler:
$ google-authenticator -t -f -d -w 3 -e 5 -r 3 -R 30
Here are the explanations for the given options:
- t: Use TOTP verification.
- f: Save the settings. to
~/.google_authenticatorwithout asking. - d: Prevent the reuse of of previously used tokens.
- w 3: Tokens normally expire every 30 seconds. With a window size of 3, you can use the token before and after the current one, accommodating potential clock differences. It provides flexibility within a time window of 90 seconds (3 tokens * 30 seconds), allowing the use of previous, current, and next tokens during authentication.
- e 5: Generate 5 emergency backup codes.
- r 3: Allow 3 login attempts to enter the correct code.
- R 30: Users have 30 seconds after the last valid token to try entering the correct code. In this context, it serves as a time limit for login attempts after receiving the last valid token.
To see all the options, you can type google-authenticator --help
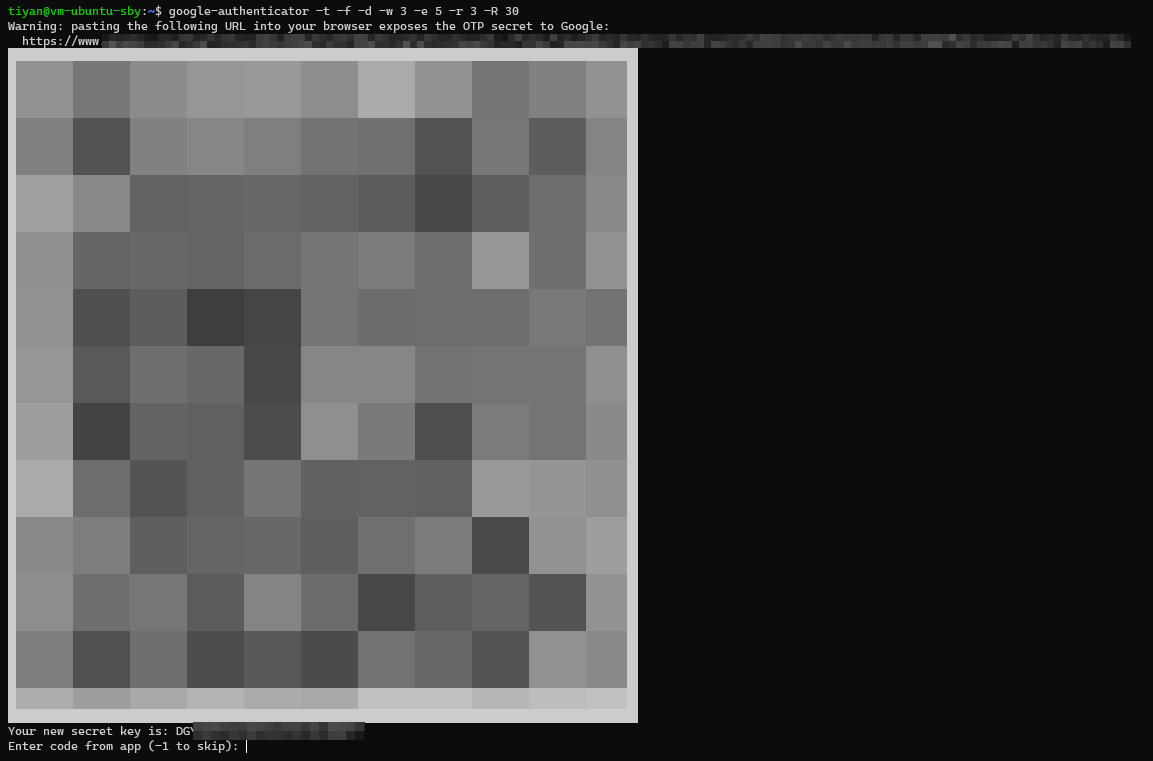
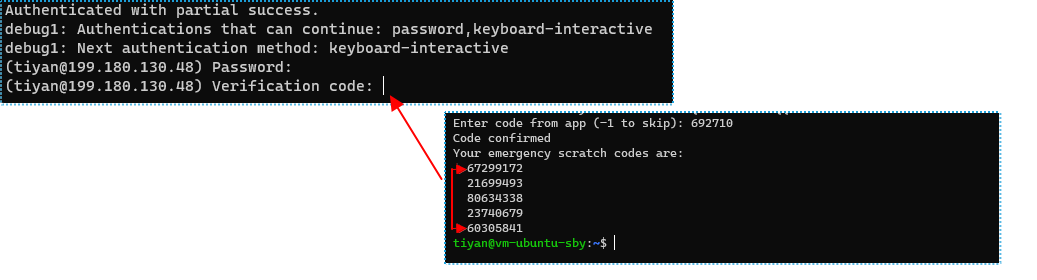
This setup will show a few things: a QR code that you can scan with many authenticator apps, and a secret key. If you can’t scan the QR code, just type in the secret key into your app.
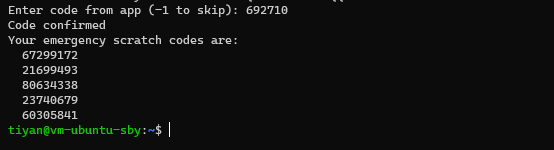
After scanning the QR code, type the code from the app into the terminal to display the 5 one-time emergency codes. Keep these codes in a safe place. If you have to reset your code, just run the program again.
Configuring SSH to Use MFA
Now that Google’s PAM is installed and configured, the next step is to configure SSH to use your TOTP key. We’ll need to tell SSH about the PAM and then configure SSH to use it.
Notes: To avoid accidental lockouts and maintain an active SSH connection while modifying SSH settings. Utilize a separate SSH session for testing purposes. Once everything functions correctly, close the sessions. Additionally, back up the system files you intend to modify before making any changes.
In case of an SSH configuration error preventing login, utilize the CloudRaya web console.
Just to be on the safe side, copy the sshd config file for easy rollback.
$ sudo cp /etc/pam.d/sshd /etc/pam.d/sshd.bak
Get in there and open the file using nano or your favorite editor
$ sudo nano /etc/pam.d/sshd
Add the following line to the bottom of the file:
				. . .

# Standard Un*x password updating.
@include common-password
auth required pam_google_authenticator.so nullok
auth required pam_permit.so
This configuration allows users to log in with either an SSH key or an OATH-TOTP token. If a user doesn’t have an OATH-TOTP token yet, the nullok option lets them log in with just their SSH key. Later, when everyone has an OATH-TOTP token, you can remove nullok to make two-factor authentication mandatory.
pam_permit.so acts as a fallback, allowing logins even if users haven’t yet configured the OATH-TOTP token. Think of it like a two-factor door with two keys: the SSH key and the OATH-TOTP token. Normally, both keys are required, but nullok provides a grace period for missing the second key. This lets pam_permit.so step in and authorize the login.
Once you’re done making changes, save and close the file.
Let’s set up SSH for key-based authentication. Back up the file first.
$ sudo cp /etc/ssh/sshd_config /etc/ssh/sshd_config.bak
Now open the SSH configuration file for editing:
$ sudo nano /etc/ssh/sshd_config
Look for KbdInteractiveAuthentication (keyboard-based interactive authentication) and set its value to yes.
				. . .
# Change to yes to enable challenge-response passwords (beware issues with
# some PAM modules and threads)
KbdInteractiveAuthentication yes
. . .
Since we will be using MFA (Three Factor Authentication ) in this guide, let’s tell SSH to use both an SSH key, password and a verification code for login. Add the following line to the bottom of the file:
				. . .
AuthenticationMethods publickey,password publickey,keyboard-interactive
Save and close the file.
Once you’ve made changes to your SSH configuration file, you’ll need to restart the SSH service for them to take effect. You can use the following command. (Restarting the service won’t disconnect your current SSH session.)
$ sudo systemctl restart sshd.service
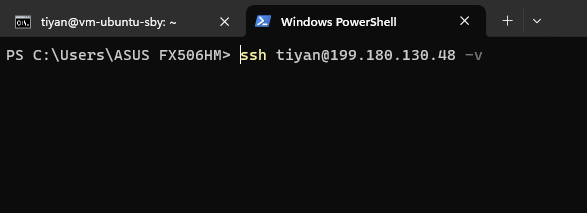
To make sure everything is working correctly, open another terminal window and try logging in over SSH from there. It’s important to keep your original SSH session open while testing, otherwise you might lock yourself out and need to use the web console to get back in.
Use -v option with SSH to enable verbose mode and see detailed process information.
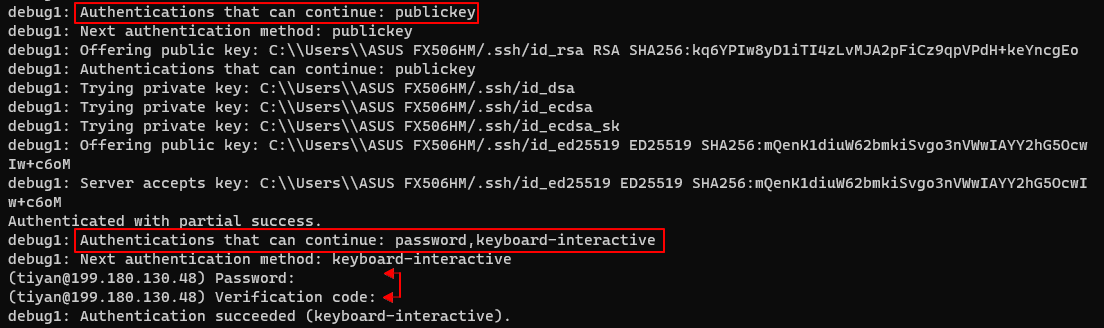
You will find that you now need access using 3-factor authentication.
Recovering Access to MFA
With increased security comes increased responsibility. In the case of TOTP, this means safeguarding your secret key and ensuring access to your TOTP app. However, unforeseen circumstances can lead to the loss of these keys or apps, potentially locking you out.
In this guide, we will explore various methods and scenarios related to recovering access.
Losing Your TOTP Secret Key (or Losing Access to the TOTP App)
In the event that your TOTP app is unavailable or you’ve lost it, you can still log in to your server using the emergency codes you were given when you first set up your account.
Note: Each code is for one-time use only.
Deactivate TOTP AUTH for a particular user
Make sure you log in as root user.
Navigate to the user’s home directory and remove the file .google_authenticator.
# rm /home/theusername/.google_authenticator
Deactivate TOTP AUTH for All Users
# nano /etc/ssh/sshd_config
Edit the sshd config again.
Back to this following line:
				. . .
AuthenticationMethods publickey,password publickey,keyboard-interactive
Remove the keyboard-interactive method so that only the publickey and password publickey methods remain.
				. . .
AuthenticationMethods publickey,password publickey
Save the changes and restart SSH.
# systemctl restart sshd.service
Conclusion
This tutorial guided you through securing your server with three-factor authentication. Now, you require your SSH key, VM password, and a temporary code from your phone to log in, significantly reducing the risk of unauthorized access.
For more tutorials on maximizing CloudRaya usage, please visit our Knowledge Base or our Youtube channel.