Implementing Continuous Integration with Gitlab CI and Continuous Delivery with Rancher Fleet
Introduction
Before implementing the mechanism in Rancher Fleet, we need to know what we would do with the CI and CD.
In this article, continuous integration (CI) means pushing our image build through Dockerfile to the registry.
Meanwhile, continuous delivery (CD) means delivering our Kubernetes workload (deployments, services, Ingresses, etc) to the Kubernetes cluster.
The workload would be some manifest files with the .yaml extension.
Environment Set
- Cluster: a Kubernetes cluster built with RKE, please refer to the following series of articles to set up the cluster
- Repository: a public GitLab repository project
- CI Flow: create CI image build flow on branch image-build
- CD Flow: create a new branch named fleet, rancher fleet agent would monitor that
Preparation Guide
- Sign in / sign up to your Gitlab instance, then create a public repository
- Create two new branches named fleet and image-build. The fleet branch will contain the Kubernetes workload manifest files. The image-build branch will contain the Dockerfile definition to build your custom image
- Set the image-build as a protected branch, so that the Gitlab CI files could read the global variables. By default global variables could only be read by the protected branch (Configure a protected branch)
- Setting up a local GitLab runner and Gitlab CI (will be explained later in the article)
- Setting up a repository to be monitored by the rancher fleet ((will be explained later in the article)
- Writing up a Dockerfile to build a custom image
- Writing up a Gitlab CI actions
- Writing up a Kubernetes workload manifest
Building CI Mechanism
Writing a Dockerfile code
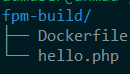
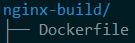
- In your image-build branch, create two folder for building custom Nginx and PHP-FPM image.
- Let’s say you’ve created folder nginx-build for building an Nginx custom image and fpm-build folder for building a PHP-FPM custom image.
- You also need to create the necessary config or file for building your custom image.
- Please see the below directory tree as a reference
Each file contains the following value:
fpm-build Dockerfile
FROM php:7.4-fpm
RUN apt-get update && apt-get install -y \
libfreetype6-dev \
libjpeg62-turbo-dev \
libpng-dev \
vim \
libicu-dev\
&& docker-php-ext-configure gd --with-freetype --with-jpeg \
&& docker-php-ext-install -j$(nproc) gd \
&& docker-php-ext-configure intl \
&& docker-php-ext-install intl \
&& docker-php-ext-configure mysqli \
&& docker-php-ext-install mysqli
# Use the default production configuration
RUN mv "$PHP_INI_DIR/php.ini-production" "$PHP_INI_DIR/php.ini"
RUN mkdir /app
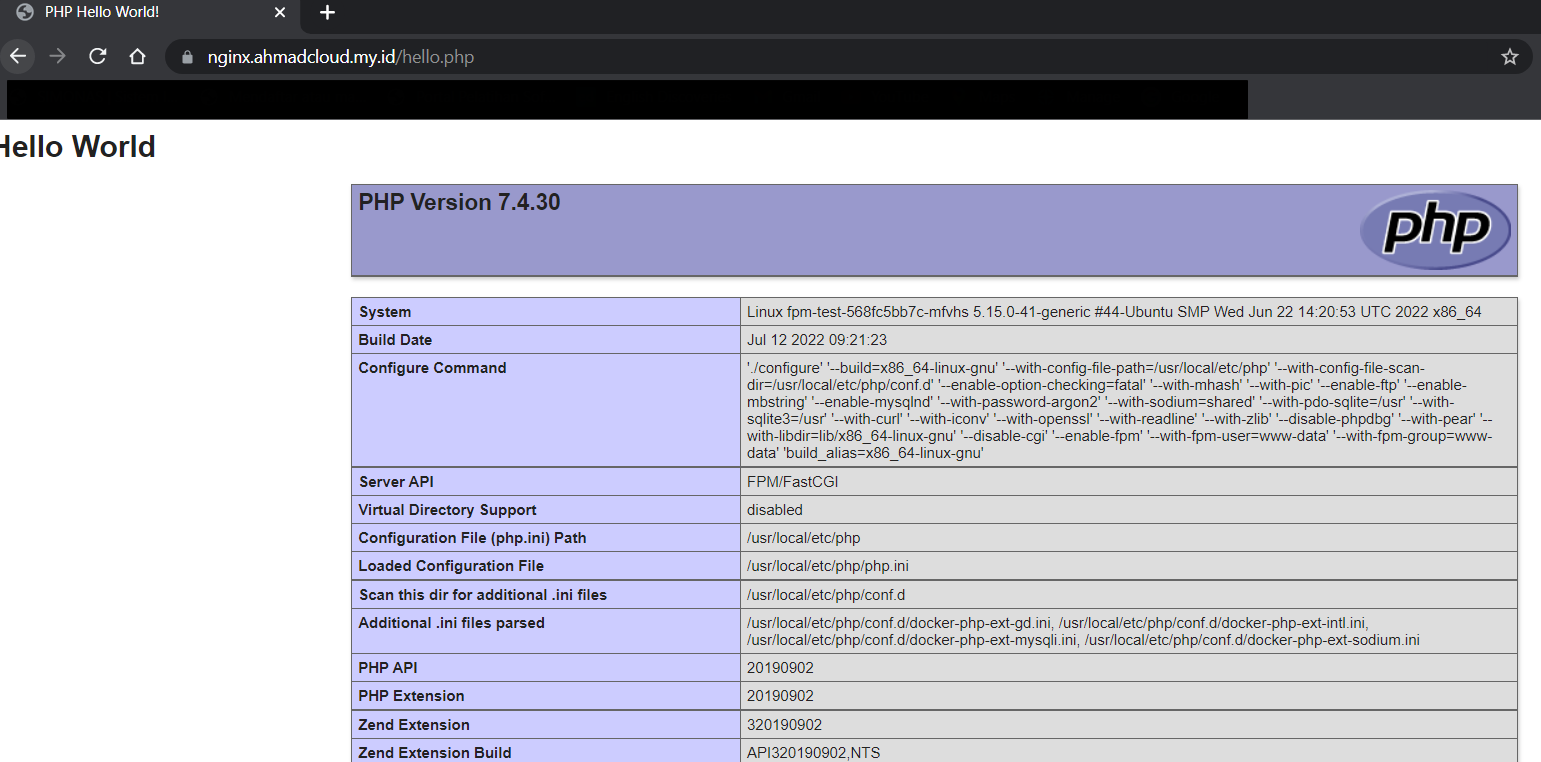
COPY hello.php /appfpm-build hello.php
<html>
    <head>
        <title>PHP Hello World!</title>
    </head>
    <body>
        <?php echo '<h1>Hello World</h1>'; ?>
        <?php phpinfo(); ?>
    </body>
</html>
nginx-build Dockerfile
FROM nginx:latest

RUN apt-get update \
    && apt-get install inetutils-ping mariadb-client -y
Setting Up a Local Gitlab Runner
In this setup, we will install a GitLab runner in a docker container.
- Install docker engine on your local machine, please use the following link for the instruction: https://docs.docker.com/engine/install/
- Use Docker volumes to start the Runner container. First, we need to create a docker volume
docker volume create gitlab-runner-config- Start the GitLab Runner container using the volume we just created:
docker run -d --name gitlab-runner --restart always \
    -v /var/run/docker.sock:/var/run/docker.sock \
    -v gitlab-runner-config:/etc/gitlab-runner \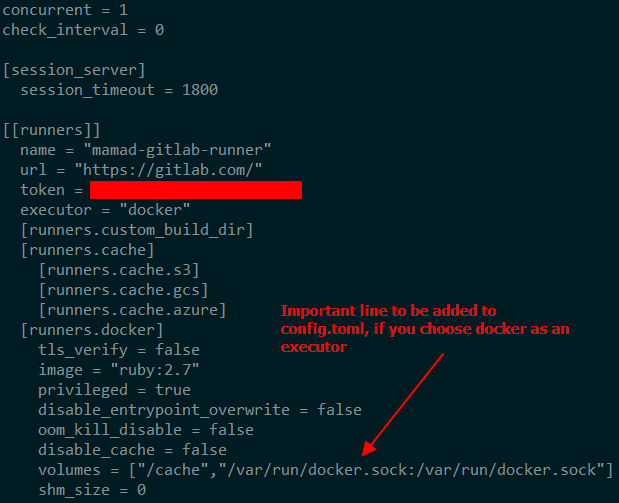
gitlab/gitlab-runner:latest- Follow the pop up instruction to set up the config.toml on gitlab runner container. Your config.toml file should be like the following picture.
- Register your runner to the Gitlab account.
- Login to your Gitlab account and navigate to Settings > CI/CD
- Expand the Runners value
- You should see the following informations
- Disable the shared runners on your settings to force all pipelines to use your registered runner
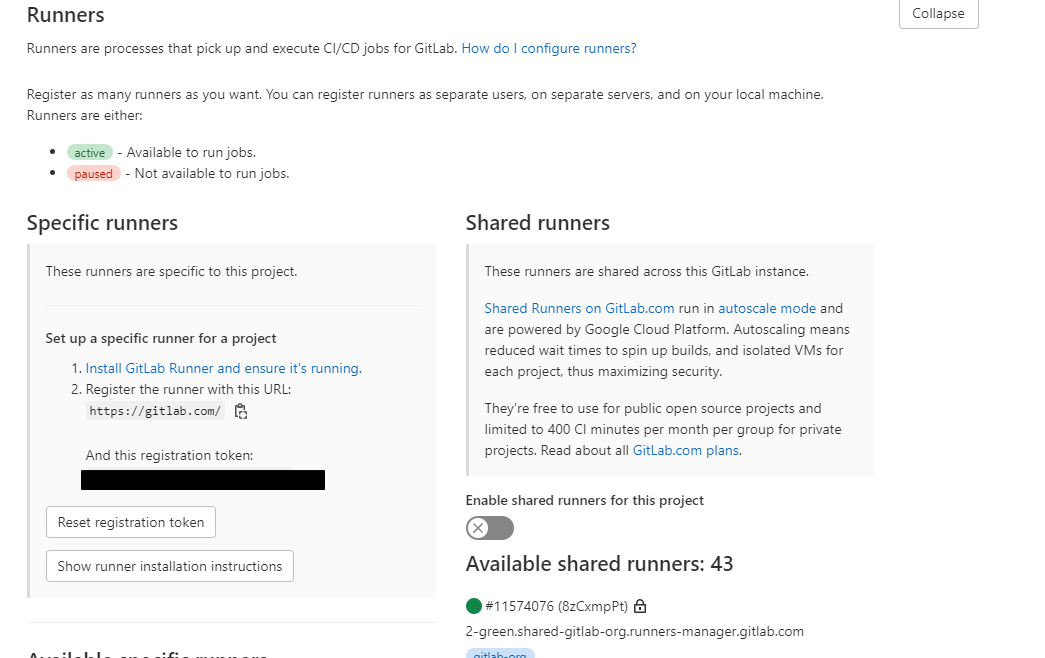
- Take a note of your token registration for later use
- Registering your docker gitlab runner by typing the following command
docker run –rm -it -v gitlab-runner-config:/etc/gitlab-runner gitlab/gitlab-runner:latest register
- Restart your gitlab-runner container,
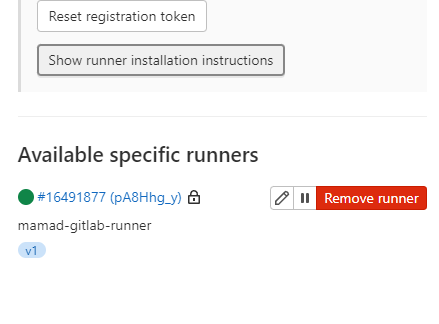
docker restart gitlab-runner - You should now see your runner registered on the Gitlab project
Writing up a Gitlab CI actions
- On your selected project, go to CI/CD > Editor > select image-build branch
- Paste the example Gitlab actions below to your editor
docker-build-php-fpm: # Name of the Job
# Official docker image.
image: docker:latest
stage: build # Define the stage as build
# Activates docker-in-docker service, which makes Docker able to run within a Docker environment
services:
- docker:dind
# Login to registry before pushing the image
before_script:
- docker login -u "$CI_REGISTRY_USER" -p "$CI_REGISTRY_PASSWORD"
script:
# Pull the latest/tagged image before building it from Dockerfile context
- docker build --pull -t "index.docker.io/sultanahmad/fpm:v1" ./fpm-build/
# Push the image to the docker registry
- docker push "index.docker.io/sultanahmad/fpm:v1"
only:
- image-build
docker-build-nginx:
# Official docker image.
image: docker:latest
stage: build
services:
- docker:dind
before_script:
- docker login -u "$CI_REGISTRY_USER" -p "$CI_REGISTRY_PASSWORD"
script:
- docker build --pull -t "index.docker.io/sultanahmad/nginx:v1" ./nginx-build/
- docker push "index.docker.io/sultanahmad/nginx:v1"
only:
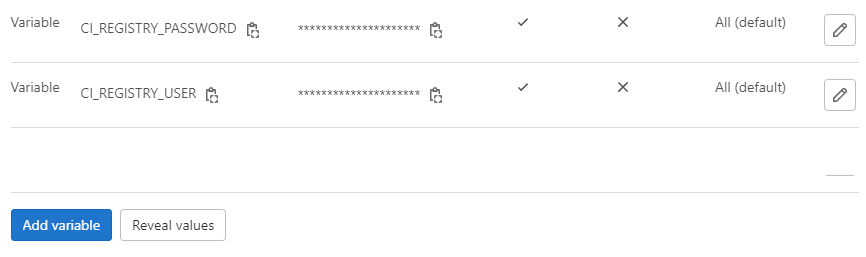
- image-buildBefore running the pipeline, add CI_REGISTRY_USER and CI_REGISTRY_PASSWORD variables to your Gitlab CI/CD variables setting.
To add variables to your project, please navigate to CI/CD > Variables and expand the Variables tab
After adding the variables, you should see the settings like below.
Pipeline Run Test
In the CI/CD > Pipelines menu, you will see the list of your pipelines. You can also monitor the pipelines jobs, by clicking the Jobs tab.
If you see the passed status on your pipeline, meaning your jobs was successfully executed.

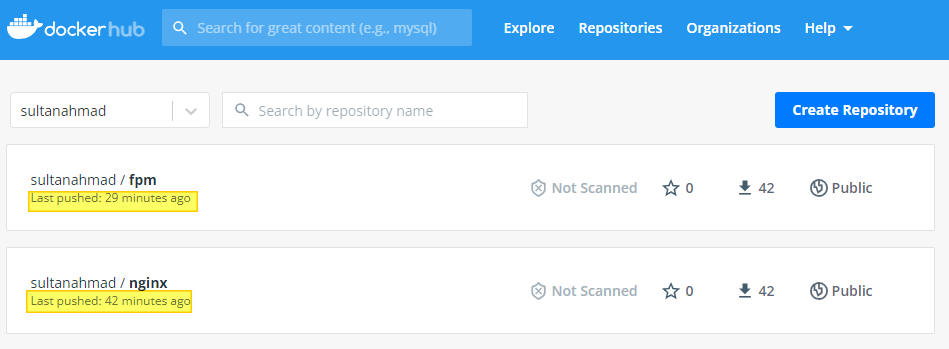
Check your image in the registry and you should see your image update is changed.
Building CD Mechanism
Build Kubernetes Workload Manifest File
In this section, we will write the Kubernetes workload manifest file for both nginx and fpm deployment.
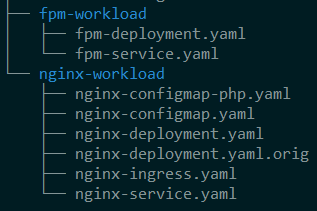
Create two folders on branch fleet named nginx-deployment and fpm-deployment. Then place the nginx workload to folder nginx-workload and the fpm workload to fpm-workload.
See the example directory tree below.
Please see the code below for reference.
Nginx Workload Manifest
nginx-configmap.yaml
apiVersion: v1
data:
sites.conf: |-
server {
listen 80;
server_name nginx.ahmadcloud.my.id www.nginx.ahmadcloud.my.id;
index index.php index.html;
error_log /var/log/nginx/error.log;
access_log /var/log/nginx/access.log;
root /var/www/html;
location / {
try_files $uri $uri/ /index.php?$query_string;
}
location ~ \.php$ {
try_files $uri =404;
fastcgi_split_path_info ^(.+\.php)(/.+)$;
fastcgi_pass fpm-svc:9000;
fastcgi_index index.php;
include fastcgi_params;
fastcgi_param SCRIPT_FILENAME $document_root$fastcgi_script_name;
fastcgi_param PATH_INFO $fastcgi_path_info;
}
}
kind: ConfigMap
metadata:
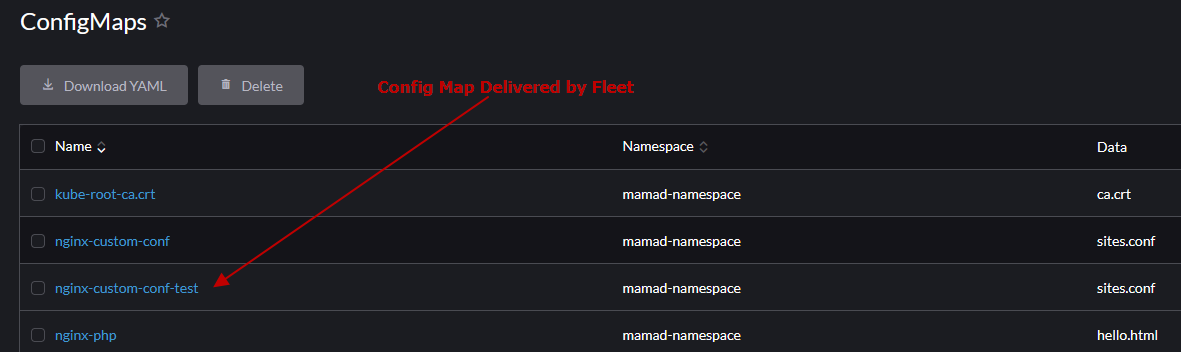
name: nginx-custom-conf-test
namespace: mamad-namespacenginx-deployment.yaml
apiVersion: apps/v1
kind: Deployment
metadata:
  name: nginx-deployment
  namespace: mamad-namespace
spec:
  progressDeadlineSeconds: 600
  replicas: 2
  revisionHistoryLimit: 10

## selector that match the apps deployment on rancher cluster
  selector:
    matchLabels:
      workload.user.cattle.io/workloadselector: apps.deployment-mamad-namespace-nginx-deployment
##
  strategy:
    rollingUpdate:
      maxSurge: 25%
      maxUnavailable: 25%
    type: RollingUpdate
  template:
    metadata:
      annotations:
        cattle.io/timestamp: "2022-07-22T19:06:28Z"
      creationTimestamp: null
      labels:
        workload.user.cattle.io/workloadselector: apps.deployment-mamad-namespace-nginx-deployment
    spec:
      affinity: {}
      containers:
      - image: index.docker.io/sultanahmad/nginx:v1 # nginx custom image from CI section
        imagePullPolicy: Always
        name: nginx-container
        ports:
        - containerPort: 80
          name: nginx-http
          protocol: TCP
        volumeMounts:
        - mountPath: /var/www/html/ # the shared volume with fpm deployment
          name: vol-nginx1
        - mountPath: /etc/nginx/conf.d/
          name: vol-nginx-configmap-test
      dnsPolicy: ClusterFirst
      restartPolicy: Always
      schedulerName: default-scheduler
      securityContext: {}
      terminationGracePeriodSeconds: 30
      volumes:
      - hostPath: # shared volume using bind-mount method
          path: /mnt/mamad-volume # path of the volume on the rancher host
          type: DirectoryOrCreate
        name: vol-nginx1
      - configMap: # configmap for custom nginx configuration
          defaultMode: 420
          name: nginx-custom-conf-test
          optional: false
        name: vol-nginx-configmap-test
nginx-service.yaml
apiVersion: v1
kind: Service
metadata:
  annotations:
    field.cattle.io/targetWorkloadIds: '["mamad-namespace/nginx-deployment"]'
    management.cattle.io/ui-managed: "true"
  name: nginx-deployment
  namespace: mamad-namespace
spec:
  ports:
  - name: nginx-http
    port: 80
    protocol: TCP
    targetPort: 80
## selector that match the apps deployment on rancher cluster
  selector:
    workload.user.cattle.io/workloadselector: apps.deployment-mamad-namespace-nginx-deployment
##
  sessionAffinity: None
  type: ClusterIP
nginx-ingress.yaml
apiVersion: networking.k8s.io/v1
kind: Ingress
metadata:
  name: nginx-ingress-test
  namespace: mamad-namespace
spec:
  ingressClassName: nginx
  rules:
  - host: nginx.ahmadcloud.my.id
    http:
      paths:
      - backend:
          service:
            name: nginx-deployment
            port:
              number: 80
        path: /hello.php
        pathType: Prefix
  tls:
  - hosts:
    - nginx.ahmadcloud.my.id
    secretName: nginx.ahmadcloud.my.id
FPM Workload Manifest
fpm-deployment.yaml
apiVersion: apps/v1
kind: Deployment
metadata:
  labels:
    workload.user.cattle.io/workloadselector: apps.deployment-mamad-namespace-fpm-test
  name: fpm-test
  namespace: mamad-namespace
spec:
  progressDeadlineSeconds: 600
  replicas: 2
  revisionHistoryLimit: 10
  selector:
    matchLabels:
      workload.user.cattle.io/workloadselector: apps.deployment-mamad-namespace-fpm-test
  strategy:
    rollingUpdate:
      maxSurge: 25%
      maxUnavailable: 25%
    type: RollingUpdate
  template:
    metadata:
      labels:
        workload.user.cattle.io/workloadselector: apps.deployment-mamad-namespace-fpm-test
    spec:
      affinity: {}
      containers:
      - image: index.docker.io/sultanahmad/fpm:v1
        imagePullPolicy: Always

        ## Command to copy all files from directory /app to /var/www/html
        lifecycle:
          postStart:
            exec:
              command:
              - sh
              - -c
              - cp -r /app/* /var/www/html
        ##
        name: fpm-test
        ports:
        - containerPort: 9000
          name: fpm-port
          protocol: TCP
        resources: {}
        terminationMessagePath: /dev/termination-log
        terminationMessagePolicy: File
        volumeMounts:
        - mountPath: /var/www/html
          name: vol-fpm1
      dnsPolicy: ClusterFirst
      restartPolicy: Always
      schedulerName: default-scheduler
      securityContext: {}
      terminationGracePeriodSeconds: 30

      ## Persistance Volume with hostpath method
      volumes:
      - hostPath:
          path: /mnt/mamad-volume # shared volume mount point
          type: ""
        name: vol-fpm1
fpm-service.yaml
apiVersion: v1
kind: Service
metadata:
annotations:
field.cattle.io/targetWorkloadIds: '["mamad-namespace/fpm-test"]'
management.cattle.io/ui-managed: "true"
name: fpm-svc
namespace: mamad-namespace
spec:
ports:
- name: fpm-port
port: 9000
protocol: TCP
targetPort: 9000
## selector that match workload in rancher
selector:
workload.user.cattle.io/workloadselector: apps.deployment-mamad-namespace-fpm-test
##
sessionAffinity: None
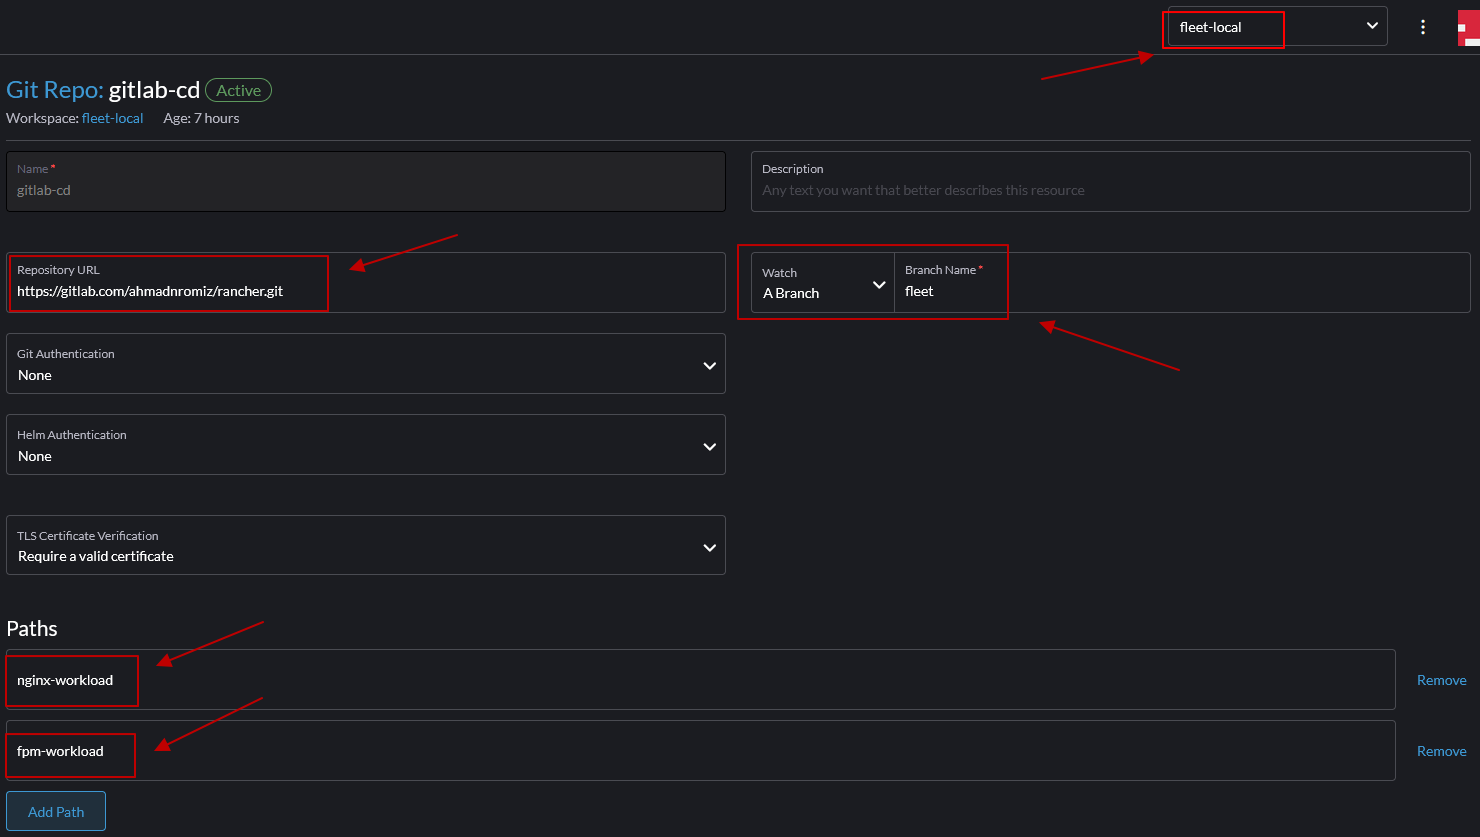
type: ClusterIPSetting Up Rancher Fleet
In this section, we will use the continuous delivery feature that rancher provided.
- Login to rancher dashboard and choose continuous delivery.
- set the namespace view to fleet-local and input the following information.
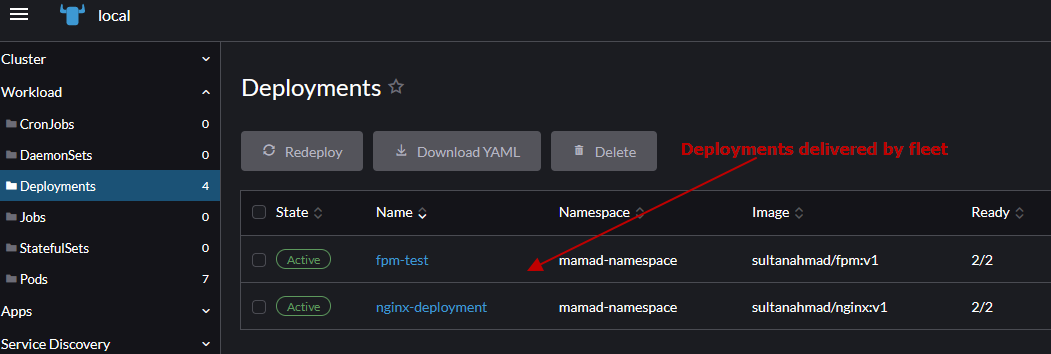
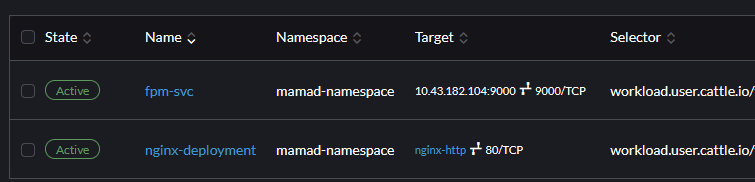
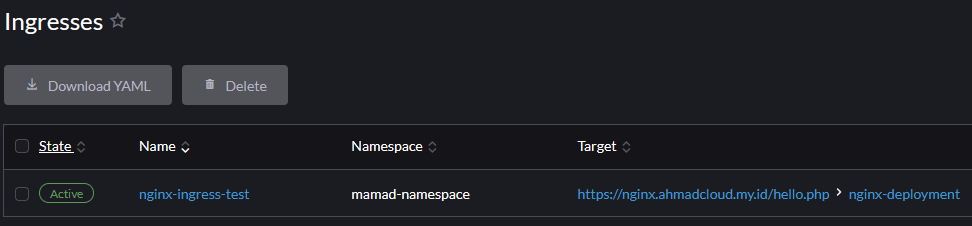
Test Result
Conclusion
In some way, you might need to add an SSL Certificate on your ingress domain.
You could achieve that setup by following this tutorial – Kubernetes Ingress Controller using SSL in Cloud Raya.
I hope you find this article helpful. Please do not be hesitate to look for other references from our Knowledge Base. For tutorial that you can video-stream, please vsit our Youtube Channel.