-
Products and Features
- Getting Started with CloudRaya Container Registry
- How to use Sudo on a CloudRaya Linux VM
- Keeping Your CloudRaya Linux VMs Up-to-Date
- Maximizing StorageRaya with Essential Practices
- Assign Multiple IP Addresses to Virtual Machine
- Generating a CloudRaya API key
- Simplify CloudRaya Management with API
- Deploying a Virtual Machine on CloudRaya
- Deploying a Kubernetes Cluster on KubeRaya
- Using StorageRaya – CloudRaya S3 Object Storage
- Opening Ping Access on Cloud Raya VM Public IP
- Maximize Your Storage Raya Access Speed with Content Delivery Network (CDN)
- How to Create Project Tag in Cloud Raya for More Organized VM Billing Report
- Exporting Cloud Raya VM to outer Cloud Raya's Infrastructure using Acronis Cyber Protect
- SSO Management on Cloud Raya
- Using the SSH key Feature in Cloud Raya Dashboard
- Cloud Raya Load Balancer, Solution to Distribute Load Equally
- Create your own VPN server with DNS-Level AdBlocker using PiVPN
- Fix Broken LetsEncrypt SSL Certificate due to Expired Root CA Certificate
- How to Make a Snapshot and Configure VM Backup in Cloud Raya
- How to Request Services or Licenses Products
- Adding, Attaching, and Resize Root Storage Disk in Cloud Raya VPS
- Managing your DNS Zone with DNS Bucket in Cloud Raya
- Create VM, Custom Package, Reinstall VM, and Adjusting Security Profile
- How to backup Linux VM via Acronis in Cloud Raya
- How to Backup Desktop Linux and Windows via Acronis in Cloud Raya
- Backing-Up Cloud Raya Windows VM Using Acronis Cyber Protect
- Load Balancing in Cloud Raya
- Establishing a VPN in Cloud Raya
- Generating an API Token
- Deploying a Virtual Machine in Cloud Raya
- Show Remaining Articles16 Collapse Articles
-
- How to backup Linux VM via Acronis in Cloud Raya
- How to Backup Desktop Linux and Windows via Acronis in Cloud Raya
-
- Maximizing StorageRaya with Essential Practices
- Using StorageRaya – CloudRaya S3 Object Storage
- Building a Static Website Using Storage Raya S3 Bucket
- Integrating S3 Storage Raya and Strapi for Asset Storage Optimization – Part 4
- Maximize Your Storage Raya Access Speed with Content Delivery Network (CDN)
- Managing Storage Raya from various tools and from various OS
- Binding NextCloud with CloudRaya S3 Object Storage as External Storage Mount
-
- How to use Sudo on a CloudRaya Linux VM
- Keeping Your CloudRaya Linux VMs Up-to-Date
- Implement Multi-Factor Authentication on CloudRaya Linux VM
- Assign Multiple IP Addresses to Virtual Machine
- Deploying a Virtual Machine on CloudRaya
- Configurating cPanel Using Ubuntu 20.04 on CloudRaya – Part 2
- Deploying cPanel Using Ubuntu 20.04 on CloudRaya - Part 1
- Exporting Cloud Raya VM to outer Cloud Raya's Infrastructure using Acronis Cyber Protect
- Using the SSH key Feature in Cloud Raya Dashboard
- Adding, Attaching, and Resize Root Storage Disk in Cloud Raya VPS
- Create VM, Custom Package, Reinstall VM, and Adjusting Security Profile
- How to backup Linux VM via Acronis in Cloud Raya
- Backing-Up Cloud Raya Windows VM Using Acronis Cyber Protect
- Deploying a Virtual Machine in Cloud Raya
-
Integration
- Implement Multi-Factor Authentication on CloudRaya Linux VM
- Accessing KubeRaya Cluster Using the Kubernetes Dashboard
- Building a Static Website Using Storage Raya S3 Bucket
- Integrating S3 Storage Raya and Strapi for Asset Storage Optimization – Part 4
- Integrating Strapi Content to Frontend React - Part 3
- Content Management with Strapi Headless CMS - Part 2
- Strapi Headless CMS Installation in CloudRaya - Part. 1
- Using SSH Key on CloudRaya VM with PuTTY
- Installing Multiple PHP Versions in One VM for More Flexible Web Development
- Replatforming Apps to K8s with RKE and GitLab CI
- OpenAI API Integration: Completions in PHP
- Building an Email Server on CloudRaya Using iRedMail
- Improving Email Delivery with Sendinblue SMTP Relay
- Building a Self Hosted Password Manager Using Passbolt
- How to Install Podman on Almalinux/Rocky Linux 9
- ElkarBackup: GUI Based backup Tools based on Rsync and Rsnapshot
- Improving Webserver Performance with SSL Termination on NGINX Load Balancer
- Using NGINX as an HTTP Load Balancer
- Automating Task with Cronjob
- Upgrade Zimbra and the OS Version
- Deploy Mailu on Rancher Kubernetes
- Export and Import Database in MySQL or MariaDB Using Mysqldump
- Backup & Sync Local and Remote Directories Using RSYNC
- Managing Storage Raya from various tools and from various OS
- Binding NextCloud with CloudRaya S3 Object Storage as External Storage Mount
- Simple monitoring and alerting with Monit on Ubuntu 22.04 LTS
- VS Code on your browser! How to install code-server on a VM
- Implementing Redis HA and Auto-Failover on Cloud Raya
- Using XFCE Desktop Environment on Cloud Raya VM
- Installing Python 3.7-3.9 on Ubuntu 22.04 Jammy LTS using PPA
- Implementing Continuous Integration with Gitlab CI and Continuous Delivery with Rancher Fleet
- Using Collabora Online on Cloud Raya NextCloud's VM
- Installing NextCloud in Cloud Raya- Detail Steps from the Beginning to the Very End
- Set Up High Availability PostgreSQL Cluster Using Patroni on Cloud Raya
- Set Up WAF KEMP in Cloud Raya Part 2
- Set Up WAF KEMP in Cloud Raya Part 1
- Using the SSH key Feature in Cloud Raya Dashboard
- Monitor Your Services Uptime Using Uptime Kuma
- Hosting Static Website with Hugo on Cloud Raya
- Kubernetes Ingress Controller using SSL in CloudRaya
- Reverse Proxy management using Nginx Proxy Manager
- Create your own VPN server with DNS-Level AdBlocker using PiVPN
- How to deploy Portainer on Linux to easily manage your docker containers
- High Availability Kubernetes Using RKE in Cloud Raya Part 3
- High Availability Kubernetes Using RKE in Cloud Raya Part 2
- High Availability Kubernetes Using RKE in Cloud Raya Part 1
- How to backup Linux VM via Acronis in Cloud Raya
- How to Backup Desktop Linux and Windows via Acronis in Cloud Raya
- Deploying Magento on Cloud Raya
- How to Install Nextcloud on Cloud Raya
- How to Install CWP in Cloud Raya
- How to Install Node.js and Launch Your First Node App
- How to install and secure MariaDB on Ubuntu 18.04 and 20.04 on Cloud Raya
- How to Install and Securing MongoDB on Ubuntu 18.04 and 20.04
- Classes: Post Installation on Ansible
- Classes: Install and Configure Ansible
- Classes: Introduction to Ansible for a robust Configuration Management
- How to Setup Active Directory Domain Service & DNS with Cloud Raya
- How to Host Your Own Docker Hub in Cloud Raya
- How to Setup Your Own Laravel with Nginx in Ubuntu 18.04
- How to Deploy Container in Cloud Raya using Docker
- Securing CentOS with iptables
- Install and Configure Squid Proxy in Ubuntu
- Installing Apache and Tomcat: A Quick Way
- Securing Ubuntu with UFW
- Install a Node.js and Launch a Node App on Ubuntu 18.04
- Installing LAMP in Ubuntu
- Installing LEMP Stack on Ubuntu 18.04
- Show Remaining Articles53 Collapse Articles
-
- Articles coming soon
-
- Implement Multi-Factor Authentication on CloudRaya Linux VM
- Configurating cPanel Using Ubuntu 20.04 on CloudRaya – Part 2
- Deploying cPanel Using Ubuntu 20.04 on CloudRaya - Part 1
- Integrating S3 Storage Raya and Strapi for Asset Storage Optimization – Part 4
- Integrating Strapi Content to Frontend React - Part 3
- Content Management with Strapi Headless CMS - Part 2
- Strapi Headless CMS Installation in CloudRaya - Part. 1
- Using SSH Key on CloudRaya VM with PuTTY
- Building an Email Server on CloudRaya Using iRedMail
- Improving Email Delivery with Sendinblue SMTP Relay
- Building a Self Hosted Password Manager Using Passbolt
- ElkarBackup: GUI Based backup Tools based on Rsync and Rsnapshot
- Improving Webserver Performance with SSL Termination on NGINX Load Balancer
- Using NGINX as an HTTP Load Balancer
- Upgrade Zimbra and the OS Version
- Deploy Mailu on Rancher Kubernetes
- Managing Storage Raya from various tools and from various OS
- Binding NextCloud with CloudRaya S3 Object Storage as External Storage Mount
- Simple monitoring and alerting with Monit on Ubuntu 22.04 LTS
- VS Code on your browser! How to install code-server on a VM
- Implementing Redis HA and Auto-Failover on Cloud Raya
- Using XFCE Desktop Environment on Cloud Raya VM
- Implementing Continuous Integration with Gitlab CI and Continuous Delivery with Rancher Fleet
- Using Collabora Online on Cloud Raya NextCloud's VM
- Installing NextCloud in Cloud Raya- Detail Steps from the Beginning to the Very End
- Set Up WAF KEMP in Cloud Raya Part 2
- Set Up WAF KEMP in Cloud Raya Part 1
- Monitor Your Services Uptime Using Uptime Kuma
- Create your own VPN server with DNS-Level AdBlocker using PiVPN
- How to deploy Portainer on Linux to easily manage your docker containers
- High Availability Kubernetes Using RKE in Cloud Raya Part 3
- High Availability Kubernetes Using RKE in Cloud Raya Part 2
- High Availability Kubernetes Using RKE in Cloud Raya Part 1
- How to Install Nextcloud on Cloud Raya
- Classes: Post Installation on Ansible
- Classes: Install and Configure Ansible
- Classes: Introduction to Ansible for a robust Configuration Management
- Connect Windows Active Directory on Cloud Raya with Azure AD
- How to Host Your Own Docker Hub in Cloud Raya
- How to Deploy Container in Cloud Raya using Docker
- Show Remaining Articles25 Collapse Articles
-
- Accessing KubeRaya Cluster Using the Kubernetes Dashboard
- Integrating S3 Storage Raya and Strapi for Asset Storage Optimization – Part 4
- Integrating Strapi Content to Frontend React - Part 3
- Content Management with Strapi Headless CMS - Part 2
- Strapi Headless CMS Installation in CloudRaya - Part. 1
- Creating Interactive Chatbot with OpenAI API in PHP
- Installing Multiple PHP Versions in One VM for More Flexible Web Development
- OpenAI API Integration: Completions in PHP
- Improving Webserver Performance with SSL Termination on NGINX Load Balancer
- Using NGINX as an HTTP Load Balancer
- Automating Task with Cronjob
- How to Deploy Django App on Cloud Raya VM Using Gunicorn, Supervisor, and Nginx
- How to Install Node.js and Launch Your First Node App
- How to Setup Your Own Laravel with Nginx in Ubuntu 18.04
- Install a Node.js and Launch a Node App on Ubuntu 18.04
-
- How to use Sudo on a CloudRaya Linux VM
- Keeping Your CloudRaya Linux VMs Up-to-Date
- Implement Multi-Factor Authentication on CloudRaya Linux VM
- Using SSH Key on CloudRaya VM with PuTTY
- Building a Self Hosted Password Manager Using Passbolt
- Improving Webserver Performance with SSL Termination on NGINX Load Balancer
- Export and Import Database in MySQL or MariaDB Using Mysqldump
- Backup & Sync Local and Remote Directories Using RSYNC
- How to Deploy Django App on Cloud Raya VM Using Gunicorn, Supervisor, and Nginx
- Set Up WAF KEMP in Cloud Raya Part 2
- Set Up WAF KEMP in Cloud Raya Part 1
- Using the SSH key Feature in Cloud Raya Dashboard
- How to backup Linux VM via Acronis in Cloud Raya
- How to Backup Desktop Linux and Windows via Acronis in Cloud Raya
- Securing CentOS with iptables
- Securing Ubuntu with UFW
- Show Remaining Articles1 Collapse Articles
-
- Configurating cPanel Using Ubuntu 20.04 on CloudRaya – Part 2
- Deploying cPanel Using Ubuntu 20.04 on CloudRaya - Part 1
- Integrating S3 Storage Raya and Strapi for Asset Storage Optimization – Part 4
- Integrating Strapi Content to Frontend React - Part 3
- Content Management with Strapi Headless CMS - Part 2
- Strapi Headless CMS Installation in CloudRaya - Part. 1
- Creating Interactive Chatbot with OpenAI API in PHP
- Installing Multiple PHP Versions in One VM for More Flexible Web Development
- Building an Email Server on CloudRaya Using iRedMail
- Building a Self Hosted Password Manager Using Passbolt
- Improving Webserver Performance with SSL Termination on NGINX Load Balancer
- Using NGINX as an HTTP Load Balancer
- Installing Python 3.7-3.9 on Ubuntu 22.04 Jammy LTS using PPA
- Reverse Proxy management using Nginx Proxy Manager
- Install and Configure Squid Proxy in Ubuntu
- Installing Apache and Tomcat: A Quick Way
- Installing LAMP in Ubuntu
- Installing LEMP Stack on Ubuntu 18.04
- Show Remaining Articles3 Collapse Articles
-
- Building a Static Website Using Storage Raya S3 Bucket
- Integrating S3 Storage Raya and Strapi for Asset Storage Optimization – Part 4
- Integrating Strapi Content to Frontend React - Part 3
- Content Management with Strapi Headless CMS - Part 2
- Strapi Headless CMS Installation in CloudRaya - Part. 1
- Creating Interactive Chatbot with OpenAI API in PHP
- Installing Multiple PHP Versions in One VM for More Flexible Web Development
- OpenAI API Integration: Completions in PHP
- Hosting Static Website with Hugo on Cloud Raya
- Deploying Magento on Cloud Raya
- How to Install CWP in Cloud Raya
- How to Setup Active Directory Domain Service & DNS with Cloud Raya
-
- Articles coming soon
Load Balancing in Cloud Raya
Load Balancing is a technique for distributing traffic loads on two or more connection lines in a balanced way so the traffic can run optimally, maximize throughput, minimize response time and avoid overloading one of the connection lines.
As your server is growing and your visitor/user is increasing, you will need a good load balancing system. You may know some of the popular load balancing systems such as Nginx, HAProxy, Balance, Pen, etc. However, you will need experience in setting up these systems. Of course, it is not easy to set up.
Don’t worry, Cloud Raya can do the magic.
Once you log into the control panel https://cp.cloudraya.com, there is a menu at the left side of the dashboard. You can click “Networking” and then choose “Load Balance”
How to Set Your Load Balancing System Up in Cloud Raya
Follow these seven easy and simple steps to load balance in Cloud Raya.
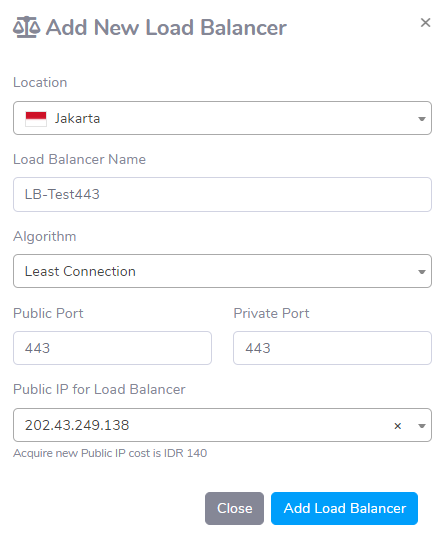
- Please click “Add New Load Balancer” to add your Loadbalance

- Please fill the box with your desire location and name
For Algorithm there is 3 method that you can choose:
* Round Robin is a simple way to distribute the load to each server or virtual machine in turn. If you have a 3 VMs or members in a loadbalancer group, then inbound request will be passed on to the 3 VMs in turn. VM-1 first will get the 1st request, then the 2nd request will be directed to VM-2 and the 3rd request will be directed to VM-3. Finally, VM-1 will get the 4th request and so on.
* Least Connection method uses or tracks the number of requests or connections to the VM and make its decision based on those numbers. The member which has the least connection is chosen to accept that request.
* Source or source IP hash method in a way that the source and the destination IP addresses are hashed which will make it sticky to that particular member or the VM that accepts the request.
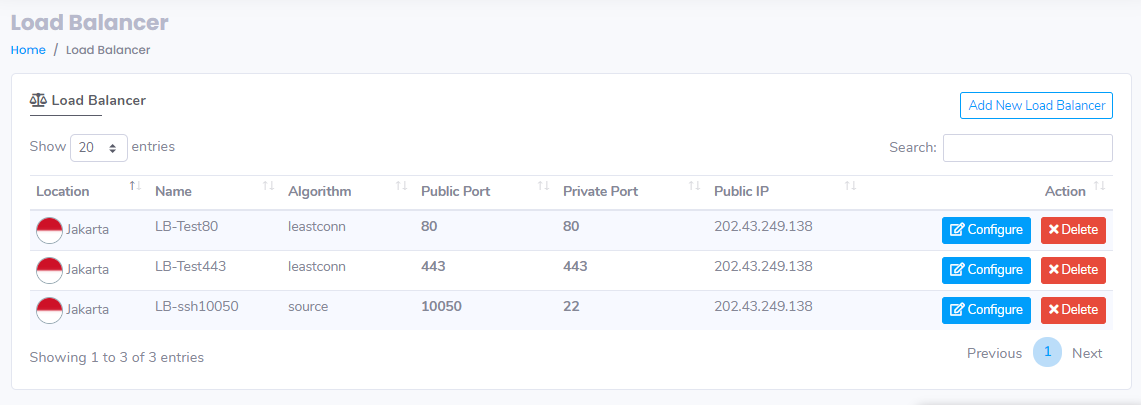
- After create some Loadbalance rule, it will show like this

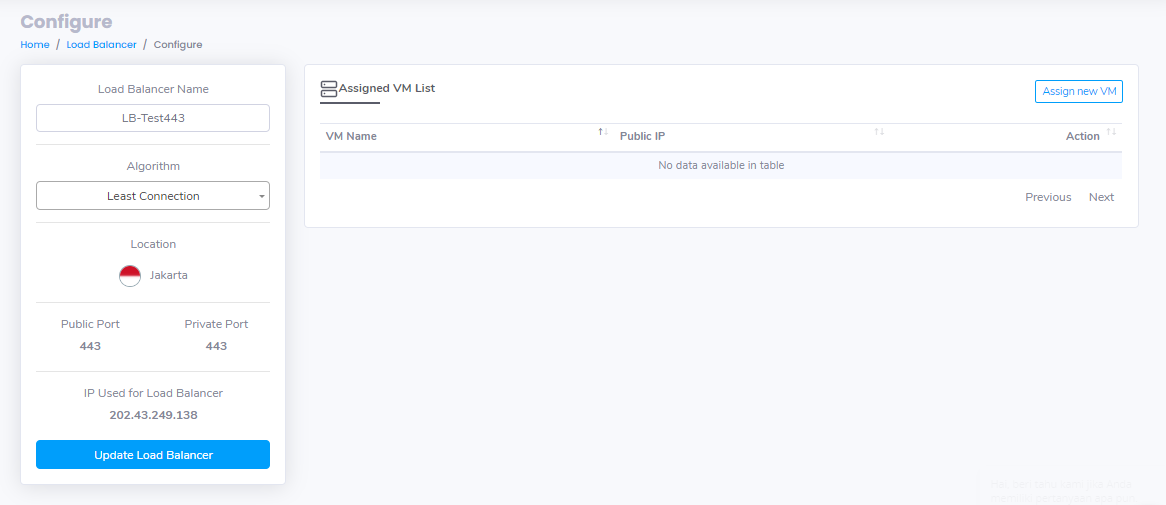
- To add the VM that you desire to loadbalance, please click “Configure”
- You will be redirected to the VM list, please click “Assign new VM”

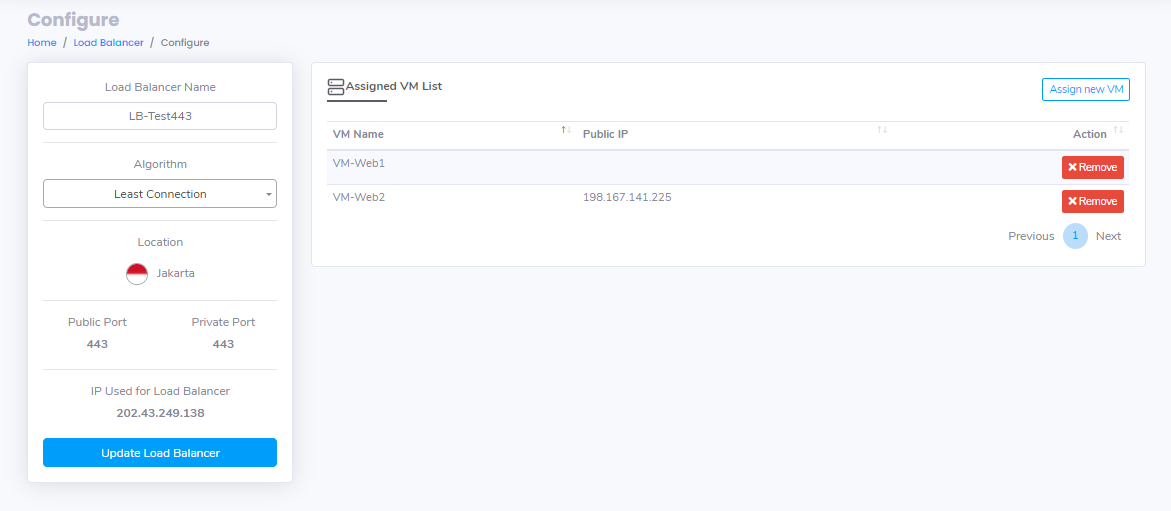
- After assign the VM, you will see it in the list of Assigned VM.

- You can assign VM more than 2 for better performance in accordance with the visitors
Done, you have your Loadbalance system on your VM just in 7 steps.