-
Products and Features
- Getting Started with CloudRaya Container Registry
- How to use Sudo on a CloudRaya Linux VM
- Keeping Your CloudRaya Linux VMs Up-to-Date
- Maximizing StorageRaya with Essential Practices
- Assign Multiple IP Addresses to Virtual Machine
- Generating a CloudRaya API key
- Simplify CloudRaya Management with API
- Deploying a Virtual Machine on CloudRaya
- Deploying a Kubernetes Cluster on KubeRaya
- Using StorageRaya – CloudRaya S3 Object Storage
- Opening Ping Access on Cloud Raya VM Public IP
- Maximize Your Storage Raya Access Speed with Content Delivery Network (CDN)
- How to Create Project Tag in Cloud Raya for More Organized VM Billing Report
- Exporting Cloud Raya VM to outer Cloud Raya's Infrastructure using Acronis Cyber Protect
- SSO Management on Cloud Raya
- Using the SSH key Feature in Cloud Raya Dashboard
- Cloud Raya Load Balancer, Solution to Distribute Load Equally
- Create your own VPN server with DNS-Level AdBlocker using PiVPN
- Fix Broken LetsEncrypt SSL Certificate due to Expired Root CA Certificate
- How to Make a Snapshot and Configure VM Backup in Cloud Raya
- How to Request Services or Licenses Products
- Adding, Attaching, and Resize Root Storage Disk in Cloud Raya VPS
- Managing your DNS Zone with DNS Bucket in Cloud Raya
- Create VM, Custom Package, Reinstall VM, and Adjusting Security Profile
- How to backup Linux VM via Acronis in Cloud Raya
- How to Backup Desktop Linux and Windows via Acronis in Cloud Raya
- Backing-Up Cloud Raya Windows VM Using Acronis Cyber Protect
- Load Balancing in Cloud Raya
- Establishing a VPN in Cloud Raya
- Generating an API Token
- Deploying a Virtual Machine in Cloud Raya
- Show Remaining Articles16 Collapse Articles
-
- How to backup Linux VM via Acronis in Cloud Raya
- How to Backup Desktop Linux and Windows via Acronis in Cloud Raya
-
- Maximizing StorageRaya with Essential Practices
- Using StorageRaya – CloudRaya S3 Object Storage
- Building a Static Website Using Storage Raya S3 Bucket
- Integrating S3 Storage Raya and Strapi for Asset Storage Optimization – Part 4
- Maximize Your Storage Raya Access Speed with Content Delivery Network (CDN)
- Managing Storage Raya from various tools and from various OS
- Binding NextCloud with CloudRaya S3 Object Storage as External Storage Mount
-
- How to use Sudo on a CloudRaya Linux VM
- Keeping Your CloudRaya Linux VMs Up-to-Date
- Implement Multi-Factor Authentication on CloudRaya Linux VM
- Assign Multiple IP Addresses to Virtual Machine
- Deploying a Virtual Machine on CloudRaya
- Configurating cPanel Using Ubuntu 20.04 on CloudRaya – Part 2
- Deploying cPanel Using Ubuntu 20.04 on CloudRaya - Part 1
- Exporting Cloud Raya VM to outer Cloud Raya's Infrastructure using Acronis Cyber Protect
- Using the SSH key Feature in Cloud Raya Dashboard
- Adding, Attaching, and Resize Root Storage Disk in Cloud Raya VPS
- Create VM, Custom Package, Reinstall VM, and Adjusting Security Profile
- How to backup Linux VM via Acronis in Cloud Raya
- Backing-Up Cloud Raya Windows VM Using Acronis Cyber Protect
- Deploying a Virtual Machine in Cloud Raya
-
Integration
- Implement Multi-Factor Authentication on CloudRaya Linux VM
- Accessing KubeRaya Cluster Using the Kubernetes Dashboard
- Building a Static Website Using Storage Raya S3 Bucket
- Integrating S3 Storage Raya and Strapi for Asset Storage Optimization – Part 4
- Integrating Strapi Content to Frontend React - Part 3
- Content Management with Strapi Headless CMS - Part 2
- Strapi Headless CMS Installation in CloudRaya - Part. 1
- Using SSH Key on CloudRaya VM with PuTTY
- Installing Multiple PHP Versions in One VM for More Flexible Web Development
- Replatforming Apps to K8s with RKE and GitLab CI
- OpenAI API Integration: Completions in PHP
- Building an Email Server on CloudRaya Using iRedMail
- Improving Email Delivery with Sendinblue SMTP Relay
- Building a Self Hosted Password Manager Using Passbolt
- How to Install Podman on Almalinux/Rocky Linux 9
- ElkarBackup: GUI Based backup Tools based on Rsync and Rsnapshot
- Improving Webserver Performance with SSL Termination on NGINX Load Balancer
- Using NGINX as an HTTP Load Balancer
- Automating Task with Cronjob
- Upgrade Zimbra and the OS Version
- Deploy Mailu on Rancher Kubernetes
- Export and Import Database in MySQL or MariaDB Using Mysqldump
- Backup & Sync Local and Remote Directories Using RSYNC
- Managing Storage Raya from various tools and from various OS
- Binding NextCloud with CloudRaya S3 Object Storage as External Storage Mount
- Simple monitoring and alerting with Monit on Ubuntu 22.04 LTS
- VS Code on your browser! How to install code-server on a VM
- Implementing Redis HA and Auto-Failover on Cloud Raya
- Using XFCE Desktop Environment on Cloud Raya VM
- Installing Python 3.7-3.9 on Ubuntu 22.04 Jammy LTS using PPA
- Implementing Continuous Integration with Gitlab CI and Continuous Delivery with Rancher Fleet
- Using Collabora Online on Cloud Raya NextCloud's VM
- Installing NextCloud in Cloud Raya- Detail Steps from the Beginning to the Very End
- Set Up High Availability PostgreSQL Cluster Using Patroni on Cloud Raya
- Set Up WAF KEMP in Cloud Raya Part 2
- Set Up WAF KEMP in Cloud Raya Part 1
- Using the SSH key Feature in Cloud Raya Dashboard
- Monitor Your Services Uptime Using Uptime Kuma
- Hosting Static Website with Hugo on Cloud Raya
- Kubernetes Ingress Controller using SSL in CloudRaya
- Reverse Proxy management using Nginx Proxy Manager
- Create your own VPN server with DNS-Level AdBlocker using PiVPN
- How to deploy Portainer on Linux to easily manage your docker containers
- High Availability Kubernetes Using RKE in Cloud Raya Part 3
- High Availability Kubernetes Using RKE in Cloud Raya Part 2
- High Availability Kubernetes Using RKE in Cloud Raya Part 1
- How to backup Linux VM via Acronis in Cloud Raya
- How to Backup Desktop Linux and Windows via Acronis in Cloud Raya
- Deploying Magento on Cloud Raya
- How to Install Nextcloud on Cloud Raya
- How to Install CWP in Cloud Raya
- How to Install Node.js and Launch Your First Node App
- How to install and secure MariaDB on Ubuntu 18.04 and 20.04 on Cloud Raya
- How to Install and Securing MongoDB on Ubuntu 18.04 and 20.04
- Classes: Post Installation on Ansible
- Classes: Install and Configure Ansible
- Classes: Introduction to Ansible for a robust Configuration Management
- How to Setup Active Directory Domain Service & DNS with Cloud Raya
- How to Host Your Own Docker Hub in Cloud Raya
- How to Setup Your Own Laravel with Nginx in Ubuntu 18.04
- How to Deploy Container in Cloud Raya using Docker
- Securing CentOS with iptables
- Install and Configure Squid Proxy in Ubuntu
- Installing Apache and Tomcat: A Quick Way
- Securing Ubuntu with UFW
- Install a Node.js and Launch a Node App on Ubuntu 18.04
- Installing LAMP in Ubuntu
- Installing LEMP Stack on Ubuntu 18.04
- Show Remaining Articles53 Collapse Articles
-
- Articles coming soon
-
- Implement Multi-Factor Authentication on CloudRaya Linux VM
- Configurating cPanel Using Ubuntu 20.04 on CloudRaya – Part 2
- Deploying cPanel Using Ubuntu 20.04 on CloudRaya - Part 1
- Integrating S3 Storage Raya and Strapi for Asset Storage Optimization – Part 4
- Integrating Strapi Content to Frontend React - Part 3
- Content Management with Strapi Headless CMS - Part 2
- Strapi Headless CMS Installation in CloudRaya - Part. 1
- Using SSH Key on CloudRaya VM with PuTTY
- Building an Email Server on CloudRaya Using iRedMail
- Improving Email Delivery with Sendinblue SMTP Relay
- Building a Self Hosted Password Manager Using Passbolt
- ElkarBackup: GUI Based backup Tools based on Rsync and Rsnapshot
- Improving Webserver Performance with SSL Termination on NGINX Load Balancer
- Using NGINX as an HTTP Load Balancer
- Upgrade Zimbra and the OS Version
- Deploy Mailu on Rancher Kubernetes
- Managing Storage Raya from various tools and from various OS
- Binding NextCloud with CloudRaya S3 Object Storage as External Storage Mount
- Simple monitoring and alerting with Monit on Ubuntu 22.04 LTS
- VS Code on your browser! How to install code-server on a VM
- Implementing Redis HA and Auto-Failover on Cloud Raya
- Using XFCE Desktop Environment on Cloud Raya VM
- Implementing Continuous Integration with Gitlab CI and Continuous Delivery with Rancher Fleet
- Using Collabora Online on Cloud Raya NextCloud's VM
- Installing NextCloud in Cloud Raya- Detail Steps from the Beginning to the Very End
- Set Up WAF KEMP in Cloud Raya Part 2
- Set Up WAF KEMP in Cloud Raya Part 1
- Monitor Your Services Uptime Using Uptime Kuma
- Create your own VPN server with DNS-Level AdBlocker using PiVPN
- How to deploy Portainer on Linux to easily manage your docker containers
- High Availability Kubernetes Using RKE in Cloud Raya Part 3
- High Availability Kubernetes Using RKE in Cloud Raya Part 2
- High Availability Kubernetes Using RKE in Cloud Raya Part 1
- How to Install Nextcloud on Cloud Raya
- Classes: Post Installation on Ansible
- Classes: Install and Configure Ansible
- Classes: Introduction to Ansible for a robust Configuration Management
- Connect Windows Active Directory on Cloud Raya with Azure AD
- How to Host Your Own Docker Hub in Cloud Raya
- How to Deploy Container in Cloud Raya using Docker
- Show Remaining Articles25 Collapse Articles
-
- Accessing KubeRaya Cluster Using the Kubernetes Dashboard
- Integrating S3 Storage Raya and Strapi for Asset Storage Optimization – Part 4
- Integrating Strapi Content to Frontend React - Part 3
- Content Management with Strapi Headless CMS - Part 2
- Strapi Headless CMS Installation in CloudRaya - Part. 1
- Creating Interactive Chatbot with OpenAI API in PHP
- Installing Multiple PHP Versions in One VM for More Flexible Web Development
- OpenAI API Integration: Completions in PHP
- Improving Webserver Performance with SSL Termination on NGINX Load Balancer
- Using NGINX as an HTTP Load Balancer
- Automating Task with Cronjob
- How to Deploy Django App on Cloud Raya VM Using Gunicorn, Supervisor, and Nginx
- How to Install Node.js and Launch Your First Node App
- How to Setup Your Own Laravel with Nginx in Ubuntu 18.04
- Install a Node.js and Launch a Node App on Ubuntu 18.04
-
- How to use Sudo on a CloudRaya Linux VM
- Keeping Your CloudRaya Linux VMs Up-to-Date
- Implement Multi-Factor Authentication on CloudRaya Linux VM
- Using SSH Key on CloudRaya VM with PuTTY
- Building a Self Hosted Password Manager Using Passbolt
- Improving Webserver Performance with SSL Termination on NGINX Load Balancer
- Export and Import Database in MySQL or MariaDB Using Mysqldump
- Backup & Sync Local and Remote Directories Using RSYNC
- How to Deploy Django App on Cloud Raya VM Using Gunicorn, Supervisor, and Nginx
- Set Up WAF KEMP in Cloud Raya Part 2
- Set Up WAF KEMP in Cloud Raya Part 1
- Using the SSH key Feature in Cloud Raya Dashboard
- How to backup Linux VM via Acronis in Cloud Raya
- How to Backup Desktop Linux and Windows via Acronis in Cloud Raya
- Securing CentOS with iptables
- Securing Ubuntu with UFW
- Show Remaining Articles1 Collapse Articles
-
- Configurating cPanel Using Ubuntu 20.04 on CloudRaya – Part 2
- Deploying cPanel Using Ubuntu 20.04 on CloudRaya - Part 1
- Integrating S3 Storage Raya and Strapi for Asset Storage Optimization – Part 4
- Integrating Strapi Content to Frontend React - Part 3
- Content Management with Strapi Headless CMS - Part 2
- Strapi Headless CMS Installation in CloudRaya - Part. 1
- Creating Interactive Chatbot with OpenAI API in PHP
- Installing Multiple PHP Versions in One VM for More Flexible Web Development
- Building an Email Server on CloudRaya Using iRedMail
- Building a Self Hosted Password Manager Using Passbolt
- Improving Webserver Performance with SSL Termination on NGINX Load Balancer
- Using NGINX as an HTTP Load Balancer
- Installing Python 3.7-3.9 on Ubuntu 22.04 Jammy LTS using PPA
- Reverse Proxy management using Nginx Proxy Manager
- Install and Configure Squid Proxy in Ubuntu
- Installing Apache and Tomcat: A Quick Way
- Installing LAMP in Ubuntu
- Installing LEMP Stack on Ubuntu 18.04
- Show Remaining Articles3 Collapse Articles
-
- Building a Static Website Using Storage Raya S3 Bucket
- Integrating S3 Storage Raya and Strapi for Asset Storage Optimization – Part 4
- Integrating Strapi Content to Frontend React - Part 3
- Content Management with Strapi Headless CMS - Part 2
- Strapi Headless CMS Installation in CloudRaya - Part. 1
- Creating Interactive Chatbot with OpenAI API in PHP
- Installing Multiple PHP Versions in One VM for More Flexible Web Development
- OpenAI API Integration: Completions in PHP
- Hosting Static Website with Hugo on Cloud Raya
- Deploying Magento on Cloud Raya
- How to Install CWP in Cloud Raya
- How to Setup Active Directory Domain Service & DNS with Cloud Raya
-
- Articles coming soon
Implementing Redis HA and Auto-Failover on Cloud Raya
INTRODUCTION
Redis is an open-source, in-memory, key-value data store most commonly used as a primary database, cache, message broker, and queue. Redis HA delivers sub-millisecond response times, enabling fast and powerful real-time applications in industries such as gaming, fintech, ad-tech, social media, healthcare, and IoT.
ARCHITECTURE
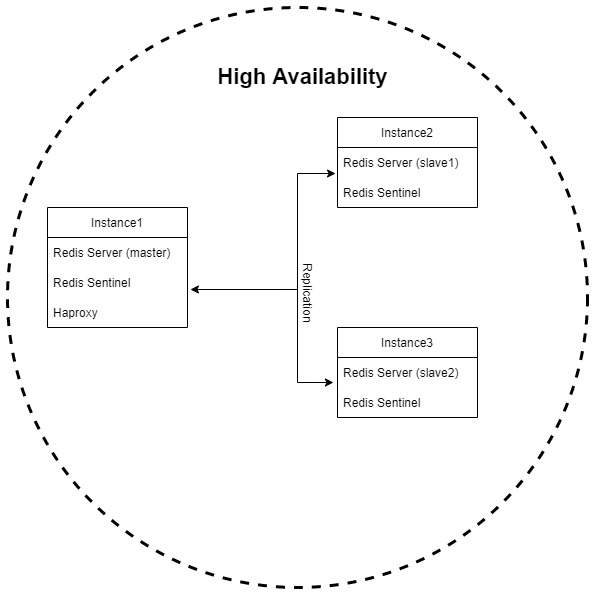
The Infrastructure layout of Redis multi-cluster is like the picture below.

The initial setup will need three instances that act as the Redis master-slave.
One instance acts as the master, and the rest instances will act as the slave that replicates the data from the Redis master.
The high availability component will be accommodated by the Redis sentinel monitoring on each instance.
The Redis sentinel will then change the Redis configuration and determine which instance stands as master or slave.
By default, only the Redis master has the capability to read and write, whereas the slave instances can only do the read command.
STEPS
Spin Up New VMs
NOTE: The setup below is the setup used in the tutorial. Please adjust the resources based on the price you are affordable to spend.
| Instance 1 | Instance 2 |
| OS: Ubuntu 22.04 Jammy vCore: 2 Memory: 2 GB Disk: 20 GB Public IP: yes Private IP: 3 |
OS: Ubuntu 22.04 Jammy vCore: 2 Memory: 2 GB Disk: 20 GB Public IP: No Private IP: 1 |
| Instance 3 | |
| OS: Ubuntu 22.04 Jammy vCore: 2 Memory: 2 GB Disk: 20 GB Public IP: No Private IP: 1 |
Machine Tuning
Disabling THP on each machine
echo never > /sys/kernel/mm/transparent_hugepage/enabledEnabling overcommit_memory
$ echo 1 > /proc/sys/vm/overcommit_memory
## Set it persistently
$ echo 'vm.overcommit_memory = 1' >> /etc/sysctl.conf
Set swappiness at the least weight
$ echo 1 > /proc/sys/vm/swappiness
## Set it persistently
$ echo 'vm.swappiness = 1' >> /etc/sysctl.conf
Install Redis HA on The Related Machine
Add the repository to the apt index, update it, and then install.
curl -fsSL https://packages.redis.io/gpg | sudo gpg --dearmor -o /usr/share/keyrings/redis-archive-keyring.gpg

echo "deb [signed-by=/usr/share/keyrings/redis-archive-keyring.gpg] https://packages.redis.io/deb $(lsb_release -cs) main" | sudo tee /etc/apt/sources.list.d/redis.list

sudo apt-get update
sudo apt-get install redis redis-sentinel
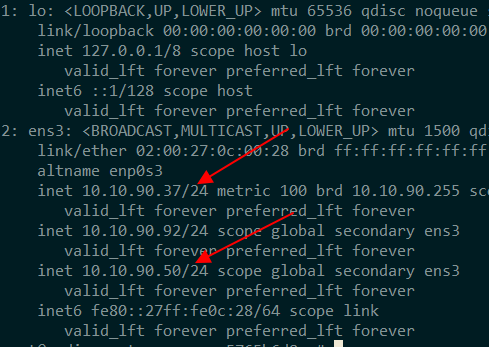
Obtain Secondary Private IP and Attached it to the Redis Master
- Navigate to your Redis Master machine from the Cloud Raya portal
- Click the Public & Private IP tab, then attempt to Acquire New Private IP

- Manually attach the new acquired private IP to the VM
~# ip addr add 10.10.90.92/24 dev <your interface name>
~# ip addr add 10.10.90.50/24 dev <your interface name>
Configure Redis Server
Add / overwrite the following config to your initial /etc/redis/redis.conf master
bind 127.0.0.1 <private IP>
protected-mode no

# add authentication feature for security
requirepass <your password>

# will be used to authenticate to master during failover
masterauth <your password>
masteruser <authoritative user>

# enable AOF feature
appendonly yes
Add / overwrite the following config to your initial /etc/redis/redis.conf slaves
bind 127.0.0.1 <private IP>
protected-mode no

# will replicate the state from the master instance
replicaof <master ip> <master port>

# add authentication feature for security
requirepass <your password>

# will be used to authenticate to master during failover
masterauth <your password>
masteruser <authoritative user>

# enable AOF feature
appendonly yes
When done, restart your Redis service on each instance.
systemctl restart redisConfig ACL to Set The Authoritative Redis User
Login to your Redis instance using the Redis-CLI command and do the AUTH using the previous password that has been set.
redis-cli -p 6379
127.0.0.1:6379> AUTH default <redis password>

## Example of the ACL
ACL SETUSER admin on allchannels >R3plicationP4sswd ~* &* +@all

## write config to the file
CONFIG REWRITE
Make sure the above ACLs are set to each Redis instance.
Configure Redis HA Sentinel
Add / overwrite the following config to your initial /etc/redis/sentinel.conf instances
protected-mode no
sentinel monitor mymaster <master IP> 6379 2

# Example seconds threshold to perform failover
sentinel down-after-milliseconds mymaster 15000
sentinel failover-timeout mymaster 30000

# Example of redis sentinel authentication
sentinel auth-pass mymaster R3plicationP4sswd
sentinel auth-user mymaster admin
When done, restart your Redis-sentinel service on each instance.
systemctl restart redis-sentinelConfigure Haproxy to Actively Check Redis Auto-Failover Process
Install Haproxy on Redis master node
~# apt-get install haproxy -yAdd the following setup to Haproxy Config
listen stats
        bind *:8080
        stats enable
        stats hide-version
        stats refresh 30s
        stats show-node
        stats auth appadmin:Asdf1234
        stats uri /stats


# redis block start

defaults REDIS
        mode tcp
        timeout connect 3s
        timeout server 30s
        timeout client 30s

frontend front_redis_master
        bind 10.10.90.92:6379 name redis
        default_backend back_redis_master

frontend front_redis_slave
        bind 10.10.90.50:6379 name redis
        default_backend back_redis_slave

backend back_redis_master
        option tcp-check
        tcp-check connect
        tcp-check send AUTH\ admin\ R3plicationP4sswd\r\n
        tcp-check send PING\r\n
        tcp-check expect string +PONG
        tcp-check send info\ replication\r\n
        tcp-check expect string role:master
        tcp-check send QUIT\r\n
        tcp-check expect string +OK

        server redis-a 10.10.90.37:6379 check inter 1s
        server redis-b 10.10.90.227:6379 check inter 1s
        server redis-c 10.10.90.147:6379 check inter 1s

backend back_redis_slave
        option tcp-check
        tcp-check connect
        tcp-check send AUTH\ admin\ R3plicationP4sswd\r\n
        tcp-check send PING\r\n
        tcp-check expect string +PONG
        tcp-check send info\ replication\r\n
        tcp-check expect string role:slave
        tcp-check send QUIT\r\n
        tcp-check expect string +OK

        server redis-a 10.10.90.37:6379 check inter 1s
        server redis-b 10.10.90.227:6379 check inter 1s
        server redis-c 10.10.90.147:6379 check inter 1s


# redis block end
Save the configuration and restart the Haproxy service
systemctl restart haproxyFailover Test
The failover test section is fulfilled by purposely stopping the Redis service on the master instance.
As an expected result, the Redis HA sentinel will change the config on the Redis master and promote one of the slaves as the new master.
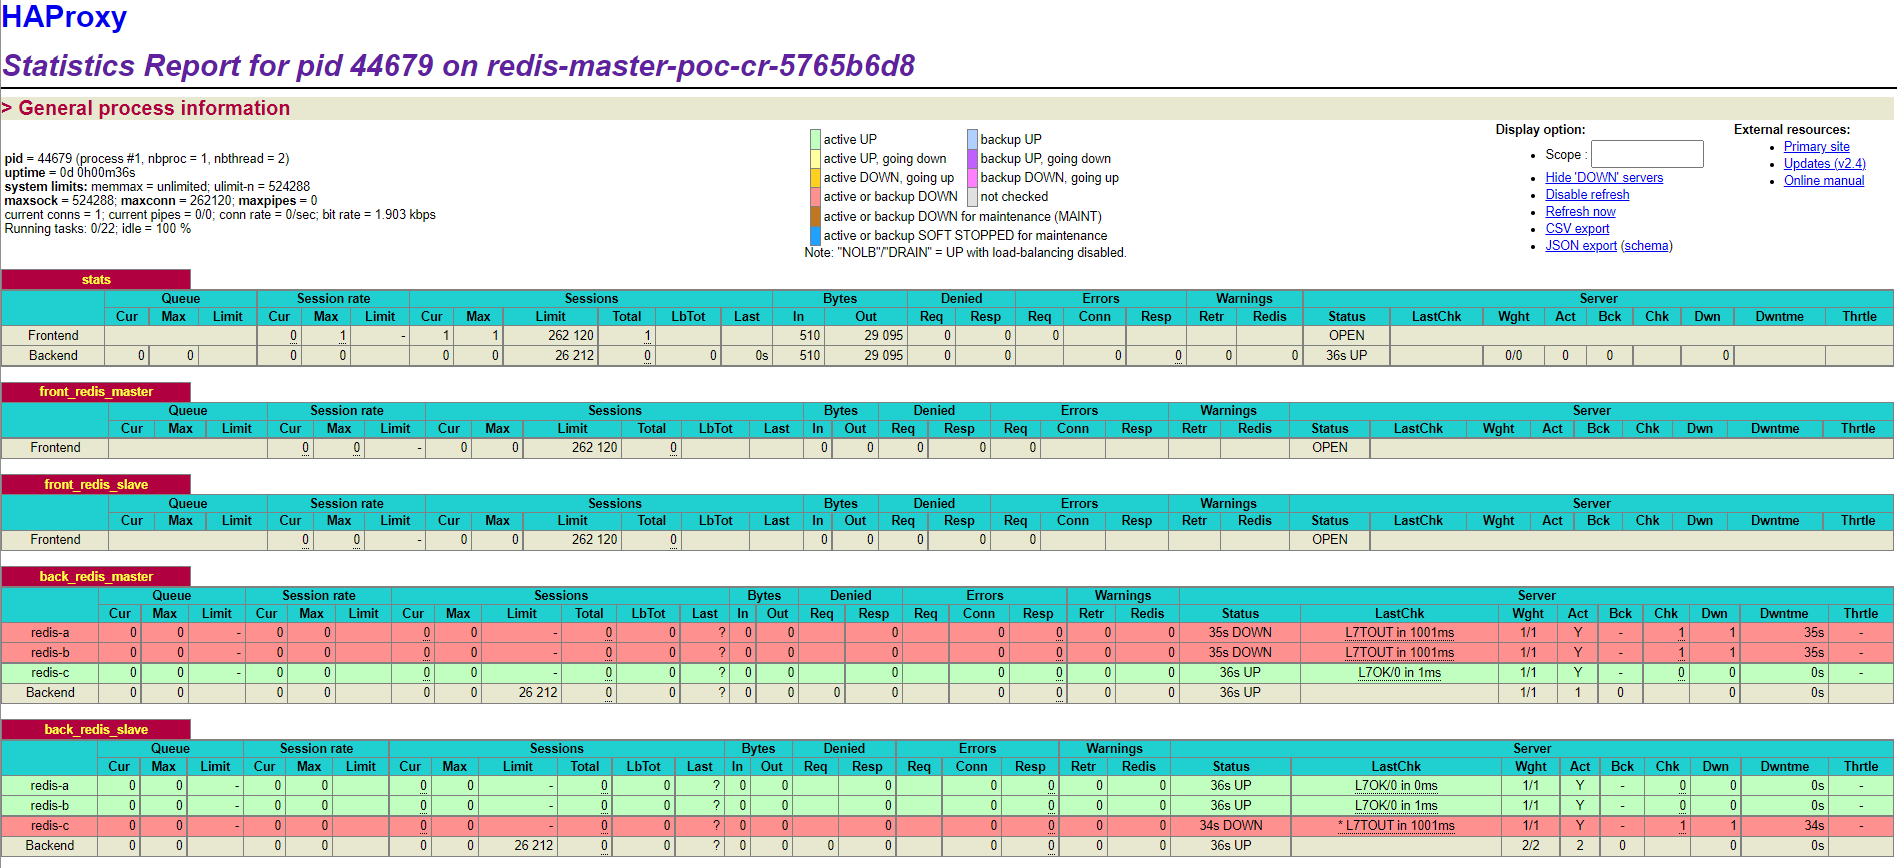
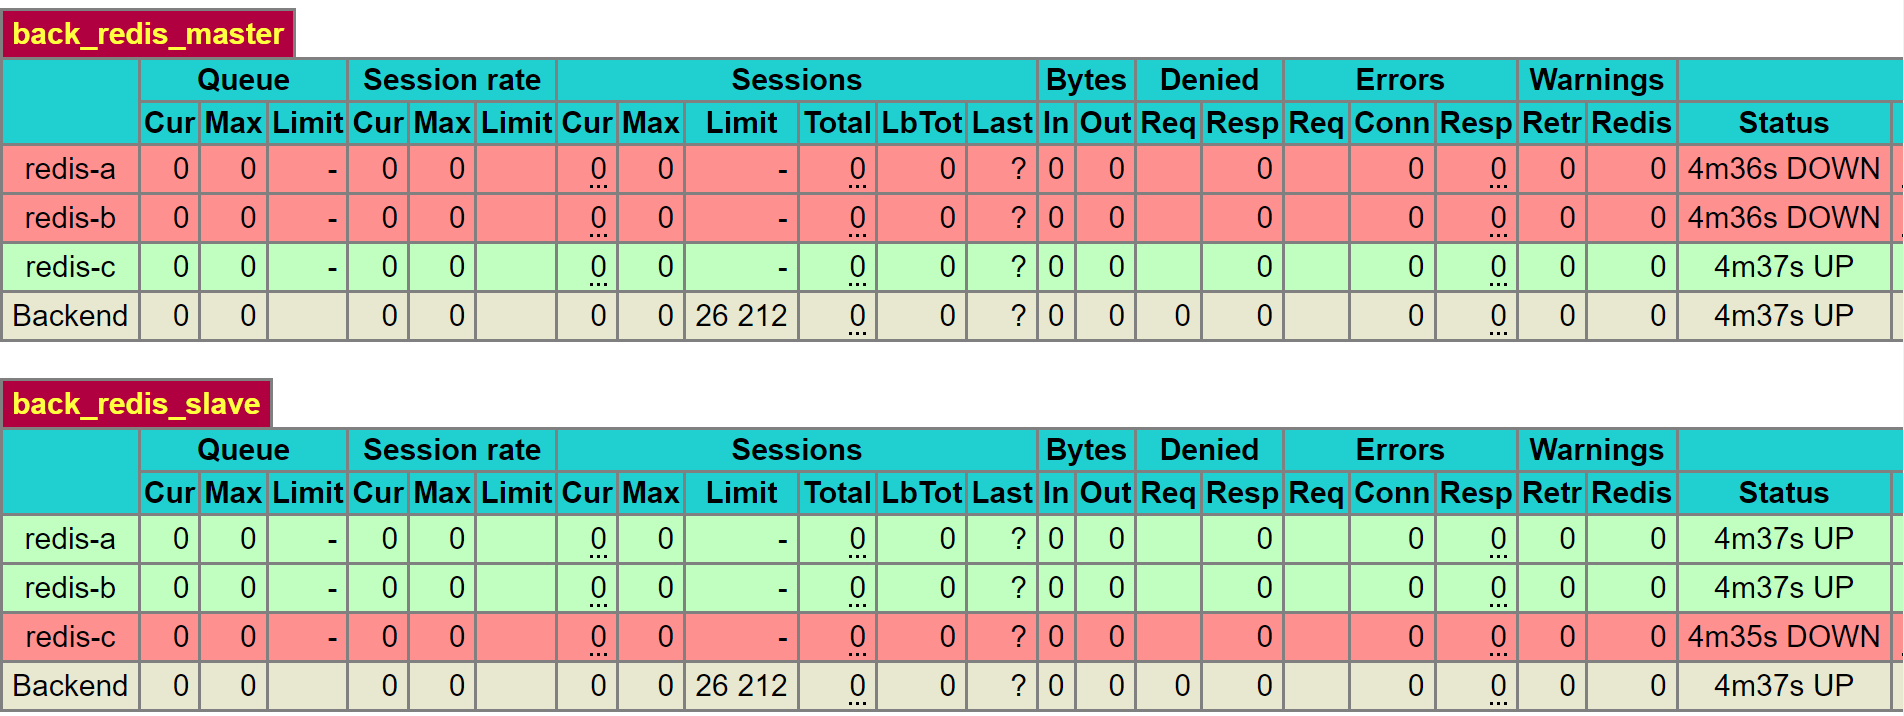
The picture below is a Haproxy TCP-check result against the Redis master and the Redis slave role.


During the master promotion, the previous master instance will turn yellow (warning alert), and the successfully promoted instance will turn green.


The picture above shows the Redis instance which was successfully promoted to a master. The Redis-c is expected as down because the service was stopped intentionally and was not started yet.
The Redis instance C will be promoted to a slave as soon as the Redis HA service is started.

CONCLUSION
We have learn how to implement Redis HA and Auto-Failover in Cloud Raya. Find more tech tutorial and informative article in Cloud Raya’s Knowledge Base and Blog. Or even better, you can go to Cloud Raya’s Youtube channel to live stream the tutorial you need.