Using NGINX as an HTTP Load Balancer
NGINX is a versatile open-source software that can act as a web server, reverse proxy, and HTTP load balancer. NGINX boasts fast and efficient performance, managing thousands of connections simultaneously while utilizing relatively few server resources.
Moreover, NGINX also has security and scalability features, making it a favorite among developers and system administrators. It’s highly flexible and easily adaptable to various technologies and application stacks.
In this article, we’ll discuss NGINX as an HTTP load balancer.
What is a Load Balancer?
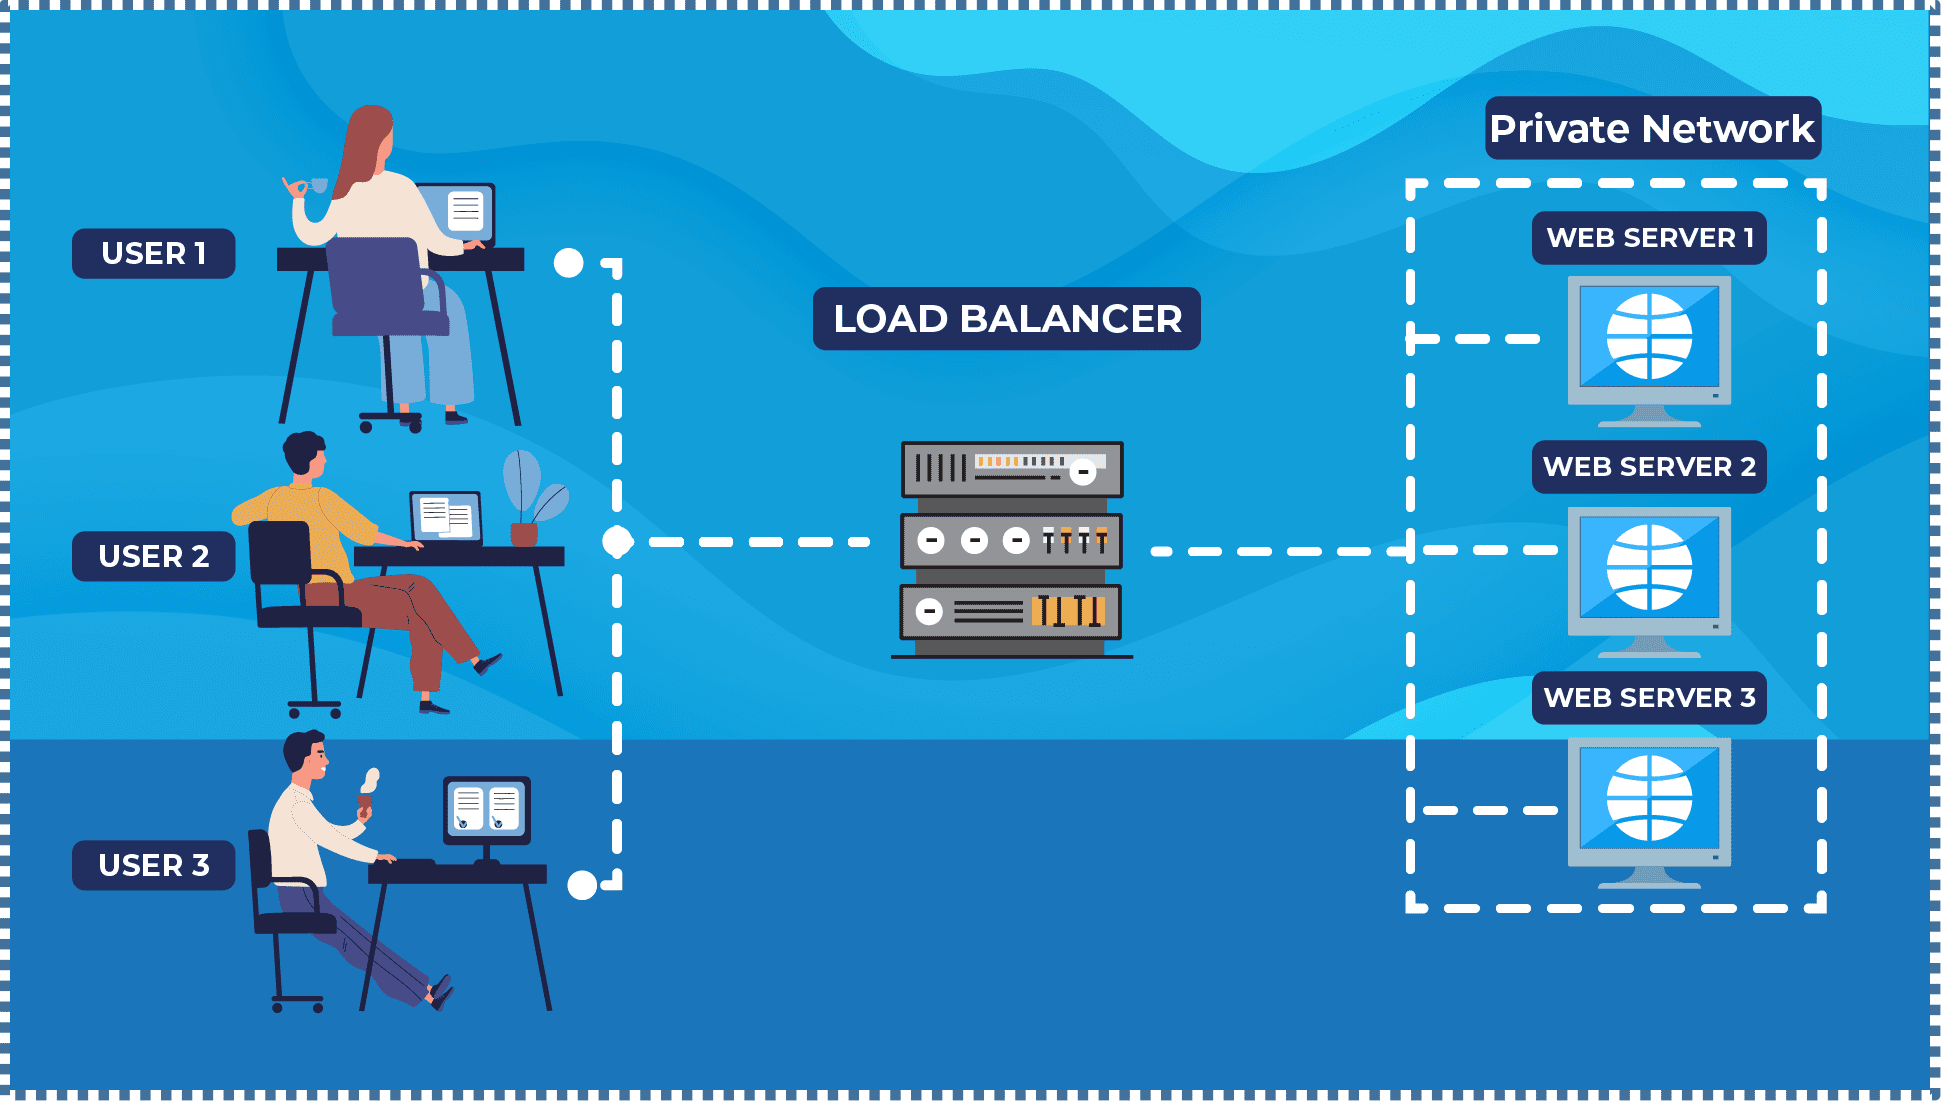
A load balancer is a crucial component of any high-traffic website or web application. By distributing requests among multiple servers, a load balancer prevents overloading a single server, which can slow down a website or even make it non-functional. With a load balancer in place, websites can remain responsive and available to users at all times.
Cloud Raya Load Balancer
Cloud Raya is equipped with a load balancer. For more information on Cloud Raya’s load balancer and its load balancing methods, you can refer to the following Knowledge Base.
However, it’s important to note that Cloud Raya’s load balancer currently doesn’t support SSL termination because its operation is at OSI layer 4. If one of your considerations is related to the need for SSL termination on the load balancer, let’s move on to the next point.
NGINX as an HTTP Load Balancer
Apart from serving as a web server, one of NGINX’s best features is its ability to function as an HTTP load balancer that operates at the OSI layer 7.
There will be an ‘upstream’ module that we will explore in the following point, where this module is useful for determining the group of web servers that receive requests and also serves as a place for declaring the load balancing methods we desire.
These web server groups can be on the same physical machine or distributed across multiple servers, either within the same data center or in different locations around the world.
Installing NGINX Quickly
Before configuring the NGINX load balancer, you need to install NGINX on your VM. You can install it using the following command:
# apt-get install nginx
Configuring NGINX Server Block
Now, let’s edit our server block to begin configuring the NGINX load balancer.
The default server block for NGINX is located at:
/etc/nginx/sites-available/default
However, you can customize it based on your preferences. For example, I’ll open my server block configuration in the following location:
/etc/nginx/sites-available/default
Now, let’s start with a simple load balancer configuration. The following server block configuration will proxy HTTP traffic (port 80) and pass it round-robin to an upstream backend group named “my-webserver“, containing web-server1 and web-server2. This configuration will establish a new HTTP connection for each process.
    upstream my-webserver {
        server 10.10.100.9 ; #web-server1
        server 10.10.100.10 ; #web-server2
    }

    server {
        listen 80;
        location / {
            proxy_pass http://my-webserver;
        }
    }
Collection of Options in NGINX Load Balancer
There’s also a collection of advanced options that we can set for more detailed purposes. These options include:
- Metode Load Balancing Load Balancing Methods
- Round Robin – default method
- Least Connections
- Least time (NGINX Plus)
- Hash
- IP Hash
- Random
- Server Weights
- HTTP Load Balancer Health Check (NGINX Open Source & NGINX Plus)
- Server Slow Start (NGINX Plus)
- TCP and UDP Load Balancing (NGINX Plus)
- Enabling Session Persistence (NGINX Plus)
- Connection Limiting (NGINX Plus), and more
Some of these options are basic features but become more comprehensive with NGINX Plus. There are also exclusive features available only in NGINX Plus.
NGINX Plus is sold as a software subscription. For more information, you can check the NGINX Plus Product Page.
In this tutorial, we will first dive into the explanation and configuration for the NGINX Open Source.
1. Load Balancing Methods
NGINX supports several load balancing methods, each with its own strengths and weaknesses. It’s important to choose the method that fits your use case.
▶️ Round Robin
Round Robin is the default method used if no parameters are specified in the server block configuration. This method distributes requests to servers in a circular order, so each server receives an equal number of requests.
    upstream my-webserver {
        server 10.10.100.9 ; #web-server1
        server 10.10.100.10 ; #web-server2
    }
▶️ Least Connection
The Least Connection method selects a server from the upstream backend group that has the fewest active connections from users to optimize resource usage and avoid overloading any single server.
However, despite its advantages, the drawback of this method is that it doesn’t take into account the capacity and speed of each server or the magnitude of the load on each connection.
For instance, if backend node A has 70 active connections (which are lightweight) and node B has 55 active connections (which are heavy), the least connection algorithm will still choose node B to handle the next request.
    upstream my-webserver {
        least_conn;
        server 10.10.100.9 ; #web-server1
        server 10.10.100.10 ; #web-server2
    }
▶️ Hash
The Hash method distributes requests to upstream backends based on a specified key that we define, such as the user’s IP or a specific request URL. This algorithm ensures that clients with the same criteria will always be directed to the same backend server.
An example of using the hash method in NGINX is as follows:
    ....

    map $request_uri $uri_hash {
        default "";
        ~^/page1 $prefix1;
        ~^/page2 $prefix2;
    }

    map $uri_hash $server_prefix {
        default "";
        $prefix1 backend1;
        $prefix2 backend2;
    }

    upstream my-webserver {
        hash $uri_hash$server_prefix consistent;
        server backend1.cloudforindonesia.com ; #web-server1
        server backend2.cloudforindonesia.com ; #web-server2
    }  ....
In the given configuration, we added a new map named $server_prefix that generates the value backend1 if the $uri_hash value is $prefix1, and the value backend2 if the $uri_hash value is $prefix2. In NGINX’s hash algorithm in the section hash $uri_hash$server_prefix consistent, the value $server_prefix is added as an additional factor to determine the appropriate backend server.
This way, the NGINX hash algorithm will select the appropriate backend server based on the values of $uri_hash and $server_prefix. For example, if the $request_uri value is /page2/index.html, then the $uri_hash will become $prefix2, and the $server_prefix will become backend2. Therefore, the NGINX hash algorithm will choose the backend server with the matching values of $uri_hash and $server_prefix , which is backend2.cloudforindonesia.com.
Here are some other hash options that we can use:
- “
hash $cookie_cookie_name“: creates a hash based on a specific cookie value called “cookie_name”. - “
hash $http_header_name“: creates a hash based on a specific HTTP header value called “header_name”. - “
hash $ssl_session_id“: creates a hash based on the SSL session ID. - “
hash $variable_name“: creates a hash based on a specific NGINX variable value called “variable_name”.
▶️ IP Hash
Hash and IP Hash are load balancing techniques that both use a hash value to select a backend server. However, the difference lies in the criteria used to generate the hash value.
While Hash uses a hash value from specified criteria, IP Hash uses the hash value from the accessing IP address. The IP Hash method hashes the accessing IP address using a specific formula to determine the backend server that will handle the request based on the hash value.
    upstream my-webserver {
        ip_hash;
        server 10.10.100.9 ; #web-server1
        server 10.10.100.10 ; #web-server2
    }
The advantage of the IP Hash method is that all requests from the same IP address will always be routed to the same backend server, ensuring that each user’s session is not interrupted due to being distributed across different servers.
The drawback of both methods is their inability to ensure balanced request loads from each accessing IP address distributed to each server. However, IP hash ensures user session consistency by ensuring that each accessing IP address is always connected to the same backend server.
With NGINX Plus, there are additional features that support cookie-based session persistence, including sticky cookie.
▶️ Random
The random method in NGINX allows us to select a server randomly from the available set of backend servers. There are two different ways to use the random method in NGINX: with or without the “two” parameter.
    upstream my-webserver {
        random;
        server 10.10.100.9 ; #web-server1
        server 10.10.100.10 ; #web-server2
        server 10.10.100.11 ; #web-server3
        server 10.10.100.12 ; #web-server4
    }
The random method without the “two” parameter selects one server randomly from the backend set each time a request arrives.
    upstream my-webserver {
        random two least_time=last_byte;
        server 10.10.100.9 ; #web-server1
        server 10.10.100.10 ; #web-server2
        server 10.10.100.11 ; #web-server3
        server 10.10.100.12 ; #web-server4
    }
On the other hand, in the next random method, we add the “two” parameter to indicate that NGINX will select two servers randomly from the available backend set. Then, from the two selected servers, NGINX will choose one server with the fastest average response time for users.
The determinants within the “two” parameter can be:
- Least Connections: selects the backend server with the lowest number of active connections currently.
- Least Time (Header): selects the backend server with the shortest average time in receiving header responses. (Using the variable
$upstream_header_time). - Least Time (Last Byte): selects the backend server with the shortest average time in receiving the entire response, including the body response.
2. Server Weights
After understanding NGINX’s load balancing methods, let’s delve into the advanced option: “server weights.”
Server weight allows us to determine the weight of each backend server in handling a request. The server weight value is a number, with the default weight for each server being 1.
    upstream my-webserver {
        server 10.10.100.9 weight=5 ; #web-server1
        server 10.10.100.10 weight=2 ; #web-server2
        server 10.10.100.11 ; #web-server3
    }
In the example above, if there are 10 access requests, the proportions would be as follows:
The total weight sum for servers A, B, dan C is 5+2+1=8.
- Server A: 5/8 x 10 = 6.25 (rounded to 6)
- Server B: 2/8 x 10 = 2.5 (rounded to 3)
- Server C: 1/8 x 10 = 1.25 (rounded to 1)
Thus, in this example, server A will receive 6 requests, server B will receive 3 requests, and server C will receive 1 request.
By defining the appropriate server weights, we can enhance the performance and availability of a web application by assigning heavier weights to stronger and more stable servers.
These server weight options can also be combined with other available options within the desired load balancer method, making our load balancer configuration and processing more complex and advanced.
3. HTTP Load Balancer Health Check
The HTTP health check feature allows verification of the backend server’s health before forwarding client requests. If a server is deemed unhealthy, NGINX will stop sending requests to it.
There are two types of health checks available in NGINX.
▶️ Passive Health Check (NGINX Open Source and NGINX Plus)
For Passive Health Check, NGINX and NGINX Plus monitor transactions while they occur, attempting to continue failed connections. If unsuccessful, NGINX marks the server as unavailable and temporarily stops sending requests to it until it’s deemed active again.
The following parameters can be used to set conditions indicating that an upstream server is considered unavailable:
- fail_timeout – specifies the maximum time to wait for unsuccessful communication attempts with the server. This time also determines the duration when the server is considered unavailable. The default is 10 seconds.
- max_fails – determines the number of failed attempts during the fail_timeout period for the server to be declared unavailable (default is 1 attempt).
    upstream my-webserver {
        server 10.10.100.9 weight=5 max_fails=3 fail_timeout=30s;
        server 10.10.100.10 weight=2 max_fails=3 fail_timeout=30s;
        server 10.10.100.11 max_fails=3 fail_timeout=30s;
    }
In the above example, each server is given max_fails and fail_timeout parameters with values of 3 and 30 seconds, respectively. Therefore, if there are 3 failed attempts within 30 seconds, the server is considered unavailable, and NGINX won’t send requests to it for 30 seconds. If it fails in the subsequent 3 attempts, the server won’t receive requests again from the load balancer.
▶️ Active Health Check (NGINX Plus)
Before a backend server encounters issues or becomes unavailable, NGINX Plus is already actively monitoring them.
NGINX Plus regularly sends requests to each backend server, measuring response times and status codes. If a server doesn’t respond within the set time or provides an incorrect status code, it’s deemed unhealthy and removed from the available server pool.
Conclusion
There’s much more to explore on this topic, and it feels very intriguing to explore them further. For a comprehensive understanding of Load Balancer parameters in NGINX, check the NGINX HTTP Upstream module.
For further insights into the benefits and cool features available in NGINX Plus, refer to its guide page.
Explore more tutorials on the knowledge base here or watch video tutorials on the Cloud Raya YouTube channel here.
Explore more tutorials on the knowledge base here, or watch video tutorials on the Cloud Raya YouTube channel here.