How to install and secure MariaDB on Ubuntu 18.04 and 20.04 on Cloud Raya
In this article we are going to show you how to install and secure MariaDB on Ubuntu 18.04 and 20.04 on Cloud Raya, after previously talk about MongoDB.
Read also: How to Install and Secure MongoDB on Ubuntu 18.04 and 20.04
But, before that let’s define what MariaDB is. In short, MariaDB is an open-source, community-developed, forever free relational database management system (RDBMS) forked from MySQL. However, it is highly compatible with MySQL as it works as a drop-in replacement.
So, check the steps below to install and secure MariaDB 10.5 for Ubuntu 18.04 and Ubuntu 20.04 instances on Cloud Raya.
TLDR
For those who need a quick steps:
- Firstly, Enter commands below
- Secondly, Allow port 3306/TCP on the Security Profile to allow remote connections.
<code>sudo apt update && sudo apt install apt-transport-https -y
curl -LsS https://downloads.mariadb.com/MariaDB/mariadb_repo_setup | sudo bash
sudo apt install mariadb-server -y
sudo mysql_secure_installation
# For remote connection, otherwise ignore these lines
sudo sed -Ei 's/(bind-address *=).*/\1 INTERFACE-IP/' /etc/mysql/mariadb.conf.d/50-server.cnf
sudo systemctl restart mariadb
sudo ufw allow 3306/tcp</code>How to Install MariaDB
MariaDB hasn’t been shipped to Ubuntu 18.04 / 20.04 official repository yet. So you will have to download it directly from https://mariadb.com. after that, you can either do:
- Download the binary packages, or
- Setup the repository via script
Hence, this tutorial will cover the second method.
Step 1. Install apt-transport-https
Firstly, the installer script needs apt-transport-https package.
sudo apt update
sudo apt install apt-transport-https -y
Step 2. Pull the script and execute
You can download the script on
https://downloads.mariadb.com/MariaDB/mariadb_repo_setup
and run it, but you can do it in one-liner like this instead:
curl -LsS https://downloads.mariadb.com/MariaDB/mariadb_repo_setup | sudo bashA brief explanation about the
-LsSflags oncurlcommand:
–LCurl will follow any redirects
–sSilent all outputs
–SIf used together withs, it will output error messages only on failure

Step 3. Install mariadb-server
You don’t have to update the repository as the script has done it for you. So, just proceed to install:
sudo apt install mariadb-server -yConfiguration
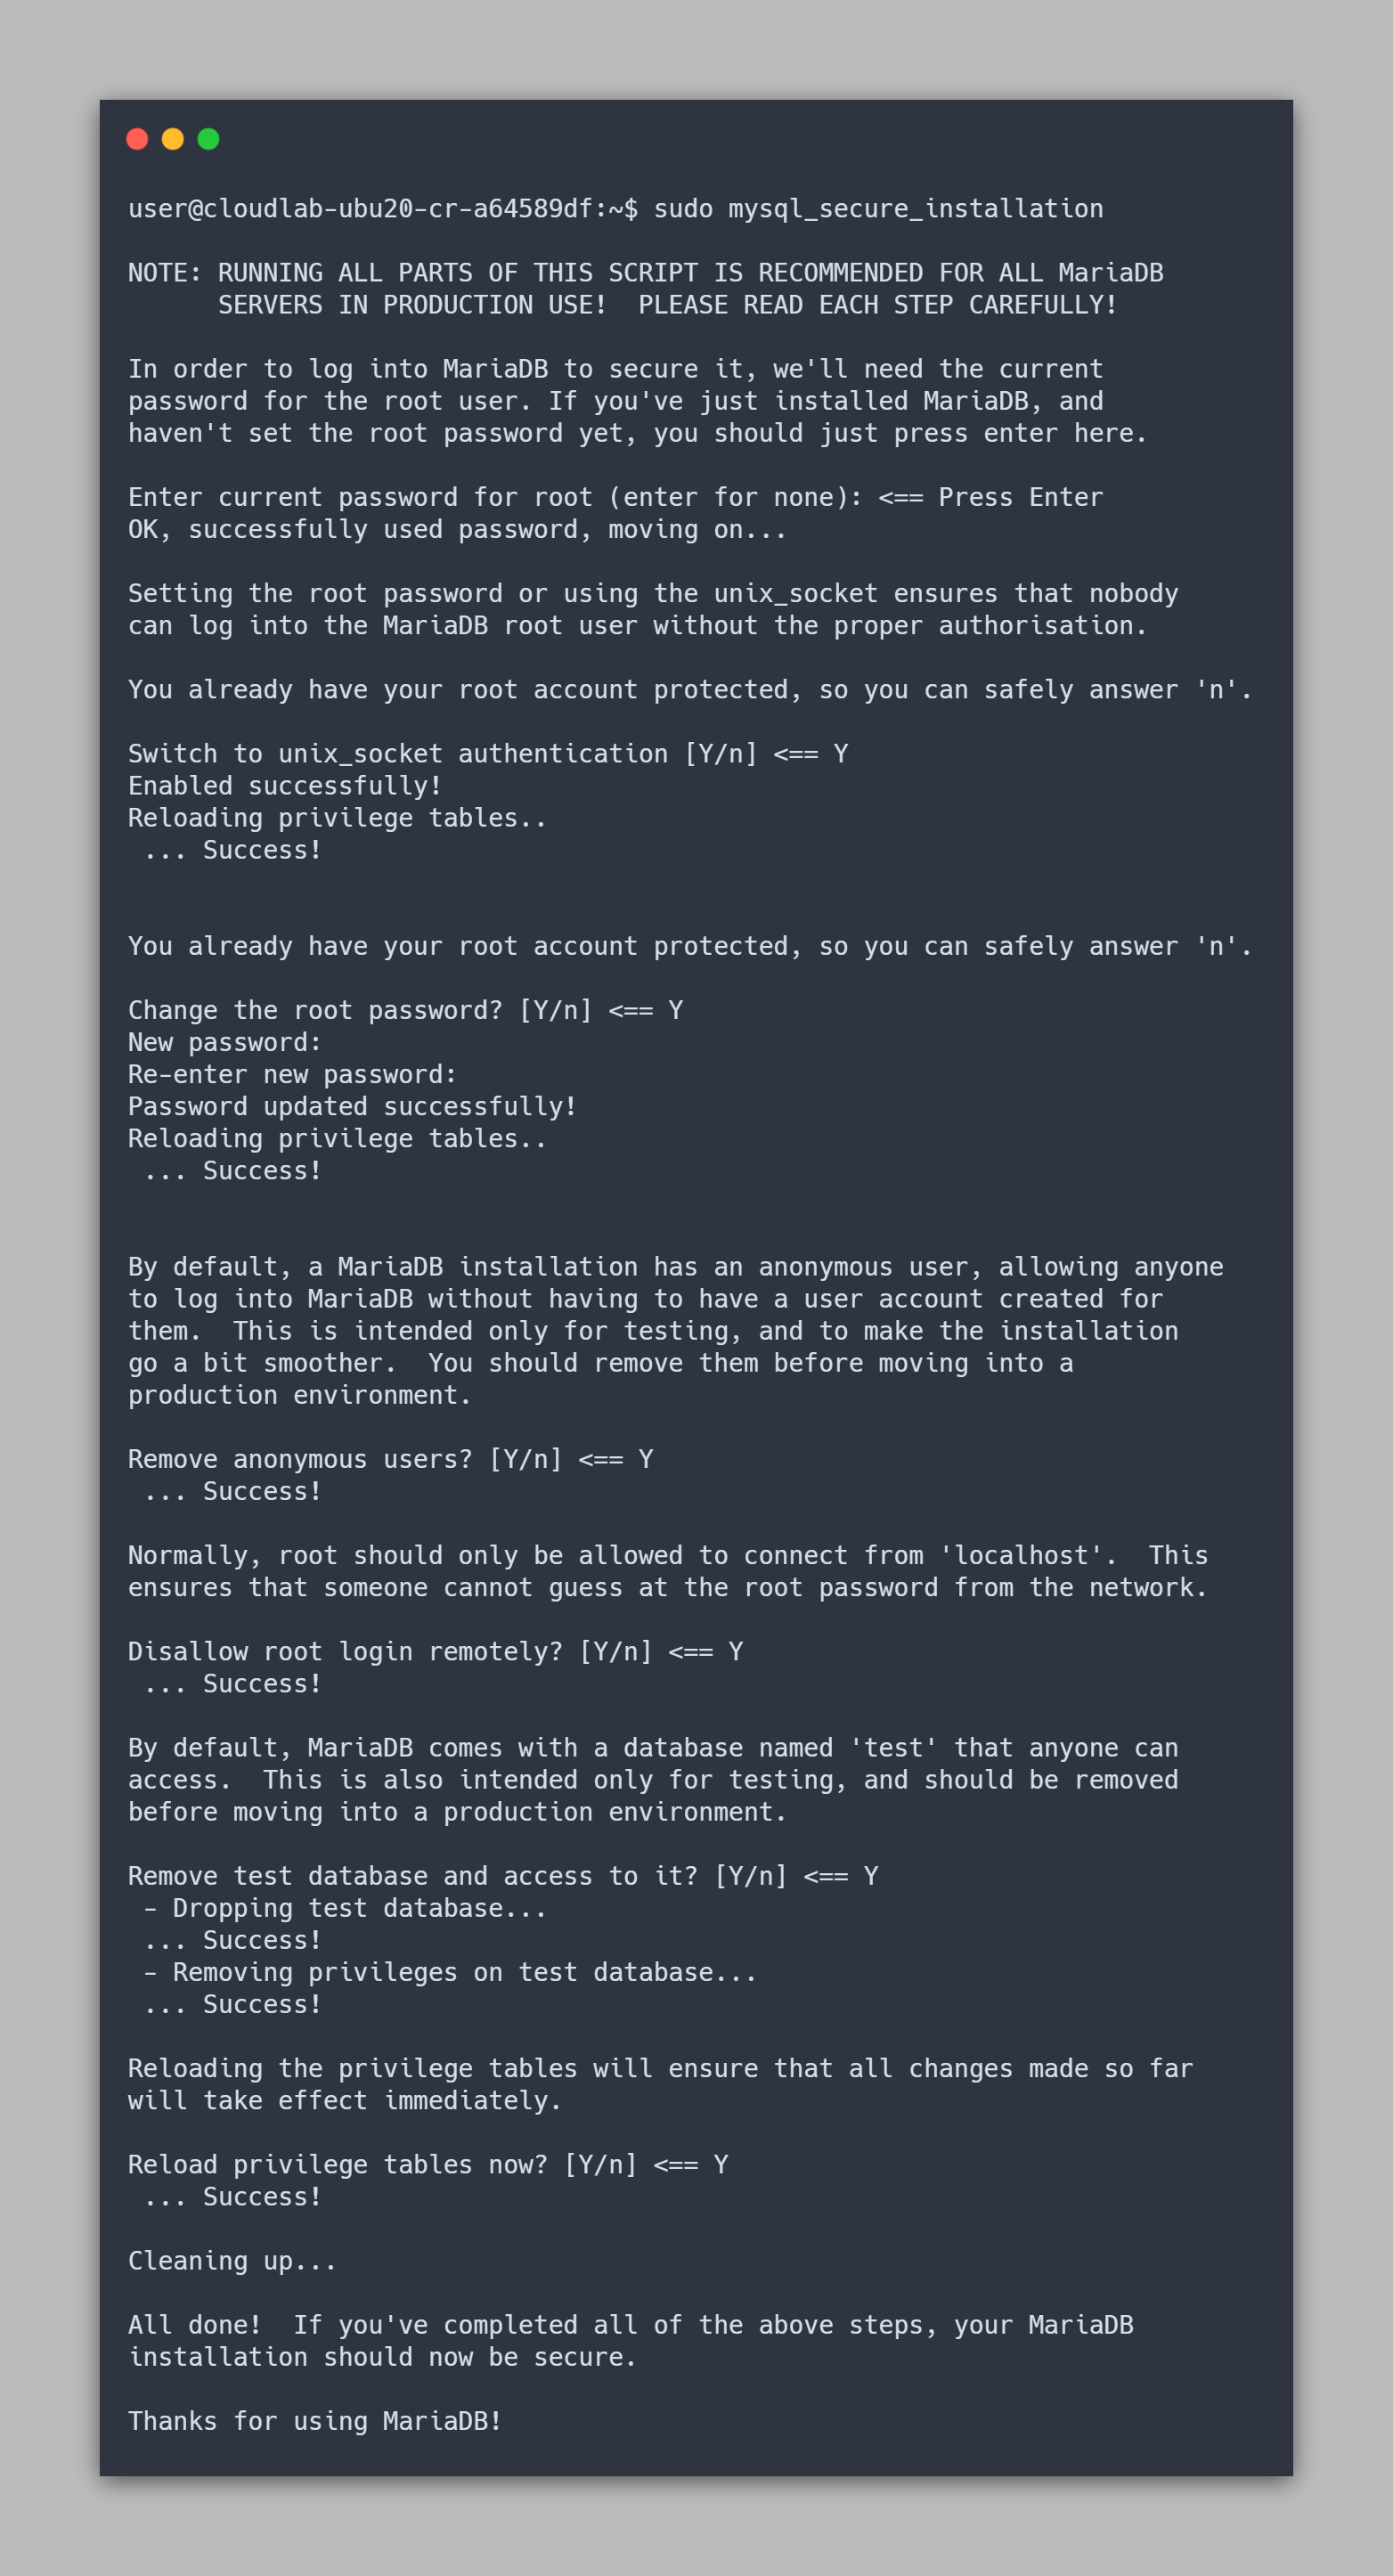
Step 4. Secure the installation
To secure the MariaDB installation, simply run:
sudo mysql_secure_installationThen, answer every prompts with yes.
Step 5. Enable remote access
The default setting for a fresh MariaDB installation is to allow only local connections. So, you can verify it via the below syntax:
sudo ss -tulpn | grep mariadb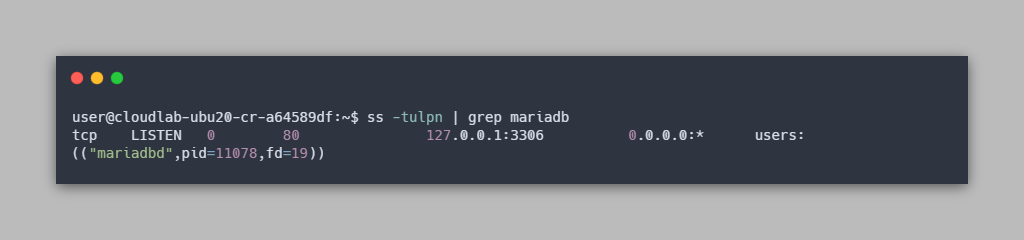
ss -tulpnwill list all listening ports/sockets.
–tDisplay TCP sockets.
–uDisplay UDP sockets.
–lDisplay only listening sockets.
–pShow process using socket.
–nDo not try to resolve service names.
There, you will see that it listens to loopback IP (127.0.0.1) which means it will not accept remote connections.
If your plan is to build an app on the same server, then this is enough and you can ignore the rest of the steps. But, if this is not the case, you can keep going.
Then, Open /etc/mysql/mariadb.conf.d/50-server.conf and find the line bind-address. After that, change the IP address from 127.0.0.1 to your interface IP.
sudoedit /etc/mysql/mariadb.conf.d/50-server.conf
# find line 'bind-address = 127.0.0.1'
# change it to interface's IP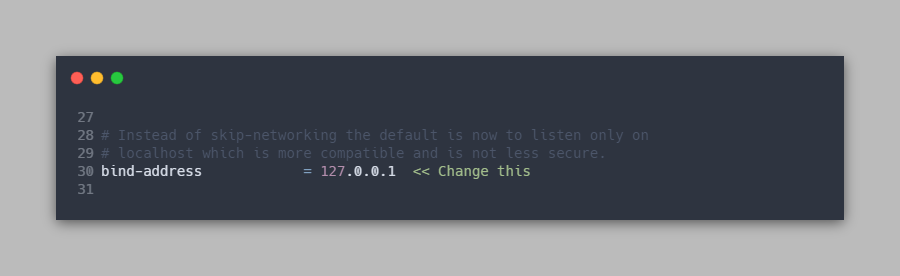
If you are not sure which IP to set, then you can check it by using the below command:
ip -4 -br a s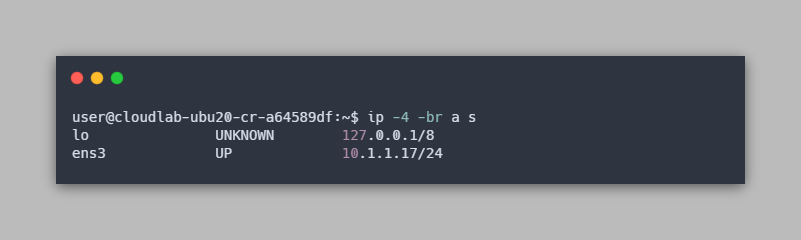
After you changed the bind-address, you need to restart the mariadb service.
sudo systemctl restart mariadb
# check the status
sudo systemctl status mariadb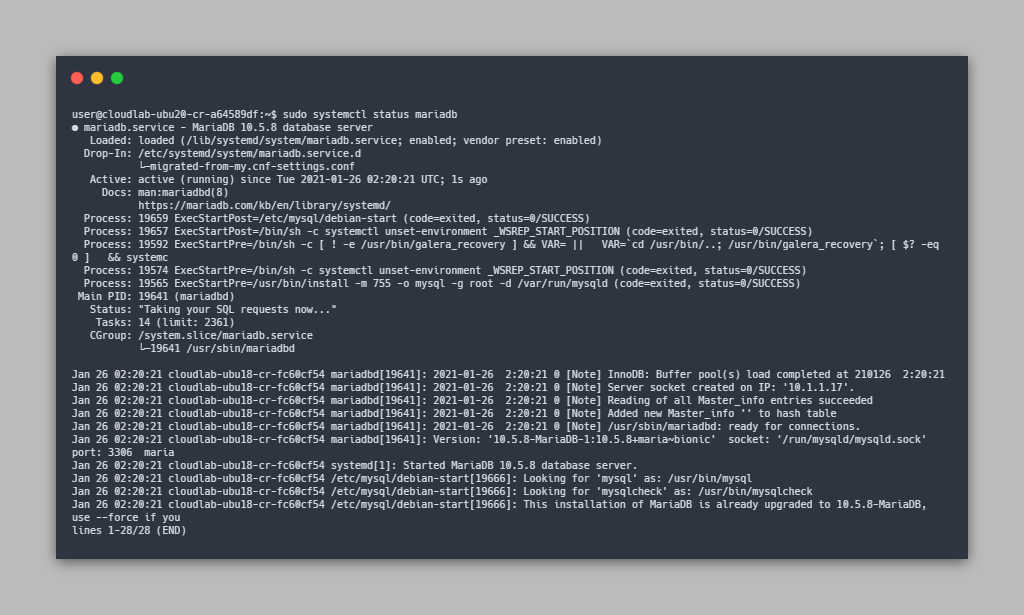
Step 6. Allow port 3306/TCP on ufw
By default, both Ubuntu 18.04 and Ubuntu 20.04 are using ufw. But first check if it’s active or not:
sudo ufw status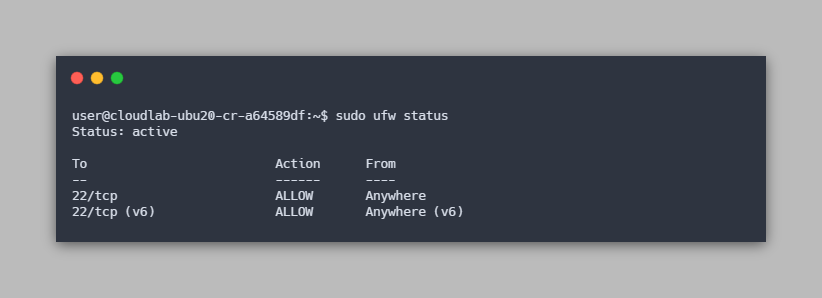
If it’s inactive, then skip this step. Otherwise, you need to allow mariadb (3306/tcp).
sudo ufw allow 3306/tcp
# or
sudo ufw allow mysql
Then, you should not forget to verify by using sudo ufw status

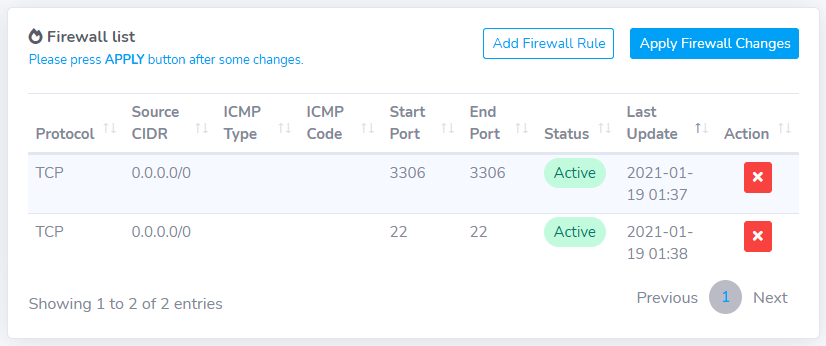
Step 7. Add Firewall Rule on the Security Profile on Cloud Raya
Lastly, add TCP port 3306 (MySQL default port) on the Security Profile to allow public remote connections.
All in all, that is how you install and secure MariaDB on Ubuntu 18.04 and 20.04. If you eager for more information, then you should check our previous article about how to install and secure MongoDB on Ubuntu.