Products and Features
- Membuka Akses Ping pada IP Public VM Cloud Raya
- Maximize Your Storage Raya Access Speed with Content Delivery Network (CDN)
- How to Create Project Tag in Cloud Raya for More Organized VM Billing Report
- Exporting Cloud Raya VM to outer Cloud Raya's Infrastructure using Acronis Cyber Protect
- SSO Management on Cloud Raya
- Easy Steps to Enable VPC in Cloud Raya
- Using the SSH key Feature in Cloud Raya Dashboard
- Cloud Raya Load Balancer, Solution to Distribute Load Equally
- Create your own VPN server with DNS-Level AdBlocker using PiVPN & PiHole in CloudRaya
- Fix Broken LetsEncrypt SSL Certificate due to Expired Root CA Certificate
- Storage Raya - Cloud Raya S3 Object Storage
- How to Make a Snapshot and Configure VM Backup in Cloud Raya
- How to Request Services or Licenses Products
- Adding, Attaching, and Resize Root Storage Disk in Cloud Raya VPS
- Managing your DNS Zone with DNS Bucket in Cloud Raya
- Create VM, Custom Package, Reinstall VM, and Adjusting Security Profile
- How to backup Linux VM via Acronis in Cloud Raya
- How to Backup Desktop Linux and Windows via Acronis in Cloud Raya
- Backing-Up Cloud Raya Windows VM Using Acronis Cyber Protect
- Load Balancing in Cloud Raya
- Establishing a VPN in Cloud Raya
- Generating an API Token
- Generating an API key
- Deploying a Virtual Machine in Cloud Raya
- Show Remaining Articles ( 9 ) Collapse Articles
- How to backup Linux VM via Acronis in Cloud Raya
- How to Backup Desktop Linux and Windows via Acronis in Cloud Raya
- Integrasi S3 Storage Raya dan Strapi untuk Pengoptimalan Penyimpanan Aset - Bag. 4
- Maximize Your Storage Raya Access Speed with Content Delivery Network (CDN)
- Managing Storage Raya from various tools and from various OS
- Binding NextCloud with Cloud Raya S3 Object Storage as External Storage Mount
- Storage Raya - Cloud Raya S3 Object Storage
- Exporting Cloud Raya VM to outer Cloud Raya's Infrastructure using Acronis Cyber Protect
- Using the SSH key Feature in Cloud Raya Dashboard
- Adding, Attaching, and Resize Root Storage Disk in Cloud Raya VPS
- Create VM, Custom Package, Reinstall VM, and Adjusting Security Profile
- How to backup Linux VM via Acronis in Cloud Raya
- Backing-Up Cloud Raya Windows VM Using Acronis Cyber Protect
- Deploying a Virtual Machine in Cloud Raya
Integration
- Integrasi S3 Storage Raya dan Strapi untuk Pengoptimalan Penyimpanan Aset - Bag. 4
- Integrasi Konten Strapi ke dalam Frontend React - Bag. 3
- Mengelola Konten dalam Strapi Headless CMS - Bag. 2
- Menginstal Strapi Headless CMS di Cloud Raya - Bag. 1
- Panduan Menggunakan SSH Key pada VM Cloud Raya dengan PuTTY
- Menginstal Beberapa Versi PHP dalam Satu VM untuk Pengembangan Web yang Lebih Fleksibel
- Replatforming Apps to K8s with RKE and GitLab CI
- Integrasi API OpenAI: Completions dalam PHP
- Membangun Email Server di Cloud Raya Menggunakan iRedMail
- Meningkatkan Pengiriman Email dengan Sendinblue SMTP Relay
- Bangun Self Hosted Password Manager menggunakan Passbolt
- How to Install Podman on Almalinux/Rocky Linux 9
- ElkarBackup: GUI Based backup Tools based on Rsync and Rsnapshot
- Meningkatkan Kinerja Webserver dengan SSL Termination pada NGINX Load Balancer
- Menggunakan NGINX sebagai HTTP Load Balancer
- Otomatisasi Task dengan Cronjob
- Upgrade Zimbra and the OS Version
- Deploy Mailu on Rancher Kubernetes
- Export dan Import Database di MySQL atau MariaDB Menggunakan Mysqldump
- Backup & Sync Local and Remote Directories Using RSYNC
- Managing Storage Raya from various tools and from various OS
- Binding NextCloud with Cloud Raya S3 Object Storage as External Storage Mount
- Simple monitoring and alerting with Monit on Ubuntu 22.04 LTS
- VS Code on your browser! How to install code-server on a VM
- Implementing Redis HA and Auto-Failover on Cloud Raya
- Using XFCE Desktop Environment on Cloud Raya VM
- Installing Python 3.7-3.9 on Ubuntu 22.04 Jammy LTS using PPA
- Implementing Continuous Integration with Gitlab CI and Continuous Delivery with Rancher Fleet
- Using Collabora Online on Cloud Raya NextCloud's VM
- Installing NextCloud in Cloud Raya- Detail Steps from the Beginning to the Very End
- Set Up High Availability PostgreSQL Cluster Using Patroni on Cloud Raya
- Set Up WAF KEMP in Cloud Raya Part 2
- Set Up WAF KEMP in Cloud Raya Part 1
- Using the SSH key Feature in Cloud Raya Dashboard
- Monitor Your Services Uptime Using Uptime Kuma
- Hosting Static Website with Hugo on Cloud Raya
- Kubernetes Ingress Controller using SSL in CloudRaya
- Reverse Proxy management using Nginx Proxy Manager
- Create your own VPN server with DNS-Level AdBlocker using PiVPN & PiHole in CloudRaya
- How to deploy Portainer on Linux to easily manage your docker containers
- High Availability Kubernetes Using RKE in Cloud Raya Part 3
- High Availability Kubernetes Using RKE in Cloud Raya Part 2
- High Availability Kubernetes Using RKE in Cloud Raya Part 1
- How to backup Linux VM via Acronis in Cloud Raya
- How to Backup Desktop Linux and Windows via Acronis in Cloud Raya
- Deploying Magento on Cloud Raya
- How to Install Nextcloud on Cloud Raya
- How to Install CWP in Cloud Raya
- How to Install Node.js and Launch Your First Node App
- How to install and secure MariaDB on Ubuntu 18.04 and 20.04 on Cloud Raya
- How to Install and Securing MongoDB on Ubuntu 18.04 and 20.04
- Classes: Post Installation on Ansible
- Classes: Install and Configure Ansible
- Classes: Introduction to Ansible for a robust Configuration Management
- How to Setup Active Directory Domain Service & DNS with Cloud Raya
- How to Host Your Own Docker Hub in Cloud Raya
- How to Setup Your Own Laravel with Nginx in Ubuntu 18.04
- How to Deploy Container in Cloud Raya using Docker
- Securing CentOS with iptables
- Install and Configure Squid Proxy in Ubuntu
- Installing Apache and Tomcat: A Quick Way
- Securing Ubuntu with UFW
- Install a Node.js and Launch a Node App on Ubuntu 18.04
- Installing LAMP in Ubuntu
- Installing LEMP Stack on Ubuntu 18.04
- Show Remaining Articles ( 50 ) Collapse Articles
- Articles coming soon
- Integrasi S3 Storage Raya dan Strapi untuk Pengoptimalan Penyimpanan Aset - Bag. 4
- Integrasi Konten Strapi ke dalam Frontend React - Bag. 3
- Mengelola Konten dalam Strapi Headless CMS - Bag. 2
- Menginstal Strapi Headless CMS di Cloud Raya - Bag. 1
- Panduan Menggunakan SSH Key pada VM Cloud Raya dengan PuTTY
- Membangun Email Server di Cloud Raya Menggunakan iRedMail
- Meningkatkan Pengiriman Email dengan Sendinblue SMTP Relay
- Bangun Self Hosted Password Manager menggunakan Passbolt
- ElkarBackup: GUI Based backup Tools based on Rsync and Rsnapshot
- Meningkatkan Kinerja Webserver dengan SSL Termination pada NGINX Load Balancer
- Menggunakan NGINX sebagai HTTP Load Balancer
- Upgrade Zimbra and the OS Version
- Deploy Mailu on Rancher Kubernetes
- Managing Storage Raya from various tools and from various OS
- Binding NextCloud with Cloud Raya S3 Object Storage as External Storage Mount
- Simple monitoring and alerting with Monit on Ubuntu 22.04 LTS
- VS Code on your browser! How to install code-server on a VM
- Implementing Redis HA and Auto-Failover on Cloud Raya
- Using XFCE Desktop Environment on Cloud Raya VM
- Implementing Continuous Integration with Gitlab CI and Continuous Delivery with Rancher Fleet
- Using Collabora Online on Cloud Raya NextCloud's VM
- Installing NextCloud in Cloud Raya- Detail Steps from the Beginning to the Very End
- Set Up WAF KEMP in Cloud Raya Part 2
- Set Up WAF KEMP in Cloud Raya Part 1
- Monitor Your Services Uptime Using Uptime Kuma
- Create your own VPN server with DNS-Level AdBlocker using PiVPN & PiHole in CloudRaya
- How to deploy Portainer on Linux to easily manage your docker containers
- High Availability Kubernetes Using RKE in Cloud Raya Part 3
- High Availability Kubernetes Using RKE in Cloud Raya Part 2
- High Availability Kubernetes Using RKE in Cloud Raya Part 1
- How to Install Nextcloud on Cloud Raya
- Classes: Post Installation on Ansible
- Classes: Install and Configure Ansible
- Classes: Introduction to Ansible for a robust Configuration Management
- Connect Windows Active Directory on Cloud Raya with Azure AD
- How to Host Your Own Docker Hub in Cloud Raya
- How to Deploy Container in Cloud Raya using Docker
- Show Remaining Articles ( 22 ) Collapse Articles
- Integrasi S3 Storage Raya dan Strapi untuk Pengoptimalan Penyimpanan Aset - Bag. 4
- Integrasi Konten Strapi ke dalam Frontend React - Bag. 3
- Mengelola Konten dalam Strapi Headless CMS - Bag. 2
- Menginstal Strapi Headless CMS di Cloud Raya - Bag. 1
- Integrasi API OpenAI untuk Membangun Chatbot Interaktif dalam Proyek PHP
- Menginstal Beberapa Versi PHP dalam Satu VM untuk Pengembangan Web yang Lebih Fleksibel
- Integrasi API OpenAI: Completions dalam PHP
- Meningkatkan Kinerja Webserver dengan SSL Termination pada NGINX Load Balancer
- Menggunakan NGINX sebagai HTTP Load Balancer
- Otomatisasi Task dengan Cronjob
- How to Deploy Django App on Cloud Raya VM Using Gunicorn, Supervisor, and Nginx
- How to Install Node.js and Launch Your First Node App
- How to Setup Your Own Laravel with Nginx in Ubuntu 18.04
- Install a Node.js and Launch a Node App on Ubuntu 18.04
- Panduan Menggunakan SSH Key pada VM Cloud Raya dengan PuTTY
- Bangun Self Hosted Password Manager menggunakan Passbolt
- Meningkatkan Kinerja Webserver dengan SSL Termination pada NGINX Load Balancer
- Export dan Import Database di MySQL atau MariaDB Menggunakan Mysqldump
- Backup & Sync Local and Remote Directories Using RSYNC
- How to Deploy Django App on Cloud Raya VM Using Gunicorn, Supervisor, and Nginx
- Set Up WAF KEMP in Cloud Raya Part 2
- Set Up WAF KEMP in Cloud Raya Part 1
- Using the SSH key Feature in Cloud Raya Dashboard
- How to backup Linux VM via Acronis in Cloud Raya
- How to Backup Desktop Linux and Windows via Acronis in Cloud Raya
- Securing CentOS with iptables
- Securing Ubuntu with UFW
- Integrasi S3 Storage Raya dan Strapi untuk Pengoptimalan Penyimpanan Aset - Bag. 4
- Integrasi Konten Strapi ke dalam Frontend React - Bag. 3
- Mengelola Konten dalam Strapi Headless CMS - Bag. 2
- Menginstal Strapi Headless CMS di Cloud Raya - Bag. 1
- Integrasi API OpenAI untuk Membangun Chatbot Interaktif dalam Proyek PHP
- Menginstal Beberapa Versi PHP dalam Satu VM untuk Pengembangan Web yang Lebih Fleksibel
- Membangun Email Server di Cloud Raya Menggunakan iRedMail
- Bangun Self Hosted Password Manager menggunakan Passbolt
- Meningkatkan Kinerja Webserver dengan SSL Termination pada NGINX Load Balancer
- Menggunakan NGINX sebagai HTTP Load Balancer
- Installing Python 3.7-3.9 on Ubuntu 22.04 Jammy LTS using PPA
- Reverse Proxy management using Nginx Proxy Manager
- Install and Configure Squid Proxy in Ubuntu
- Installing Apache and Tomcat: A Quick Way
- Installing LAMP in Ubuntu
- Installing LEMP Stack on Ubuntu 18.04
- Show Remaining Articles ( 1 ) Collapse Articles
- Integrasi S3 Storage Raya dan Strapi untuk Pengoptimalan Penyimpanan Aset - Bag. 4
- Integrasi Konten Strapi ke dalam Frontend React - Bag. 3
- Mengelola Konten dalam Strapi Headless CMS - Bag. 2
- Menginstal Strapi Headless CMS di Cloud Raya - Bag. 1
- Integrasi API OpenAI untuk Membangun Chatbot Interaktif dalam Proyek PHP
- Menginstal Beberapa Versi PHP dalam Satu VM untuk Pengembangan Web yang Lebih Fleksibel
- Integrasi API OpenAI: Completions dalam PHP
- Hosting Static Website with Hugo on Cloud Raya
- Deploying Magento on Cloud Raya
- How to Install CWP in Cloud Raya
- How to Setup Active Directory Domain Service & DNS with Cloud Raya
High Availability Kubernetes Using RKE in Cloud Raya Part 1
Kubernetes is an Opensource platform that manages workloads or containerized applications on servers.
This platform was first developed by Google. Now it’s managed by the Cloud Native Computing Foundation (CNCF).
In short, It’s function is to made us easy to configure, deploy, manage or monitor the largest-scale of a containerized application in the different deployment environment
Before we talk about containers, let’s talk about Docker because docker is a popular application that is often used with Kubernetes.
Docker is an open-source application that only uses the required program and elements that are needed by a program itself to be a complete unit as an image. We can use that image to run an application such as Nginx, WordPress, etc.
The collection of these images which we will call a Container.
The container will run on a pod, where the pod is the smallest deployable unit in Kubernetes.
Installing Kubernetes is tricky because there are multiple ways to install it. Also, Kubernetes deployments container creation is not limited to using docker. We can use another container runtime like CoreOS, Mesos, LXC, Podman, etc.
In RKE1 (Rancher Kubernetes Engine), we will use Docker as the container runtime to deploy Kubernetes with simplicity installation.
RKE1 is a CNCF-certified Kubernetes distribution that runs within Docker Container and it will make us easier to install Kubernetes in our infrastructure with a single YAML file.
After Kubernetes has been installed, we will install Rancher to manage it.
Rancher has a nice web UI that we can use to add, manage, monitor, remove the nodes, create a deployment, create the persistent volume of Kubernetes, and many things.
In Part 1, we will deploy Kubernetes in Cloudraya as follow:
- Launch at least 3 VM on CloudRaya server for High Availability workload.
- Enable SSH passwordless login for each kubernetes nodes.
- Install docker on each node.
- Download RKE binary file and configure the kubernetes.
Launch at Least 3 VM on Cloud Raya Server for High Availability Workload
For High Availability Kubernetes, we need three VMs as Kubernetes nodes in Cloudraya. Below is the specification for every node:
Operating System: Ubuntu 20.04
Memory: 4GB
CPU: 2 Core
Disk: 20 GB
Public IP Address only for node1 because we will install RKE from node1.
For node2 and node3, we only need the Private IP Address.
Below is the IP Address of every node:
node1 :
Public IP Address: 198.167.141.249
Private IP Address: 10.1.1.205
node2:
Private IP Address: 10.1.1.47
node3 :
Private IP Address: 10.1.1.238
Enable SSH Passwordless Login for Each Kubernetes Nodes
Before deploying RKE on the server, we need to enable SSH passwordless for easy installation with custom domain internal. Instead of remembering the IP Address, it’s easy to remember the node using its names.
# vim /etc/hosts

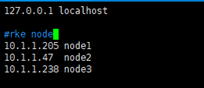
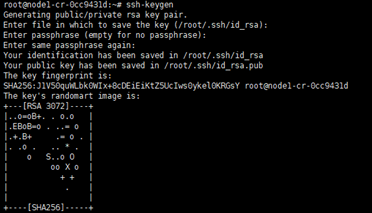
Let’s generate the ssh key pair using the following command.
# ssh-keygen

After generating ssh keypair is completed, we can upload the Public key to each node using command ssh-copy-id
Please run the following command from node1.
# ssh-copy-id node3
# ssh-copy-id node2
# ssh-copy-id node1

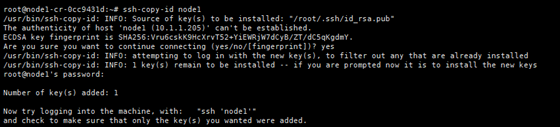
Install docker on each node:
Since we need docker for the Kubernetes, we will install it on every node using the following command:
Firstly, we need to update our repository and allow our server to access the Docker repository using HTTPS
sudo apt-get update && sudo apt-get install apt-transport-https ca-certificates curl software-properties-common -y
Add GPG key to ensure the authenticity of the software package
# curl -fsSL https://download.docker.com/linux/ubuntu/gpg | sudo apt-key add -

Now, we can add Docker repository to our server then install the stable docker version using the following command :
# sudo add-apt-repository "deb [arch=amd64] https://download.docker.com/linux/ubuntu $(lsb_release -cs) stable" # sudo apt-get update && sudo apt-get install docker-ce containerd.io -y
Download RKE Binary File and Configure the Kubernetes
Before we deploy Kubernetes on the server, we need to download rke binary from the following link.
Download latest rke from https://github.com/rancher/rke/releases/
# wget https://github.com/rancher/rke/releases/download/v1.2.12/rke_linux-amd64
Rename the file as rke
# mv rke_linux-amd64 rke
Then, make rke as executable file
# chmod +x rke
In Cloudraya, we will create a simple cluster from three nodes using the following yml.
Create a simple cluster.yml
nodes:
- address: node1
user: root
internal_address: 10.1.1.205
role: [controlplane, etcd, worker]
- address: node2
user: root
internal_address: 10.1.1.47
role: [controlplane, etcd, worker]
- address: node3
user: root
internal_address: 10.1.1.238
role: [controlplane, etcd, worker]
services:
etcd:
snapshot: true
creation: 6h
retention: 24h
# Required for external TLS termination with
# ingress-nginx v0.22+
ingress:
provider: nginx
options:
use-forwarded-headers: "true"
Save the file then we can continue to deploy Kubernetes using command rke up. The installation will take around 10-15 minutes.
# ./rke up


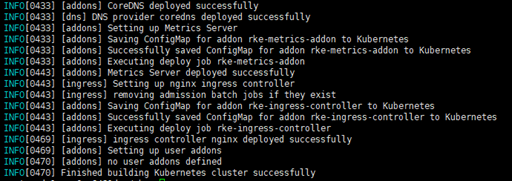
After the installation is completed. It will create three files and please save them in a secure location:
rancher-cluster.yml: The RKE cluster configuration file that we have created previously.
kube_config_rancher-cluster.yml: The Kubeconfig file for the cluster.
rancher-cluster.rkestate: The Kubernetes Cluster State file
If you want to know the status of the cluster node, we can use the kubectl command.
kubectl is a command-line tool that we can use to send a command to the Kubernetes cluster.
kubectl is authenticating with the Master node and making API calls to perform a variety of management actions.
Copy the kube_config_rancher-cluster.yml as a config file. You can follow the following steps:
# mkdir /root/.kube
# cp kube_config_cluster.yml /root/.kube/config

Now, install kubectl on the master node
# snap install kubectl --classic

Run kubectl command to get the status of the nodes
#kubectl get nodes

#kubectl get namespace

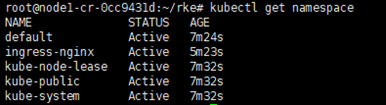
Now it has been deployed. Next step we will install Rancher to manage our Kubernetes Server.
Let’s go to continue to the next part