-
Products and Features
- Getting Started with CloudRaya Container Registry
- How to use Sudo on a CloudRaya Linux VM
- Keeping Your CloudRaya Linux VMs Up-to-Date
- Maximizing StorageRaya with Essential Practices
- Assign Multiple IP Addresses to Virtual Machine
- Generating a CloudRaya API key
- Simplify CloudRaya Management with API
- Deploying a Virtual Machine on CloudRaya
- Deploying a Kubernetes Cluster on KubeRaya
- Using StorageRaya – CloudRaya S3 Object Storage
- Opening Ping Access on Cloud Raya VM Public IP
- Maximize Your Storage Raya Access Speed with Content Delivery Network (CDN)
- How to Create Project Tag in Cloud Raya for More Organized VM Billing Report
- Exporting Cloud Raya VM to outer Cloud Raya's Infrastructure using Acronis Cyber Protect
- SSO Management on Cloud Raya
- Using the SSH key Feature in Cloud Raya Dashboard
- Cloud Raya Load Balancer, Solution to Distribute Load Equally
- Create your own VPN server with DNS-Level AdBlocker using PiVPN
- Fix Broken LetsEncrypt SSL Certificate due to Expired Root CA Certificate
- How to Make a Snapshot and Configure VM Backup in Cloud Raya
- How to Request Services or Licenses Products
- Adding, Attaching, and Resize Root Storage Disk in Cloud Raya VPS
- Managing your DNS Zone with DNS Bucket in Cloud Raya
- Create VM, Custom Package, Reinstall VM, and Adjusting Security Profile
- How to backup Linux VM via Acronis in Cloud Raya
- How to Backup Desktop Linux and Windows via Acronis in Cloud Raya
- Backing-Up Cloud Raya Windows VM Using Acronis Cyber Protect
- Load Balancing in Cloud Raya
- Establishing a VPN in Cloud Raya
- Generating an API Token
- Deploying a Virtual Machine in Cloud Raya
- Show Remaining Articles16 Collapse Articles
-
- How to backup Linux VM via Acronis in Cloud Raya
- How to Backup Desktop Linux and Windows via Acronis in Cloud Raya
-
- Maximizing StorageRaya with Essential Practices
- Using StorageRaya – CloudRaya S3 Object Storage
- Building a Static Website Using Storage Raya S3 Bucket
- Integrating S3 Storage Raya and Strapi for Asset Storage Optimization – Part 4
- Maximize Your Storage Raya Access Speed with Content Delivery Network (CDN)
- Managing Storage Raya from various tools and from various OS
- Binding NextCloud with CloudRaya S3 Object Storage as External Storage Mount
-
- How to use Sudo on a CloudRaya Linux VM
- Keeping Your CloudRaya Linux VMs Up-to-Date
- Implement Multi-Factor Authentication on CloudRaya Linux VM
- Assign Multiple IP Addresses to Virtual Machine
- Deploying a Virtual Machine on CloudRaya
- Configurating cPanel Using Ubuntu 20.04 on CloudRaya – Part 2
- Deploying cPanel Using Ubuntu 20.04 on CloudRaya - Part 1
- Exporting Cloud Raya VM to outer Cloud Raya's Infrastructure using Acronis Cyber Protect
- Using the SSH key Feature in Cloud Raya Dashboard
- Adding, Attaching, and Resize Root Storage Disk in Cloud Raya VPS
- Create VM, Custom Package, Reinstall VM, and Adjusting Security Profile
- How to backup Linux VM via Acronis in Cloud Raya
- Backing-Up Cloud Raya Windows VM Using Acronis Cyber Protect
- Deploying a Virtual Machine in Cloud Raya
-
Integration
- Implement Multi-Factor Authentication on CloudRaya Linux VM
- Accessing KubeRaya Cluster Using the Kubernetes Dashboard
- Building a Static Website Using Storage Raya S3 Bucket
- Integrating S3 Storage Raya and Strapi for Asset Storage Optimization – Part 4
- Integrating Strapi Content to Frontend React - Part 3
- Content Management with Strapi Headless CMS - Part 2
- Strapi Headless CMS Installation in CloudRaya - Part. 1
- Using SSH Key on CloudRaya VM with PuTTY
- Installing Multiple PHP Versions in One VM for More Flexible Web Development
- Replatforming Apps to K8s with RKE and GitLab CI
- OpenAI API Integration: Completions in PHP
- Building an Email Server on CloudRaya Using iRedMail
- Improving Email Delivery with Sendinblue SMTP Relay
- Building a Self Hosted Password Manager Using Passbolt
- How to Install Podman on Almalinux/Rocky Linux 9
- ElkarBackup: GUI Based backup Tools based on Rsync and Rsnapshot
- Improving Webserver Performance with SSL Termination on NGINX Load Balancer
- Using NGINX as an HTTP Load Balancer
- Automating Task with Cronjob
- Upgrade Zimbra and the OS Version
- Deploy Mailu on Rancher Kubernetes
- Export and Import Database in MySQL or MariaDB Using Mysqldump
- Backup & Sync Local and Remote Directories Using RSYNC
- Managing Storage Raya from various tools and from various OS
- Binding NextCloud with CloudRaya S3 Object Storage as External Storage Mount
- Simple monitoring and alerting with Monit on Ubuntu 22.04 LTS
- VS Code on your browser! How to install code-server on a VM
- Implementing Redis HA and Auto-Failover on Cloud Raya
- Using XFCE Desktop Environment on Cloud Raya VM
- Installing Python 3.7-3.9 on Ubuntu 22.04 Jammy LTS using PPA
- Implementing Continuous Integration with Gitlab CI and Continuous Delivery with Rancher Fleet
- Using Collabora Online on Cloud Raya NextCloud's VM
- Installing NextCloud in Cloud Raya- Detail Steps from the Beginning to the Very End
- Set Up High Availability PostgreSQL Cluster Using Patroni on Cloud Raya
- Set Up WAF KEMP in Cloud Raya Part 2
- Set Up WAF KEMP in Cloud Raya Part 1
- Using the SSH key Feature in Cloud Raya Dashboard
- Monitor Your Services Uptime Using Uptime Kuma
- Hosting Static Website with Hugo on Cloud Raya
- Kubernetes Ingress Controller using SSL in CloudRaya
- Reverse Proxy management using Nginx Proxy Manager
- Create your own VPN server with DNS-Level AdBlocker using PiVPN
- How to deploy Portainer on Linux to easily manage your docker containers
- High Availability Kubernetes Using RKE in Cloud Raya Part 3
- High Availability Kubernetes Using RKE in Cloud Raya Part 2
- High Availability Kubernetes Using RKE in Cloud Raya Part 1
- How to backup Linux VM via Acronis in Cloud Raya
- How to Backup Desktop Linux and Windows via Acronis in Cloud Raya
- Deploying Magento on Cloud Raya
- How to Install Nextcloud on Cloud Raya
- How to Install CWP in Cloud Raya
- How to Install Node.js and Launch Your First Node App
- How to install and secure MariaDB on Ubuntu 18.04 and 20.04 on Cloud Raya
- How to Install and Securing MongoDB on Ubuntu 18.04 and 20.04
- Classes: Post Installation on Ansible
- Classes: Install and Configure Ansible
- Classes: Introduction to Ansible for a robust Configuration Management
- How to Setup Active Directory Domain Service & DNS with Cloud Raya
- How to Host Your Own Docker Hub in Cloud Raya
- How to Setup Your Own Laravel with Nginx in Ubuntu 18.04
- How to Deploy Container in Cloud Raya using Docker
- Securing CentOS with iptables
- Install and Configure Squid Proxy in Ubuntu
- Installing Apache and Tomcat: A Quick Way
- Securing Ubuntu with UFW
- Install a Node.js and Launch a Node App on Ubuntu 18.04
- Installing LAMP in Ubuntu
- Installing LEMP Stack on Ubuntu 18.04
- Show Remaining Articles53 Collapse Articles
-
- Articles coming soon
-
- Implement Multi-Factor Authentication on CloudRaya Linux VM
- Configurating cPanel Using Ubuntu 20.04 on CloudRaya – Part 2
- Deploying cPanel Using Ubuntu 20.04 on CloudRaya - Part 1
- Integrating S3 Storage Raya and Strapi for Asset Storage Optimization – Part 4
- Integrating Strapi Content to Frontend React - Part 3
- Content Management with Strapi Headless CMS - Part 2
- Strapi Headless CMS Installation in CloudRaya - Part. 1
- Using SSH Key on CloudRaya VM with PuTTY
- Building an Email Server on CloudRaya Using iRedMail
- Improving Email Delivery with Sendinblue SMTP Relay
- Building a Self Hosted Password Manager Using Passbolt
- ElkarBackup: GUI Based backup Tools based on Rsync and Rsnapshot
- Improving Webserver Performance with SSL Termination on NGINX Load Balancer
- Using NGINX as an HTTP Load Balancer
- Upgrade Zimbra and the OS Version
- Deploy Mailu on Rancher Kubernetes
- Managing Storage Raya from various tools and from various OS
- Binding NextCloud with CloudRaya S3 Object Storage as External Storage Mount
- Simple monitoring and alerting with Monit on Ubuntu 22.04 LTS
- VS Code on your browser! How to install code-server on a VM
- Implementing Redis HA and Auto-Failover on Cloud Raya
- Using XFCE Desktop Environment on Cloud Raya VM
- Implementing Continuous Integration with Gitlab CI and Continuous Delivery with Rancher Fleet
- Using Collabora Online on Cloud Raya NextCloud's VM
- Installing NextCloud in Cloud Raya- Detail Steps from the Beginning to the Very End
- Set Up WAF KEMP in Cloud Raya Part 2
- Set Up WAF KEMP in Cloud Raya Part 1
- Monitor Your Services Uptime Using Uptime Kuma
- Create your own VPN server with DNS-Level AdBlocker using PiVPN
- How to deploy Portainer on Linux to easily manage your docker containers
- High Availability Kubernetes Using RKE in Cloud Raya Part 3
- High Availability Kubernetes Using RKE in Cloud Raya Part 2
- High Availability Kubernetes Using RKE in Cloud Raya Part 1
- How to Install Nextcloud on Cloud Raya
- Classes: Post Installation on Ansible
- Classes: Install and Configure Ansible
- Classes: Introduction to Ansible for a robust Configuration Management
- Connect Windows Active Directory on Cloud Raya with Azure AD
- How to Host Your Own Docker Hub in Cloud Raya
- How to Deploy Container in Cloud Raya using Docker
- Show Remaining Articles25 Collapse Articles
-
- Accessing KubeRaya Cluster Using the Kubernetes Dashboard
- Integrating S3 Storage Raya and Strapi for Asset Storage Optimization – Part 4
- Integrating Strapi Content to Frontend React - Part 3
- Content Management with Strapi Headless CMS - Part 2
- Strapi Headless CMS Installation in CloudRaya - Part. 1
- Creating Interactive Chatbot with OpenAI API in PHP
- Installing Multiple PHP Versions in One VM for More Flexible Web Development
- OpenAI API Integration: Completions in PHP
- Improving Webserver Performance with SSL Termination on NGINX Load Balancer
- Using NGINX as an HTTP Load Balancer
- Automating Task with Cronjob
- How to Deploy Django App on Cloud Raya VM Using Gunicorn, Supervisor, and Nginx
- How to Install Node.js and Launch Your First Node App
- How to Setup Your Own Laravel with Nginx in Ubuntu 18.04
- Install a Node.js and Launch a Node App on Ubuntu 18.04
-
- How to use Sudo on a CloudRaya Linux VM
- Keeping Your CloudRaya Linux VMs Up-to-Date
- Implement Multi-Factor Authentication on CloudRaya Linux VM
- Using SSH Key on CloudRaya VM with PuTTY
- Building a Self Hosted Password Manager Using Passbolt
- Improving Webserver Performance with SSL Termination on NGINX Load Balancer
- Export and Import Database in MySQL or MariaDB Using Mysqldump
- Backup & Sync Local and Remote Directories Using RSYNC
- How to Deploy Django App on Cloud Raya VM Using Gunicorn, Supervisor, and Nginx
- Set Up WAF KEMP in Cloud Raya Part 2
- Set Up WAF KEMP in Cloud Raya Part 1
- Using the SSH key Feature in Cloud Raya Dashboard
- How to backup Linux VM via Acronis in Cloud Raya
- How to Backup Desktop Linux and Windows via Acronis in Cloud Raya
- Securing CentOS with iptables
- Securing Ubuntu with UFW
- Show Remaining Articles1 Collapse Articles
-
- Configurating cPanel Using Ubuntu 20.04 on CloudRaya – Part 2
- Deploying cPanel Using Ubuntu 20.04 on CloudRaya - Part 1
- Integrating S3 Storage Raya and Strapi for Asset Storage Optimization – Part 4
- Integrating Strapi Content to Frontend React - Part 3
- Content Management with Strapi Headless CMS - Part 2
- Strapi Headless CMS Installation in CloudRaya - Part. 1
- Creating Interactive Chatbot with OpenAI API in PHP
- Installing Multiple PHP Versions in One VM for More Flexible Web Development
- Building an Email Server on CloudRaya Using iRedMail
- Building a Self Hosted Password Manager Using Passbolt
- Improving Webserver Performance with SSL Termination on NGINX Load Balancer
- Using NGINX as an HTTP Load Balancer
- Installing Python 3.7-3.9 on Ubuntu 22.04 Jammy LTS using PPA
- Reverse Proxy management using Nginx Proxy Manager
- Install and Configure Squid Proxy in Ubuntu
- Installing Apache and Tomcat: A Quick Way
- Installing LAMP in Ubuntu
- Installing LEMP Stack on Ubuntu 18.04
- Show Remaining Articles3 Collapse Articles
-
- Building a Static Website Using Storage Raya S3 Bucket
- Integrating S3 Storage Raya and Strapi for Asset Storage Optimization – Part 4
- Integrating Strapi Content to Frontend React - Part 3
- Content Management with Strapi Headless CMS - Part 2
- Strapi Headless CMS Installation in CloudRaya - Part. 1
- Creating Interactive Chatbot with OpenAI API in PHP
- Installing Multiple PHP Versions in One VM for More Flexible Web Development
- OpenAI API Integration: Completions in PHP
- Hosting Static Website with Hugo on Cloud Raya
- Deploying Magento on Cloud Raya
- How to Install CWP in Cloud Raya
- How to Setup Active Directory Domain Service & DNS with Cloud Raya
-
- Articles coming soon
Building a Self Hosted Password Manager Using Passbolt
How to Building a Self Hosted Password Manager Using Passbolt ? In this digital era, the proliferation of password hacking cases has become a concern faced by many people. In response, many individuals have started using complex and hard-to-remember passwords. However, the complexity of these passwords often leads to other problems, such as difficulty in remembering the passwords used.
This has led to the emergence of password management applications, such as LastPass, Bitwarden, KeePass, and others. However, concerns about the security of user data stored by these password management service providers have also become an issue.
To address this, Passbolt has emerged as an open-source password management application that allows users to build their own password manager on their infrastructure.
In this tutorial, we will learn together how to build a password manager using Passbolt on Cloud Raya.
Features of Passbolt
According to the plan-comparison page of Passbolt, Passbolt consists of several plans, with its free version being the Community Plan.
The essential features of the Community Plan are:
- Can be hosted on your own server
- Passwords management
- Users and groups management
- Detailed password sharing
- Multi Factor Authentication (MFA)
- Import / export (csv, xls, kdbx)
- Browser extensions & CLI
- Mobile apps (iOS & Android)
- Community support
Alternatively, you can also refer to the plan-comparison link above for further details.
Pre-installation Self hosted password

Passbolt can be easily installed through package repositories provided by Passbolt itself for various types of systems, ranging from conventional systems like Debian, Ubuntu, and others to containerized systems like Docker. Additionally, Passbolt can also be installed from scratch.
In this tutorial, we will use the popular installation method recommended, which is through the Debian package repository.
Here are the system prerequisites recommended by Passbolt::
- 2 Cores CPU dan 2GB RAM
- Debian server with at least version 11.
- Domain name or host pointing to your server, or at least accessible via a static IP address.
- Functioning SMTP server for email notifications.
- NTP service functioning to avoid GPG authentication issues.
- It’s important to use a vanilla server (fresh without pre-installed services or tools) because the Passbolt installation script could potentially disrupt existing data on your server.
- If you plan to provide an SSL certificate manually, it’s advisable to do so before starting the Passbolt installation.
Installation of Package Repository
Now SSH into the Cloud Raya VM, and let’s download the installation script from the provided Passbolt package repository that needs to be installed first (like NGINX, Haveged, Certbot). Use the following wget command:

wget “https://download.passbolt.com/ce/installer/passbolt-repo-setup.ce.sh”
Next, download the checksum for the installation script mentioned before to ensure that the file is intact and not corrupted.

wget https://github.com/passbolt/passbolt-dep-scripts/releases/latest/download/passbolt-ce-SHA512SUM.txt
Run the following command to check its checksum. If it’s okay, execute the passbolt-repo-setup.

sha512sum -c passbolt-ce-SHA512SUM.txt && sudo bash ./passbolt-repo-setup.ce.sh || echo \”Bad checksum. Aborting\” && rm -f passbolt-repo-setup.ce.sh
Install Passbolt CE Edition
Okay, if the Passbolt repository setup is completed, now we can install the Passbolt CE edition. Use the following command:

sudo apt install passbolt-ce-server
During the installation process, several “Package Configuration” dialogs will appear regarding the configuration of the Passbolt supporting packages.
▶️ MySQL Configuration

First, configure to create an empty MySQL database to be used by Passbolt.

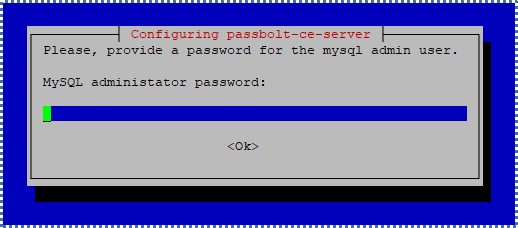
Next, you’ll be asked to enter the admin user credentials for MySQL to create the Passbolt database. By default, the MySQL admin user usually uses the root account and an empty password. Fill in these credentials.
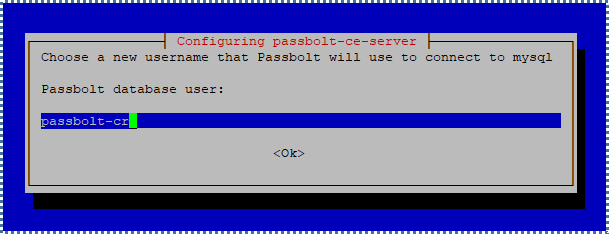
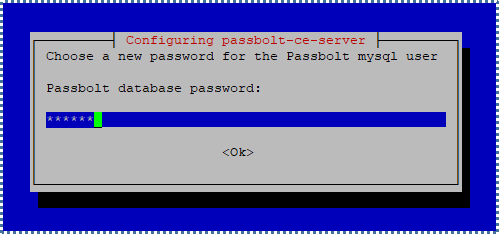
Following that, you’ll be asked to create a new MySQL user with limited permissions, specifically for managing the Passbolt database only (for the integrity and security of all our other database collections, of course).
These credentials will be required later in the final Passbolt configuration, so remember them.
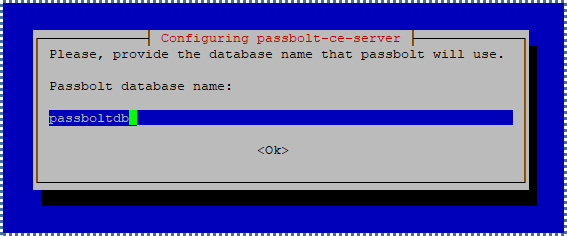
Finally, enter the name of the Passbolt database you’ll create.
▶️ NGINX Webserver Configuration and HTTPS Accommodation
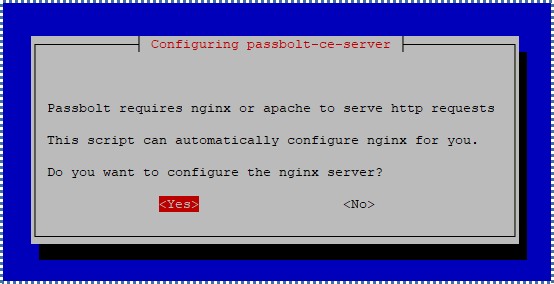
Next is the configuration of NGINX as the webserver for Passbolt and the HTTPS setup for more secure transactions on the Passbolt website.
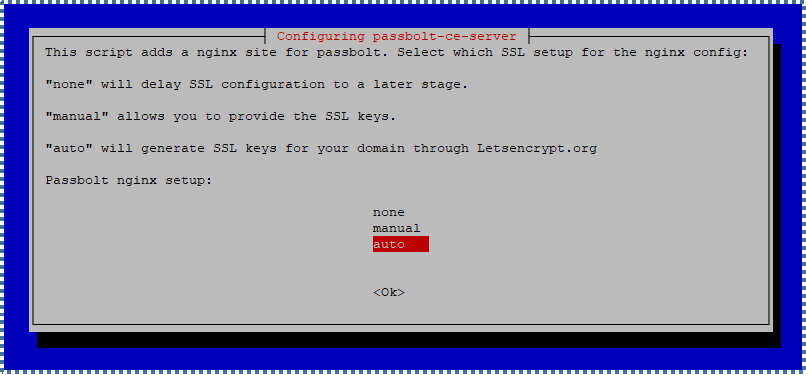
There are 3 SSL setup options provided:
"none"defers SSL configuration at this step."manual"allows us to input SSL Keys that we already possess."auto"uses Letsencrypt.org to provide SSL Keys for our Passbolt domain.
In this tutorial, we’ll use the “auto” method as it’s simpler. But if you already have SSL Keys from your SSL provider, use the “manual” option following these steps.

Enter the domain name where you’ll run Passbolt.
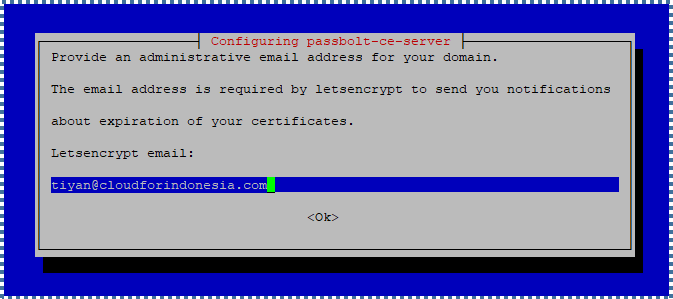
Input the administrative email for your domain. This email is needed by Letsencrypt to send notifications if the certificate is nearing expiration.
▶️ Finalization
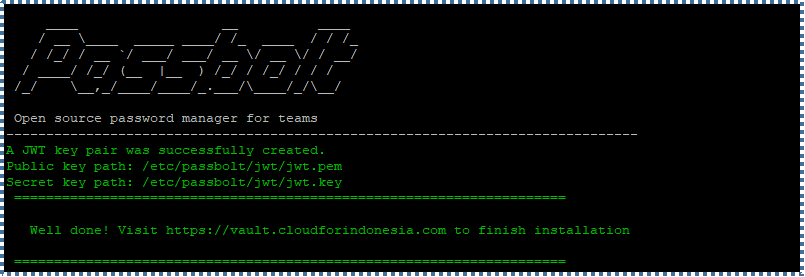
When the finalization process is complete, the following message will be displayed, and we can start configuring Passbolt before using it.
Passbolt Configuration
Now open a browser and enter the domain where we previously configured Passbolt. You’ll be directed to the "Getting Started" page.
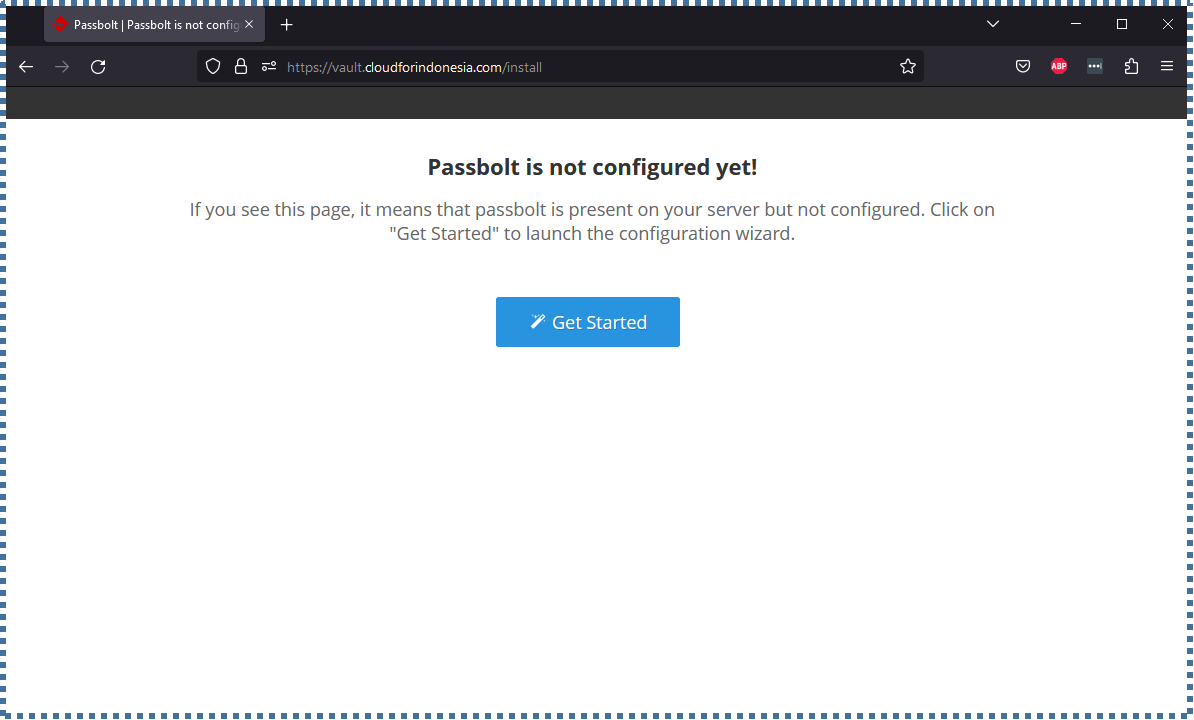
▶️ System Check

The first configuration page will inform you if the server environment is ready for Passbolt or not. Resolve any issues and click Start Configuration if there are none.
▶️ Database

The next page will configure which database we’ll use for Passbolt.

Fill in the following:
- "Hostname": Enter the hostname to access the database. If following this tutorial where the database is placed on the same local system as Passbolt, you can enter
localhostor127.0.0.1 - "Port 3306": Input the port number used for MySQL.
Make sure to have opened ACL in the VPC menu for TCP protocol port 3306. For details on opening specific ports in VPC, check the following tutorial. - "Username and Password": Enter the credentials for the Passbolt database user created in the previous step.
- "Database Name": Enter the Passbolt database name created earlier.
▶️ Server Keys

On this page, you can create a new key or import an existing GPG key pair. During the login process, the GPG key is used to ensure that login messages sent by users can only be read by the Passbolt API server, and vice versa, the token messages sent by the Passbolt API server can only be read by legitimate users.
To create new, fill in the provided form.
▶️ Options

Next is the “Options” page, where we’re asked to fill in the “Full base URL” of our Passbolt system; usually, this field gets auto-filled.
Then, there’s the “Force SSL” option, where the Passbolt system will not accept connections from visitors using HTTP. For better security, select Yes, especially since we configured SSL in the previous step.
▶️ Emails

On this page, you can enter the details of your SMTP account and server so that Passbolt can send notifications via email.
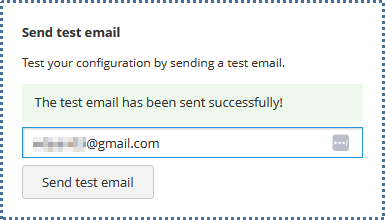
On the right-hand side, there’s a “Send test email” feature where you can check if your SMTP configuration is correct. A successful test email sent indicates the configuration is correct.
▶️ First User

On this page, create the first user admin for this Passbolt system. Enter the details as desired.
▶️ Installation

After collecting several inputs, Passbolt will now finalize its configuration process. Wait for a while.
Administrator Account Configuration
After the configuration process is complete, we can now start accessing the main system of Passbolt. However, there are a few final steps to take.
▶️ Download Passbolt plugin


Similar to other Password managers, Passbolt also requires us to install its plugin into the browser we’re using. Click Download Extension and then add it to your browser.
▶️ Create Administrator Key

Passbolt will ask us to create or import a key that will be used to identify us and encrypt our collection of passwords. This key must also be protected by a password.
In this step, create a passphrase that you’ll always need for administrator-related Passbolt system activities. So, make sure to remember it.
▶️ Download Recovery Kit

This step is crucial, where the key you created earlier will be vital to access your account. If you lose this key for any reason, the Passbolt panel won’t be accessible even if you remember the password.
So, in this step, Passbolt will provide a Recovery Kit as a backup of the key you created. Make sure to store it in a secure place.
▶️ Create Security Token
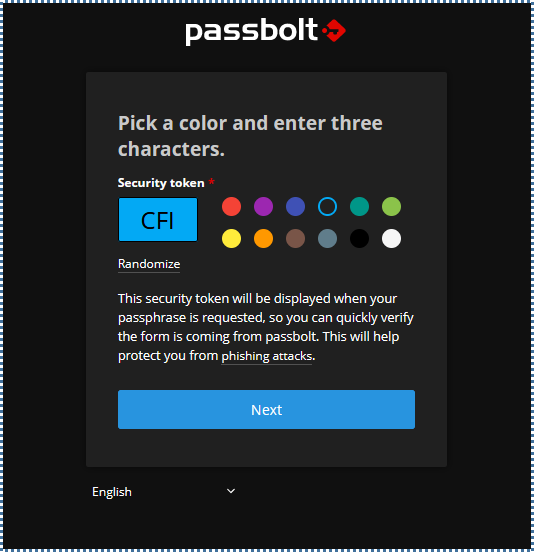
In this final step, you’re asked to select a color and a three-character token, which is an additional security mechanism from Passbolt to help reduce the risk of phishing attacks. Whenever sensitive operations are performed in Passbolt, you’ll be asked to input this token as verification.
▶️ Success and Access Passbolt Panel

Now that the Administrator account configuration is complete, you’ll be taken to the Passbolt panel page.
Conclusion
From this article, it can be concluded that using Passbolt is a suitable choice for those who want to manage passwords securely, effectively, and efficiently. With Passbolt, you can install it on your own infrastructure, providing a higher level of security for stored password data.
Passbolt offers comprehensive features, including import-export capabilities, allowing users who have a lot of password data stored in other password managers to switch to Passbolt easily without needing to input each password manually.
With password management capabilities on mobile devices, users can organize and access passwords from anywhere. Passbolt also enables users to manage access rights and share passwords with teams or colleagues, facilitating collaboration within a team.
Visit our other tutorials on our knowledge base page. Alternatively, you can also visit the Cloud Raya Youtube channel.