-
Products and Features
- Getting Started with CloudRaya Container Registry
- How to use Sudo on a CloudRaya Linux VM
- Keeping Your CloudRaya Linux VMs Up-to-Date
- Maximizing StorageRaya with Essential Practices
- Assign Multiple IP Addresses to Virtual Machine
- Generating a CloudRaya API key
- Simplify CloudRaya Management with API
- Deploying a Virtual Machine on CloudRaya
- Deploying a Kubernetes Cluster on KubeRaya
- Using StorageRaya – CloudRaya S3 Object Storage
- Opening Ping Access on Cloud Raya VM Public IP
- Maximize Your Storage Raya Access Speed with Content Delivery Network (CDN)
- How to Create Project Tag in Cloud Raya for More Organized VM Billing Report
- Exporting Cloud Raya VM to outer Cloud Raya's Infrastructure using Acronis Cyber Protect
- SSO Management on Cloud Raya
- Using the SSH key Feature in Cloud Raya Dashboard
- Cloud Raya Load Balancer, Solution to Distribute Load Equally
- Create your own VPN server with DNS-Level AdBlocker using PiVPN
- Fix Broken LetsEncrypt SSL Certificate due to Expired Root CA Certificate
- How to Make a Snapshot and Configure VM Backup in Cloud Raya
- How to Request Services or Licenses Products
- Adding, Attaching, and Resize Root Storage Disk in Cloud Raya VPS
- Managing your DNS Zone with DNS Bucket in Cloud Raya
- Create VM, Custom Package, Reinstall VM, and Adjusting Security Profile
- How to backup Linux VM via Acronis in Cloud Raya
- How to Backup Desktop Linux and Windows via Acronis in Cloud Raya
- Backing-Up Cloud Raya Windows VM Using Acronis Cyber Protect
- Load Balancing in Cloud Raya
- Establishing a VPN in Cloud Raya
- Generating an API Token
- Deploying a Virtual Machine in Cloud Raya
- Show Remaining Articles16 Collapse Articles
-
- How to backup Linux VM via Acronis in Cloud Raya
- How to Backup Desktop Linux and Windows via Acronis in Cloud Raya
-
- Maximizing StorageRaya with Essential Practices
- Using StorageRaya – CloudRaya S3 Object Storage
- Building a Static Website Using Storage Raya S3 Bucket
- Integrating S3 Storage Raya and Strapi for Asset Storage Optimization – Part 4
- Maximize Your Storage Raya Access Speed with Content Delivery Network (CDN)
- Managing Storage Raya from various tools and from various OS
- Binding NextCloud with CloudRaya S3 Object Storage as External Storage Mount
-
- How to use Sudo on a CloudRaya Linux VM
- Keeping Your CloudRaya Linux VMs Up-to-Date
- Implement Multi-Factor Authentication on CloudRaya Linux VM
- Assign Multiple IP Addresses to Virtual Machine
- Deploying a Virtual Machine on CloudRaya
- Configurating cPanel Using Ubuntu 20.04 on CloudRaya – Part 2
- Deploying cPanel Using Ubuntu 20.04 on CloudRaya - Part 1
- Exporting Cloud Raya VM to outer Cloud Raya's Infrastructure using Acronis Cyber Protect
- Using the SSH key Feature in Cloud Raya Dashboard
- Adding, Attaching, and Resize Root Storage Disk in Cloud Raya VPS
- Create VM, Custom Package, Reinstall VM, and Adjusting Security Profile
- How to backup Linux VM via Acronis in Cloud Raya
- Backing-Up Cloud Raya Windows VM Using Acronis Cyber Protect
- Deploying a Virtual Machine in Cloud Raya
-
Integration
- Implement Multi-Factor Authentication on CloudRaya Linux VM
- Accessing KubeRaya Cluster Using the Kubernetes Dashboard
- Building a Static Website Using Storage Raya S3 Bucket
- Integrating S3 Storage Raya and Strapi for Asset Storage Optimization – Part 4
- Integrating Strapi Content to Frontend React - Part 3
- Content Management with Strapi Headless CMS - Part 2
- Strapi Headless CMS Installation in CloudRaya - Part. 1
- Using SSH Key on CloudRaya VM with PuTTY
- Installing Multiple PHP Versions in One VM for More Flexible Web Development
- Replatforming Apps to K8s with RKE and GitLab CI
- OpenAI API Integration: Completions in PHP
- Building an Email Server on CloudRaya Using iRedMail
- Improving Email Delivery with Sendinblue SMTP Relay
- Building a Self Hosted Password Manager Using Passbolt
- How to Install Podman on Almalinux/Rocky Linux 9
- ElkarBackup: GUI Based backup Tools based on Rsync and Rsnapshot
- Improving Webserver Performance with SSL Termination on NGINX Load Balancer
- Using NGINX as an HTTP Load Balancer
- Automating Task with Cronjob
- Upgrade Zimbra and the OS Version
- Deploy Mailu on Rancher Kubernetes
- Export and Import Database in MySQL or MariaDB Using Mysqldump
- Backup & Sync Local and Remote Directories Using RSYNC
- Managing Storage Raya from various tools and from various OS
- Binding NextCloud with CloudRaya S3 Object Storage as External Storage Mount
- Simple monitoring and alerting with Monit on Ubuntu 22.04 LTS
- VS Code on your browser! How to install code-server on a VM
- Implementing Redis HA and Auto-Failover on Cloud Raya
- Using XFCE Desktop Environment on Cloud Raya VM
- Installing Python 3.7-3.9 on Ubuntu 22.04 Jammy LTS using PPA
- Implementing Continuous Integration with Gitlab CI and Continuous Delivery with Rancher Fleet
- Using Collabora Online on Cloud Raya NextCloud's VM
- Installing NextCloud in Cloud Raya- Detail Steps from the Beginning to the Very End
- Set Up High Availability PostgreSQL Cluster Using Patroni on Cloud Raya
- Set Up WAF KEMP in Cloud Raya Part 2
- Set Up WAF KEMP in Cloud Raya Part 1
- Using the SSH key Feature in Cloud Raya Dashboard
- Monitor Your Services Uptime Using Uptime Kuma
- Hosting Static Website with Hugo on Cloud Raya
- Kubernetes Ingress Controller using SSL in CloudRaya
- Reverse Proxy management using Nginx Proxy Manager
- Create your own VPN server with DNS-Level AdBlocker using PiVPN
- How to deploy Portainer on Linux to easily manage your docker containers
- High Availability Kubernetes Using RKE in Cloud Raya Part 3
- High Availability Kubernetes Using RKE in Cloud Raya Part 2
- High Availability Kubernetes Using RKE in Cloud Raya Part 1
- How to backup Linux VM via Acronis in Cloud Raya
- How to Backup Desktop Linux and Windows via Acronis in Cloud Raya
- Deploying Magento on Cloud Raya
- How to Install Nextcloud on Cloud Raya
- How to Install CWP in Cloud Raya
- How to Install Node.js and Launch Your First Node App
- How to install and secure MariaDB on Ubuntu 18.04 and 20.04 on Cloud Raya
- How to Install and Securing MongoDB on Ubuntu 18.04 and 20.04
- Classes: Post Installation on Ansible
- Classes: Install and Configure Ansible
- Classes: Introduction to Ansible for a robust Configuration Management
- How to Setup Active Directory Domain Service & DNS with Cloud Raya
- How to Host Your Own Docker Hub in Cloud Raya
- How to Setup Your Own Laravel with Nginx in Ubuntu 18.04
- How to Deploy Container in Cloud Raya using Docker
- Securing CentOS with iptables
- Install and Configure Squid Proxy in Ubuntu
- Installing Apache and Tomcat: A Quick Way
- Securing Ubuntu with UFW
- Install a Node.js and Launch a Node App on Ubuntu 18.04
- Installing LAMP in Ubuntu
- Installing LEMP Stack on Ubuntu 18.04
- Show Remaining Articles53 Collapse Articles
-
- Articles coming soon
-
- Implement Multi-Factor Authentication on CloudRaya Linux VM
- Configurating cPanel Using Ubuntu 20.04 on CloudRaya – Part 2
- Deploying cPanel Using Ubuntu 20.04 on CloudRaya - Part 1
- Integrating S3 Storage Raya and Strapi for Asset Storage Optimization – Part 4
- Integrating Strapi Content to Frontend React - Part 3
- Content Management with Strapi Headless CMS - Part 2
- Strapi Headless CMS Installation in CloudRaya - Part. 1
- Using SSH Key on CloudRaya VM with PuTTY
- Building an Email Server on CloudRaya Using iRedMail
- Improving Email Delivery with Sendinblue SMTP Relay
- Building a Self Hosted Password Manager Using Passbolt
- ElkarBackup: GUI Based backup Tools based on Rsync and Rsnapshot
- Improving Webserver Performance with SSL Termination on NGINX Load Balancer
- Using NGINX as an HTTP Load Balancer
- Upgrade Zimbra and the OS Version
- Deploy Mailu on Rancher Kubernetes
- Managing Storage Raya from various tools and from various OS
- Binding NextCloud with CloudRaya S3 Object Storage as External Storage Mount
- Simple monitoring and alerting with Monit on Ubuntu 22.04 LTS
- VS Code on your browser! How to install code-server on a VM
- Implementing Redis HA and Auto-Failover on Cloud Raya
- Using XFCE Desktop Environment on Cloud Raya VM
- Implementing Continuous Integration with Gitlab CI and Continuous Delivery with Rancher Fleet
- Using Collabora Online on Cloud Raya NextCloud's VM
- Installing NextCloud in Cloud Raya- Detail Steps from the Beginning to the Very End
- Set Up WAF KEMP in Cloud Raya Part 2
- Set Up WAF KEMP in Cloud Raya Part 1
- Monitor Your Services Uptime Using Uptime Kuma
- Create your own VPN server with DNS-Level AdBlocker using PiVPN
- How to deploy Portainer on Linux to easily manage your docker containers
- High Availability Kubernetes Using RKE in Cloud Raya Part 3
- High Availability Kubernetes Using RKE in Cloud Raya Part 2
- High Availability Kubernetes Using RKE in Cloud Raya Part 1
- How to Install Nextcloud on Cloud Raya
- Classes: Post Installation on Ansible
- Classes: Install and Configure Ansible
- Classes: Introduction to Ansible for a robust Configuration Management
- Connect Windows Active Directory on Cloud Raya with Azure AD
- How to Host Your Own Docker Hub in Cloud Raya
- How to Deploy Container in Cloud Raya using Docker
- Show Remaining Articles25 Collapse Articles
-
- Accessing KubeRaya Cluster Using the Kubernetes Dashboard
- Integrating S3 Storage Raya and Strapi for Asset Storage Optimization – Part 4
- Integrating Strapi Content to Frontend React - Part 3
- Content Management with Strapi Headless CMS - Part 2
- Strapi Headless CMS Installation in CloudRaya - Part. 1
- Creating Interactive Chatbot with OpenAI API in PHP
- Installing Multiple PHP Versions in One VM for More Flexible Web Development
- OpenAI API Integration: Completions in PHP
- Improving Webserver Performance with SSL Termination on NGINX Load Balancer
- Using NGINX as an HTTP Load Balancer
- Automating Task with Cronjob
- How to Deploy Django App on Cloud Raya VM Using Gunicorn, Supervisor, and Nginx
- How to Install Node.js and Launch Your First Node App
- How to Setup Your Own Laravel with Nginx in Ubuntu 18.04
- Install a Node.js and Launch a Node App on Ubuntu 18.04
-
- How to use Sudo on a CloudRaya Linux VM
- Keeping Your CloudRaya Linux VMs Up-to-Date
- Implement Multi-Factor Authentication on CloudRaya Linux VM
- Using SSH Key on CloudRaya VM with PuTTY
- Building a Self Hosted Password Manager Using Passbolt
- Improving Webserver Performance with SSL Termination on NGINX Load Balancer
- Export and Import Database in MySQL or MariaDB Using Mysqldump
- Backup & Sync Local and Remote Directories Using RSYNC
- How to Deploy Django App on Cloud Raya VM Using Gunicorn, Supervisor, and Nginx
- Set Up WAF KEMP in Cloud Raya Part 2
- Set Up WAF KEMP in Cloud Raya Part 1
- Using the SSH key Feature in Cloud Raya Dashboard
- How to backup Linux VM via Acronis in Cloud Raya
- How to Backup Desktop Linux and Windows via Acronis in Cloud Raya
- Securing CentOS with iptables
- Securing Ubuntu with UFW
- Show Remaining Articles1 Collapse Articles
-
- Configurating cPanel Using Ubuntu 20.04 on CloudRaya – Part 2
- Deploying cPanel Using Ubuntu 20.04 on CloudRaya - Part 1
- Integrating S3 Storage Raya and Strapi for Asset Storage Optimization – Part 4
- Integrating Strapi Content to Frontend React - Part 3
- Content Management with Strapi Headless CMS - Part 2
- Strapi Headless CMS Installation in CloudRaya - Part. 1
- Creating Interactive Chatbot with OpenAI API in PHP
- Installing Multiple PHP Versions in One VM for More Flexible Web Development
- Building an Email Server on CloudRaya Using iRedMail
- Building a Self Hosted Password Manager Using Passbolt
- Improving Webserver Performance with SSL Termination on NGINX Load Balancer
- Using NGINX as an HTTP Load Balancer
- Installing Python 3.7-3.9 on Ubuntu 22.04 Jammy LTS using PPA
- Reverse Proxy management using Nginx Proxy Manager
- Install and Configure Squid Proxy in Ubuntu
- Installing Apache and Tomcat: A Quick Way
- Installing LAMP in Ubuntu
- Installing LEMP Stack on Ubuntu 18.04
- Show Remaining Articles3 Collapse Articles
-
- Building a Static Website Using Storage Raya S3 Bucket
- Integrating S3 Storage Raya and Strapi for Asset Storage Optimization – Part 4
- Integrating Strapi Content to Frontend React - Part 3
- Content Management with Strapi Headless CMS - Part 2
- Strapi Headless CMS Installation in CloudRaya - Part. 1
- Creating Interactive Chatbot with OpenAI API in PHP
- Installing Multiple PHP Versions in One VM for More Flexible Web Development
- OpenAI API Integration: Completions in PHP
- Hosting Static Website with Hugo on Cloud Raya
- Deploying Magento on Cloud Raya
- How to Install CWP in Cloud Raya
- How to Setup Active Directory Domain Service & DNS with Cloud Raya
-
- Articles coming soon
Integrating Strapi Content to Frontend React – Part 3
In the previous article, we have learned how to manage data content in Strapi’s backend. In this article we are going to learn the next step, how to displaying the data on our application frontend.
For the frontend section, React will be used with Vite as its development tool, and for styling each element, classes from Tailwind CSS will be utilized. This choice aims to facilitate and make the appearance of our website more flexible.
It’s not an issue at all for those of you who might be utilizing an alternative frontend. On the other hand, it is advised that you first grasp the principles in this lesson by following the steps that are given. Thereafter, you can use these ideas with different technologies that you might be utilizing.
Some of the data processing activities from Strapi that we will carry out in this frontend include:
- Displaying all article data
- Displaying one of the article data based on the ID
- Implementing authentication by registration process, login, and logout.
And of course, you can explore further from this simple case study based on your needs in the future
Running Vite Project
If you don’t have a Vite project yet, you need to create one first. Fortunately, Tailwind CSS provides a step-by-step guide on how to integrate it into a Vite project. You can find the steps on the following page: https://tailwindcss.com/docs/guides/vite
However, here I have provided a repository on my GitHub related to the “Mini Article” website template that we will use in this tutorial.

This is in line with the content management concept in Strapi that has been explained in the previous tutorial, that we will build an Article website.

Access this attachment and clone it to the repository.
Now we can start to run the Vite project with the following command:
					npm install
npm run dev -- --host 10.20.0.44 <-- [IP Private VM kita]
First, let’s call back the API endpoint for our articles to ensure that the data can be accessed normally.
GET http://163.53.195.233:1337/api/articles?populate=*
The monitored API response results indicate that the data has been successfully retrieved.
Mengambil Data dari Strapi ke dalam Proyek Vite
Pertama-tama, kita memerlukan fungsi untuk mengambil data dari Strapi. Dalam konteks ini, kita akan menggunakan sebuah hook. Hook ini akan mengatur proses pengambilan data dari API.

Create a folder named ‘hooks’ within your project directory, then create a new hook with a name like 'useFetch.js'.
Next, insert a script like the one below:
				// useFetch.js

import { useEffect, useState } from 'react'; // Import useEffect and useState hooks dari React's library

// Deklarasikan useFetch sebagai custom React hook untuk mengambil data dari Endpoint URL Strapi
// Parameter URL akan diteruskan dari komponen/page yang menggunakan hook ini

const useFetch = (url) => {
    const [data, setData] = useState(null); // State untuk menyimpan data yang diambil
    const [error, setError] = useState(null); // State untuk menangani error
    const [loading, setLoading] = useState(true); // State untuk mengatur status loading

    // Definisikan fungsi fetchData untuk mengambil data menggunakan fetch
    const fetchData = async () => {
        setLoading(true); // Tunjukkan bahwa pengambilan data sedang berlangsung
        try {
            const response = await fetch(url); // Mengambil data dari URL menggunakan fetch.
            const json = await response.json(); // Mengubah respons menjadi objek JSON.
            setData(json); // Mengatur data dengan objek JSON yang diterima.
            setLoading(false); // Menghentikan status loading.
        } catch (error) {
            setError(error); // Tangani kesalahan dengan mengatur state error
            setLoading(false); // Tunjukkan pengambilan data sudah selesai (meskipun ada kesalahan)
        }
    };

    // Gunakan hook useEffect untuk memulai operasi pengambilan Data ketika ada URL yg berubah
    // Jalankan efek setiap kali ada permintaan baru terkait pengambilan data melalui parameter url
    useEffect(() => {
        fetchData(); // Panggil fungsi fetchData untuk menjalankan isi dari fungsinya
    }, [url]);

    // Kirimkan status loading, error, dan data ke page/komponen yang menggunakan hook ini
    return { loading, error, data };
};

export default useFetch;
In that script, we create a custom React hook function called useFetch. This hook will be useful in the data fetching process based on its URL Endpoint parameter. To achieve this, we use two essential React hooks, namely useState and useEffect:
useEffectused to monitor changes in specific values, such as changes in the URL in the context of data fetching. This allows us to execute code when the desired changes occur, such as requesting new data.- Meanwhile
useState, in the context of fetching data from the URL, it will help us store the results of data requests, loading status, and error handling.
And we use fetch to complete the request of HTTP, including retrieving the data from URL.
In this hook, there is an asynchronous function called fetchData that manage the whole process of data retrieving. By using the async, we use await to ensure that the function waits for a response from the URL first, while continuously indicating the loading state if the data has not been received.

In Vite, there is an 'App.jsx' file which serves as the main or entry file for the React application.
Basically, this file is the starting point of the React application. Inside it, we can set up main components, configurations, and the basic structure of the React application. One of the things typically set in 'App.jsx' is routing using a routing library like react-router-dom.
We will fetch the article data from Strapi through the 'App.jsx' file. Modify some scripts on this page to make API calls to Strapi, then send this data to the desired pages:
				// App.jsx

import { HomePage, ArticleContentPage, UserRegistrationPage, UserLoginPage, CategoriesPage } from "./pages";
import { Routes, Route } from "react-router-dom";
import useFetch from "./hooks/useFetch"; // Pertama, impor 'useFetch' hook ke dalam komponen App kita

export default function App() {

  // Dalam fungsi useFetch, kita mendefinisikan parameter URL sesuai dengan endpoint Strapi yang diinginkan.
  // Di sini, saya memuat semua konten Artikel.
  let { loading: articleLoading, data: articleData, error: articleError } = useFetch('http://163.53.195.233:1337/api/articles?populate=*');

	// Tampilkan animasi "Loading.." jika data masih dimuat
	if (articleLoading) {
    return (
      <div className="fixed inset-0 flex items-center justify-center z-50 bg-opacity-50 bg-gray-800">
        <div className="animate-spin rounded-full h-16 w-16 border-t-4 border-blue-500 border-opacity-75"></div>
      </div>
    );
  }
// Tampilkan pesan "Error!" jika terjadi kesalahan dalam pengambilan data
  if (articleError) {
    return (
    <div className="fixed inset-0 flex items-center justify-center z-50 bg-opacity-50 bg-gray-800">
      <div className="bg-white p-6 rounded-md shadow-md"><p className="ml-2 text-red-500">⛔ An error occurred. Please try again later. ⛔</p></div>
    </div>
    );
  }

  // Setelah data tersedia, lewatkan nilai data artikel, yang diberi alias sebagai articleData,
  // ke halaman-halaman lain yang memerlukan data ini.
  // Saya akan menggunakan variabel "articles" untuk menyimpan data ini,
  // yang kemudian akan kita panggil di halaman-hal yang sesuai (HomePage dan ArticleContentPage).
  return (
    <div>
        <Routes>
          <Route path="/" element={<HomePage articles={articleData} />} />
          <Route path="/article/:idFromURL" element={<ArticleContentPage articles={articleData} />} />
          <Route path="/registration" element={<UserRegistrationPage />} />
		  <Route path="/login" element={<UserLoginPage />} />
          <Route path="/categories" element={<CategoriesPage />} />
        </Routes>
    </div>
  )
}
Displaying Data for All Articles from Strapi
Now, let’s open the'HomePage.jsx' file where we will call the Articles component. This component will display a collection of article data that we obtained earlier. Add some scripts to this page as I have highlighted:
				// HomePage.jsx

import React from 'react';
import { Navbar, Articles } from "../components";

// Komponen HomePage menerima prop articles yang akan digunakan untuk menampilkan daftar artikel.
// Prop articles diteruskan dari komponen App.jsx yang mengambil data artikel melalui useFetch hook.
const HomePage = ({ articles }) => {
  return (
    <div>
      <Navbar />
      {/* Mengirimkan prop articles ke komponen Articles untuk ditampilkan */}
      <Articles articles={articles} />
    </div>
  );
};

export default HomePage;
Now, let’s open the'Articles.jsx' component. Adjust some scripts as highlighted here:
				// Articles.jsx

import React from 'react'
import { Link } from 'react-router-dom'
import { ReactMarkdown } from 'react-markdown/lib/react-markdown'

// Menggunakan prop articles yang diterima dari parent component (App.jsx).
// Hal ini memastikan bahwa aliran data tetap terjaga
const Articles = ({articles}) => {

    // data artikel awal yang masih static
    /* const articles=[ ... ]*/

  return (
    <div className='w-full bg-[#f9f9f9] py-[50px]'>
        <div className='max-w-[1240px] mx-auto'>
            <div className='grid lg:grid-cols-3 md:grid-cols-2 sm:grid-cols-2 ss:grid-cols-1 gap-8 px-4 text-black'>

                {/* Kita melakukan mapping terhadap data artikel yang diberikan melalui prop articles */}
                {/* Menggunakan .map untuk mengiterasi setiap artikel dalam array */}

                {articles.data.map((articlesmap)=>
                    <div key={articlesmap.id} className='bg-white rounded-xl overflow-hidden drop-shadow-md'>
                        <Link to={`/article/${articlesmap.id}`}>
                        <img
                            className='h-56 w-full object-cover'
                            src={`http://163.53.195.233:1337${articlesmap.attributes.coverImage.data.attributes.url}`}
                            alt={articlesmap.attributes.title} />
                        </Link>
                        <div className='p-8'>
                        <Link to={`/article/${articlesmap.id}`}>
                            <h3 className='font-bold text-2xl my-1'>{articlesmap.attributes.title}</h3>
                        </Link>
                        <div className='flex space-x-2 mt-2'>
                            {articlesmap.attributes.categories.data.map((category) => (
                            <span
                                key={category.id}
                                className='px-2 py-1 text-sm font-medium bg-[#1A9FDA] text-gray-800 rounded'
                            >
                                {category.attributes.name}
                            </span>
                            ))}
                        </div>
                        <ReactMarkdown className='mt-2 text-gray-600 text-xl line-break'>{`${articlesmap.attributes.body.substring(0, 150)}...`}</ReactMarkdown>
                            <Link to={`/article/${articlesmap.id}`} className='text-blue-500 font-medium'>
                                Read more
                            </Link>
                        </div>
                    </div>
                )}
            </div>
        </div>
    </div>
  )
}

export default Articles
With further explanation from the script as follow:
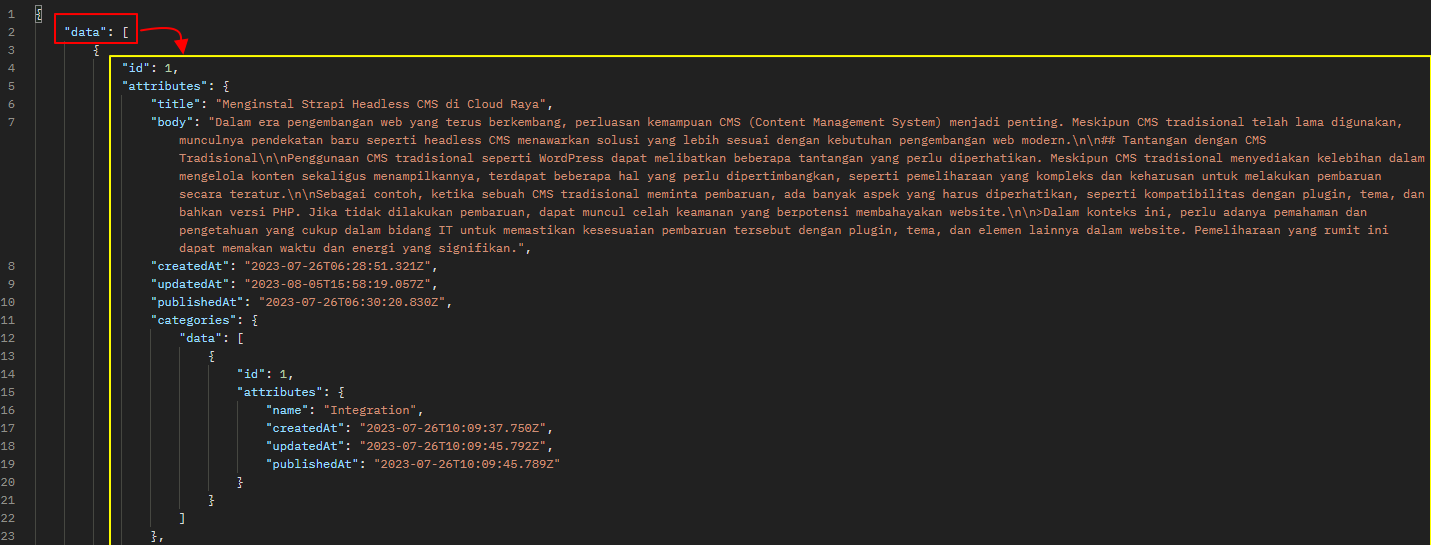
In the process of calling specific data, it is crucial for us to understand the hierarchy structure of the API response well. Here is an example of the API response we are using:
				{
    "data": [
        {
            "id": 1,
            "attributes": {
                "title": "Menginstal Strapi Headless CMS di CloudRaya",
                "body": "Dalam era pengembangan web yang terus berkembang....",
                "createdAt": "2023-07-26T06:28:51.321Z",
                "updatedAt": "2023-08-05T15:58:19.057Z",
                "publishedAt": "2023-07-26T06:30:20.830Z",
                "categories": {
                    "data": [
                        {
                            "id": 1,
                            "attributes": {
                                "name": "Integration",
                                "createdAt": "2023-07-26T10:09:37.750Z",
                                "updatedAt": "2023-07-26T10:09:45.792Z",
                                "publishedAt": "2023-07-26T10:09:45.789Z"
                            }
                        }
                    ]
                },
                "coverImage": {
                    "data": {
                        "id": 1,
                        "attributes": {
                            "name": "cover1.jpg",
                            "url": "/uploads/cover1.jpg",
                            {...}
                        }
                    }
                }
            }
        },
Because in this API response, all the data we need for articles is located within the “data” hierarchy, we write it like this:
				// Articles.jsx

/*...*/
{articles.data.map((articlesmap)=>
/*...*/
In the script snippet above:
articlesis the prop containing the data response from the Strapi API we called.datais an array that holds the article data from the API response.articlesmapis the prop representing each element in the array of article data from the API response.
The purpose of this script is to map the results of the API call we made earlier and select specific data within the “data” hierarchy.
Next, we just need to adjust the data we want to display. For example, to display the article cover image, the hierarchy will be like this:
				// Articles.jsx

/*...*/
<img src={`http://163.53.195.233:1337${articlesmap.attributes.coverImage.data.attributes.url}`} />
/*...*/
Similarly, when calling a hierarchy that is one level deeper, we can use the dot (.) notation to refer to that hierarchy. For example, to display category data based on this API response, the script arrangement would be like this:
				// Articles.jsx

/*...*/
{articlesmap.attributes.categories.data.map((category) => (
  <span>
    {category.attributes.name}
  </span>
))}
/*...*/
Displaying Some Article Data Based on the ID
Okay, let’s check on the script on 'App.jsx' that manage the ID returning by using this Router React.
				// App.jsx

/*...*/
<Route path="/article/:idFromURL" element={<ArticleContentPage articles={articleData} />} />
/*...*/
path="/article/:idFromURL" indicates that we are setting a route for the article page that receives an ID as a parameter.
:idfromURL is an example of a commonly used dynamic parameter in routing to create specific routes. The value of :idfromURL will eventually be obtained from the link to each article that we have set up earlier:
				// Articles.jsx

/*...*/
<Link to={`/article/${articlesmap.id}`}>...</Link>
/*...*/
Now, let’s open the 'ArticleContentPage.jsx' file first to pass data from articles to the ArticleContent component that will display the article details. Adjust the script as follows:
				// ArticleContentPage.jsx

import React from 'react'
import { Navbar, ArticleContent } from "../components"

const ArticleContentPage = ({articles}) => {
  return (
    <div>
         <Navbar />
         <ArticleContent articles={articles}/>
    </div>
  )
}

export default ArticleContentPage
Then, open 'ArticleContent.jsx' and adjust the script as follows:
				// ArticleContent.jsx

import React from 'react'
import { useParams } from 'react-router-dom'
import { ReactMarkdown } from 'react-markdown/lib/react-markdown'

const ArticleContent = ({ articles }) => {
  // useParams() sebagai hook yang disediakan oleh React Router akan membaca parameter dari URL dan menyimpannya di dalam variabel idFromURL.
  const { idFromURL } = useParams()

  /*const articles=[...] */

  /*
  Membuat array baru dengan memfilter data artikel berdasarkan artikel ID yang diambil dari variabel idFromURL.
  Jika variabel idFromURL cocok dengan ID artikel yang tersedia, maka gunakan datanya.
  Jika tidak cocok, tampilkan pesan error "Article not found".
  */
  let articlemap = {};
  let array = articles.data.filter((articlemap) => articlemap.id == idFromURL);
  if (array.length > 0) {
    articlemap = array[0];
  } else {
    return (
      <div className="flex items-center justify-center h-screen">
        <p>⛔ Article not found. ⛔</p></div>
    );
  }


  return (

    <div className='w-full pb-10 bg-[#f9f9f9]'>
      <div className='max-w-7xl mx-auto px-4 py-12 sm:px-6 lg:px-8'>
        <div className='grid lg:grid-cols-3 gap-8'>
          <div className='col-span-2 bg-white shadow rounded-lg overflow-hidden'>
            <img className='h-[300px] w-full object-cover' src={`http://163.53.195.233:1337${articlemap.attributes.coverImage.data.attributes.url}`} />
            <div className='p-6'>
              <h1 className='text-3xl font-semibold'>{articlemap.attributes.title}</h1>
              <div className='flex space-x-2 mt-2'>
                {articlemap.attributes.categories.data.map((categorymap) => (
                  <span key={categorymap.id} className='px-2 py-1 text-sm font-medium bg-[#1A9FDA] text-gray-800 rounded'>
                    {categorymap.attributes.name}
                  </span>
                ))}
              </div>
              <ReactMarkdown className='mt-2 text-gray-500 text-justify' >{articlemap.attributes.body}</ReactMarkdown>
            </div>
          </div>
          <div className='items-center w-full bg-white rounded-xl drop-shadow-md py-5 max-h-[250px]'>

              <div>
                <img className='p-2 w-32 h-32 rounded-full mx-auto object-cover' src={`http://163.53.195.233:1337${articlemap.attributes.authorImage.data.attributes.url}`} />
                <h1 className='font-bold text-2xl text-center text-gray-900 pt-3'>{articlemap.attributes.authorName}</h1>
                <p className='text-center text-gray-900 font-medium'>{articlemap.attributes.authorDesc}</p>
              </div>

          </div>
        </div>
      </div>
    </div>
  )
}

export default ArticleContent
User Registration
Here is a brief implementation of user registration in Strapi using React.
For the essential functions we need are as follows:
				// RegistrationForm.jsx

import React, { useState } from 'react';
import { useNavigate, Link } from 'react-router-dom';

const RegistrationForm = () => {
   // State untuk menyimpan data formulir
  const [formData, setFormData] = useState({
    username: '',
    email: '',
    password: '',
  });

  const [isSuccess, setIsSuccess] = useState(false);
  const [isError, setIsError] = useState(false);
  const [errorMessage, setErrorMessage] = useState('');

  // Menggunakan useNavigate dari react-router-dom untuk navigasi halaman
  const navigate = useNavigate();

  // Mengatur perubahan input dalam formulir
  const handleInputChange = (event) => {
    const { name, value } = event.target;
    setFormData((prevData) => ({
      ...prevData, // Menyalin nilai sebelumnya dari state formData
      [name]: value, // Memperbarui nilai yang sesuai dengan input yang diubah
    }));
  };

  // Menghandle pengiriman formulir
  const handleSubmit = async (event) => {

    // Mencegah perilaku default browser yang biasanya akan memuat ulang halaman atau berpindah ke halaman lain saat tombol "Register" ditekan
    // Kita akan mengambil alih pengiriman data formulir dan mengontrolnya dengan menggunakan fungsi handleSubmit.
    event.preventDefault();

    // Mengirim data formulir ke server menggunakan metode POST
    const response = await fetch('http://163.53.195.233:1337/api/auth/local/register', {
      method: 'POST',
      headers: {
        'Content-Type': 'application/json',
      },
      body: JSON.stringify(formData),
    });

    const responseData = await response.json();

    // Jika permintaan berhasil (ditandai dengan terbuatnya JWT token), setIsSucess menjadi true.
    if (responseData.jwt) {
      setIsSuccess(true);
      setIsError(false);
    } else {
      // Menangani kesalahan jika terjadi masalah selama proses pengiriman
      setIsSuccess(false);
      setIsError(true);
      setErrorMessage(responseData.error.message);
    }
  };
  // navigasikan ke halaman utama ketika klik tombol close.
  const handleModalClose = () => {
    setIsSuccess(false);
    setIsError(false);
    if (isSuccess) {
      navigate('/');
    }
  };

  return (
    <div className="flex justify-center items-center h-screen bg-gray-100">
      <div className="w-full max-w-md p-6 bg-white rounded-lg shadow-md">
        <h2 className="text-2xl font-semibold mb-4 text-center">Registration</h2>
        <form onSubmit={handleSubmit}>
          <div className="mb-4">
            <label htmlFor="username" className="block text-sm font-medium">
              Username
            </label>
            <input
              type="text"
              id="username"
              name="username"
              value={formData.username}
              onChange={handleInputChange}
              className="mt-1 p-2 w-full border rounded focus:outline-none focus:border-blue-400"
              required
            />
          </div>
          <div className="mb-4">
            <label htmlFor="email" className="block text-sm font-medium">
              Email
            </label>
            <input
              type="email"
              id="email"
              name="email"
              value={formData.email}
              onChange={handleInputChange}
              className="mt-1 p-2 w-full border rounded focus:outline-none focus:border-blue-400"
              required
            />
          </div>
          <div className="mb-4">
            <label htmlFor="password" className="block text-sm font-medium">
              Password
            </label>
            <input
              type="password"
              id="password"
              name="password"
              value={formData.password}
              onChange={handleInputChange}
              className="mt-1 p-2 w-full border rounded focus:outline-none focus:border-blue-400"
              required
            />
          </div>
          <button
            type="submit"
            className="w-full py-2 px-4 bg-[#202E60] rounded-md hover:bg-[#30448c] hover:text-white"
          >
            Register
          </button>
        </form>
        <div className='py-5 border-t border-gray-300 mt-5'>
          <p class="text-sm text-center text-gray-400">Already have an account? <Link to={`/login`} class="text-indigo-400 focus:outline-none focus:underline focus:text-indigo-500 dark:focus:border-indigo-800">Login</Link>.</p>
        </div>
      </div>
      {isSuccess && (
        <div className="fixed inset-0 flex items-center justify-center bg-black bg-opacity-50">
          <div className="bg-white p-6 rounded shadow-md text-center">
            <p className="text-green-500 font-semibold mb-2">Registration successful</p>
            <button
              onClick={handleModalClose}
              className="bg-green-500 text-white px-4 py-2 rounded hover:bg-green-600 focus:outline-none"
            >
              Close
            </button>
          </div>
        </div>
      )}
      {isError && (
        <div className="fixed inset-0 flex items-center justify-center bg-black bg-opacity-50">
          <div className="bg-white p-6 rounded shadow-md text-center">
            <p className="text-red-500 font-semibold mb-2">{errorMessage}</p>
            <button
              onClick={handleModalClose}
              className="bg-red-500 text-white px-4 py-2 rounded hover:bg-red-600 focus:outline-none"
            >
              Close
            </button>
          </div>
        </div>
      )}
    </div>
  );
};

export default RegistrationForm;
User Login
The login process follows a flow that is almost similar to the registration process, but adjustments need to be made to the URL endpoint:
				// LoginForm.jsx

import React, { useState } from 'react';
import { useNavigate, Link, Route } from 'react-router-dom';

const LoginForm = () => {
  const [formData, setFormData] = useState({
    identifier: '',
    password: '',
  });

  const [isSuccess, setIsSuccess] = useState(false);
  const [isError, setIsError] = useState(false);
  const [errorMessage, setErrorMessage] = useState('');

  const navigate = useNavigate();

  const handleInputChange = (event) => {
    const { name, value } = event.target;
    setFormData((prevData) => ({
      ...prevData,
      [name]: value,
    }));
  };

  const handleSubmit = async (event) => {
    event.preventDefault();

    const response = await fetch('http://163.53.195.233:1337/api/auth/local', {
      method: 'POST',
      headers: {
        'Content-Type': 'application/json',
      },
      body: JSON.stringify(formData),
    });

    const responseData = await response.json();

    if (responseData.jwt) {
      setIsSuccess(true);
      setIsError(false);
    } else {
      setIsSuccess(false);
      setIsError(true);
      setErrorMessage(responseData.error.message);
    }
  };

  const handleModalClose = () => {
    setIsSuccess(false);
    setIsError(false);
    if (isSuccess) {
      navigate('/');
    }
  };

  return (
    <div className="flex justify-center items-center h-screen bg-gray-100">
      <div className="w-full max-w-md p-6 bg-white rounded-lg shadow-md">
        <h2 className="text-2xl font-semibold mb-4 text-center">Login</h2>
        <form onSubmit={handleSubmit}>
          <div className="mb-4">
            <label htmlFor="identifier" className="block text-sm font-medium">
              Username
            </label>
            <input
              type="text"
              id="identifier"
              name="identifier"
              value={formData.username}
              onChange={handleInputChange}
              className="mt-1 p-2 w-full border rounded focus:outline-none focus:border-blue-400"
              required
            />
          </div>
          <div className="mb-4">
            <label htmlFor="password" className="block text-sm font-medium">
              Password
            </label>
            <input
              type="password"
              id="password"
              name="password"
              value={formData.password}
              onChange={handleInputChange}
              className="mt-1 p-2 w-full border rounded focus:outline-none focus:border-blue-400"
              required
            />
          </div>
          <button type="submit" className="w-full py-2 px-4 bg-[#202E60] rounded-md hover:bg-[#30448c] hover:text-white">
            Login
          </button>
        </form>
        <div className='py-5 border-t border-gray-300 mt-5'>
          <p className="text-sm text-center text-gray-400">Don't have an account yet? <Link to={`/registration`} className="text-indigo-400 focus:outline-none focus:underline focus:text-indigo-500 dark:focus:border-indigo-800">Sign up</Link>.</p>
        </div>
      </div>
      {isSuccess && (
        <div className="fixed inset-0 flex items-center justify-center bg-black bg-opacity-50">
          <div className="bg-white p-6 rounded shadow-md text-center">
            <p className="text-green-500 font-semibold mb-2">Login success</p>
            <button
              onClick={handleModalClose}
              className="bg-green-500 text-white px-4 py-2 rounded hover:bg-green-600 focus:outline-none"
            >
              Close
            </button>
          </div>
        </div>
      )}
      {isError && (
        <div className="fixed inset-0 flex items-center justify-center bg-black bg-opacity-50">
          <div className="bg-white p-6 rounded shadow-md text-center">
            <p className="text-red-500 font-semibold mb-2">{errorMessage}</p>
            <button
              onClick={handleModalClose}
              className="bg-red-500 text-white px-4 py-2 rounded hover:bg-red-600 focus:outline-none"
            >
              Close
            </button>
          </div>
        </div>
      )}
    </div>
  )
};

export default LoginForm;
Every time a successful login occurs, if we enable console.log(responseData.jwt) in the script, the JWT (JavaScript Web Token) will be displayed as discussed in the previous article.

This JWT is what we will store in a browser cookie to maintain the continuity of the session.
Continued Activities
 Login Session Management with Cookies
To ensure the proper functioning of login session storage, one method is to store the JWT token inside a cookie.
In cookie management, there are various methods, such as using document.cookie or manually handling cookies on the server. However, for convenience and clarity in script writing, we can leverage js-cookie, a library that assists in cookie management.
Firstly, we need to install the js-cookie ibrary with the following command:
npm install js-cookie
After the installation is complete, we can import this library into the 'LoginForm.jsx' file as follows:
				// LoginForm.jsx

/*...*/
import Cookies from 'js-cookie';
/*...*/
The next step is to add configuration to store the cookie when the login is successful.
				// LoginForm.jsx

/*...*/
// Jika permintaan berhasil (ditandai dengan terbuatnya JWT token), navigasikan ke halaman utama
if (responseData.jwt) {
  // Set JWT token dengan js-cookie
	Cookies.set('jwt', responseData.jwt, {
		expires: 30 / (60 * 24), // menghitung waktu kedaluwarsa cookie 30 menit dalam bentuk fraksi dari 1 hari (24 jam), di mana 1 hari terdiri dari 60 * 24 menit.
	});
	navigate('/');
}
/*...*/
After that, we can try to log in and check the cookies in the browser. You will see that the JWT token has been stored with the name 'jwt'.

Although these steps are relatively straightforward, it’s important to remember that cookie settings can be more complex depending on your application’s needs. Some cookie options such as domain, path, httponly, and secure may need adjustment. Be sure to refer to the js-cookie documentation or general cookie guides to ensure the proper configuration.
Displaying The Logout Button After Login
We can use Cookies.get('jwt') to check if the token exists in the cookie. If it does, the login and register buttons will be replaced with the logout button.
				//Navbar.jsx

/*...*/
import Cookies from 'js-cookie'; // Import js-cookie library

const Navbar = () => {
/*...*/
  const handleLogout = () => {
    Cookies.remove('jwt'); // Menghapus token pada logout
  };

  return (
    <div>
      <div>
        {/*...*/}
        {Cookies.get('jwt') ? ( // Cek apakah token ada dalam cookie
          <div>
            <button onClick={handleLogout}>Logout</button>
          </div>
        ) : (
          <div>
            <Link to={`/login`}><button>Login</button></Link>
            <Link to={`/registration`}><button>Register</button></Link>
          </div>
        )}
        {/*...*/}
      </div>
    </div>
  )
}

export default Navbar;
Summary
In this tutorial, we have learned how to manage content data from the Strapi backend and then display it on the frontend application.
Other tutorial series that can complement your understanding of development with Strapi can be found before or after this article, or you can explore various other interesting tutorials on the CloudRaya Knowledge Base (KB) page.