Using StorageRaya – CloudRaya S3 Object Storage
StorageRaya is CloudRaya’s S3 Object Storage service that can be used for a wide range of storage needs, from simple to advanced scenarios.
However, StorageRaya is best suited for storing archived document files and basic static files like website assets such as images, music, and videos.
In this guide, you will explore how to easily use and manage files and buckets in StorageRaya through the dashboard panel.
Exploring the StorageRaya Menu
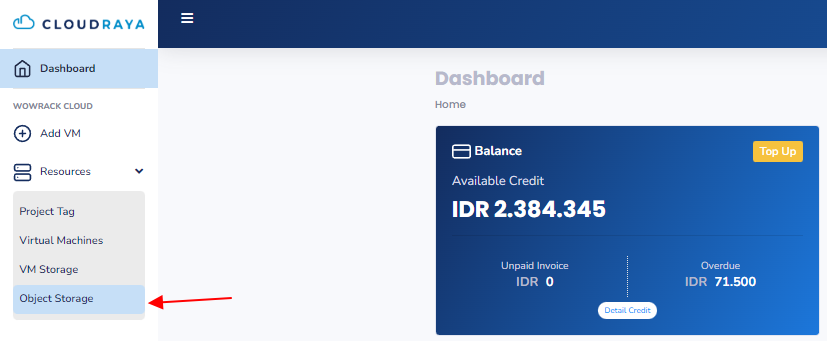
Once you are logged into the CloudRaya User panel, on the left of the dashboard, navigate to the ‘Resources‘ > ‘Object Storage‘ menu.

Next, we will be taken to the “Object Storage” page.
- There are three main menus for the Object Storage service: ‘Bucket List,’ ‘Sub-Bucket List,’ ‘Bucket Log.’
- We can start creating the main Bucket by clicking the ‘Create Bucket‘ button.
- All the information about the buckets we have will be displayed in this list, including some actions we can perform.
- Your account’s ‘Access key’ and ‘Secret key’ information will be shown. We will always need these two credentials when integrating our Object Storage service with third-party tools we use. Use the ‘Reset Access & Secret Key‘ button if you need to reset them.
- You can find information about StorageRaya’s features and pricing here.
Here are some activities we can do:
▶ Creating Main Bucket
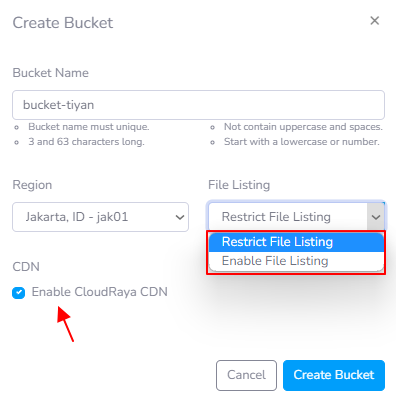
When we click the ‘Create Bucket’ button, a dialog box will appear.
- Enter the desired bucket name and ensure that it follows the provided guidelines.
- In the region section, select Jakarta.
- File Listing is a feature that allows you to determine whether the public viewers can see the contents of your bucket.
- Enable File Listing: The public can see the contents and names of the files in the bucket.
- Restrict File Listing: The public cannot see its contents.
- Enable File Listing: The public can see the contents and names of the files in the bucket.
- In the “Enable CloudRaya CDN” option, turn on this feature if you want to improve the user experience and overall performance of your application by enhancing asset access through the network.
In short, with a CDN (Content Delivery Network), the content stored in your bucket will be distributed globally through CloudRaya’s nearest edge servers in different parts of the world. This is done to enhance the speed of accessing your website or application and reduce network delays. Users in different geographical locations will experience faster loading times when accessing content from your bucket.

After clicking the ‘Create Bucket’ button, the newly created bucket will appear in the Bucket List.
You can access the bucket in two ways:
- Through https://s3-jak01.storageraya.com/bucket-name, or
- Via the CDN URL https://5d986f1a5faae.z.cdn.cloudraya.com
It is recommended to use the CDN URL, especially if you have activated the CDN feature. This way, users accessing assets in your bucket will automatically get the closest edge server based on their geographic location.

There are many activities that you can do with this bucket, such as checking the contents, adjusting settings, disabling CDN, copying the URL, or deleting it.
Uploading Objects to a Storage Raya Bucket
To start adding (uploading) objects, it’s also very easy. First, we select the newly created bucket:
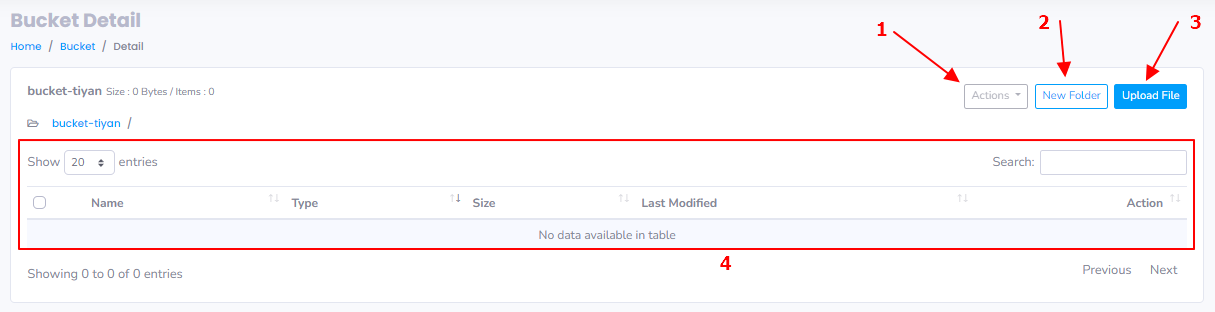
On the Bucket Detail page, we can see the contents of our bucket and perform various activities.
- The Actions button becomes active when we have selected multiple objects and want to perform mass actions.
- We can organize objects within our bucket by clicking New Folder.
- To add objects to our bucket, we simply click ‘Upload File’.
- All objects and folders we have added will appear in the following list.
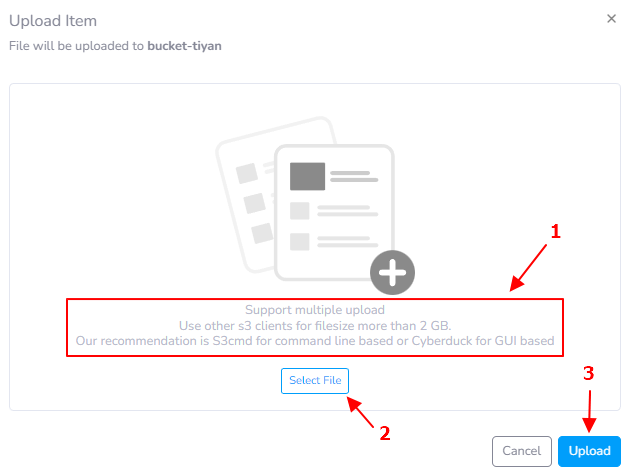
When you click the ‘Upload File’ button, a dialog box like the one above will appear.
- You can upload multiple objects at once. If you want to upload a file larger than 2GB, we recommend using a third-party file manager application, such as S3CMD or CyberDuck.
- Select the file you want to add to Storage Raya.
- Once you’ve done that, click ‘Upload‘.

When we have selected the file, the dialog box will provide information about which files we are about to upload. We can also choose the permission for the file we want to upload, whether to set it as public or private. Once done, click on ‘Upload‘.
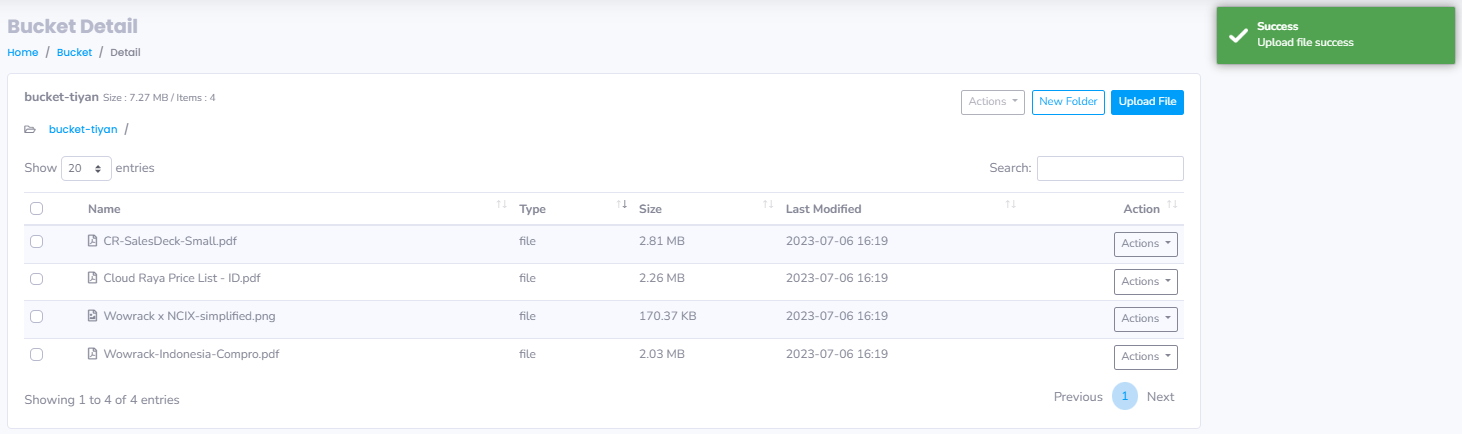
Here’s how the contents of the bucket, filled with objects, will appear.
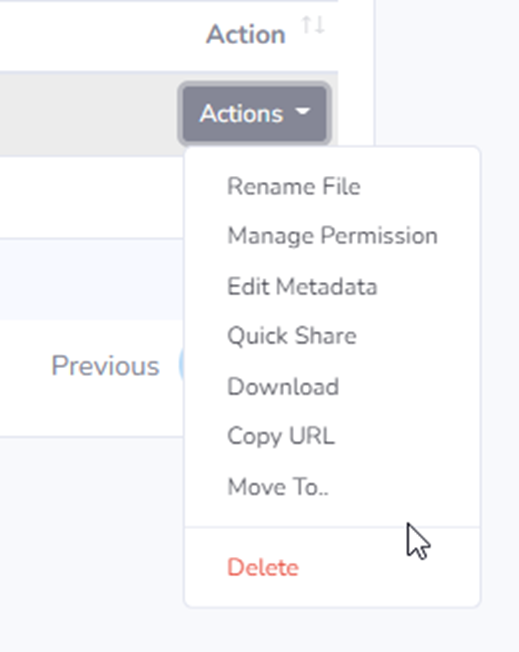
There are many actions you can do with each file. These include:
- Rename File – Change the file’s name.
- Manage Permissions – Control who can access the file.
- Edit Metadata – Modify additional information about the file.
- Quick Share – Share it quickly and set how long the sharing lasts.
- Download – Get a copy of the file on your device.
- Copy URL – Obtain the web link for your file.
- Move To – Transfer the file to a specific folder you want.
- Delete – Remove the file permanently.
▶ Creating Sub Bucket
The functions of sub-buckets in Storage Raya are versatile and serve both individual needs and B2B solutions.
Sub-buckets allow users to create additional storage structures within a main bucket, offering benefits in various scenarios:
- Reseller: Sub-buckets enable users to become resellers of Cloud Raya services. By creating sub-buckets for each customer, data can be separated and managed independently, allowing resellers to offer storage services to their clients.
- Team and Project Management: With sub-buckets, users can configure separate access permissions, enabling different access rights for each sub-bucket. For instance, if you run a production house with multiple teams or projects, sub-buckets can be used to segregate project data for each team to maintain confidentiality and security. By granting each team or project access only to the relevant sub-bucket, without needing to know the main bucket’s secret key, this can be achieved. Each sub-bucket has its own Access Key and Secret Key, distinguishing it from the main bucket.
Additionally, with sub-buckets, you can implement automatic storage policies or deletions for each sub-bucket. You can set maximum quotas for each sub-bucket and establish rules to delete sub-buckets after a specific period. This is useful for maintaining efficient storage management and upkeep.

Here is the menu view of the Sub-bucket list. To create your first sub-bucket, click on “Create Sub-Bucket.”
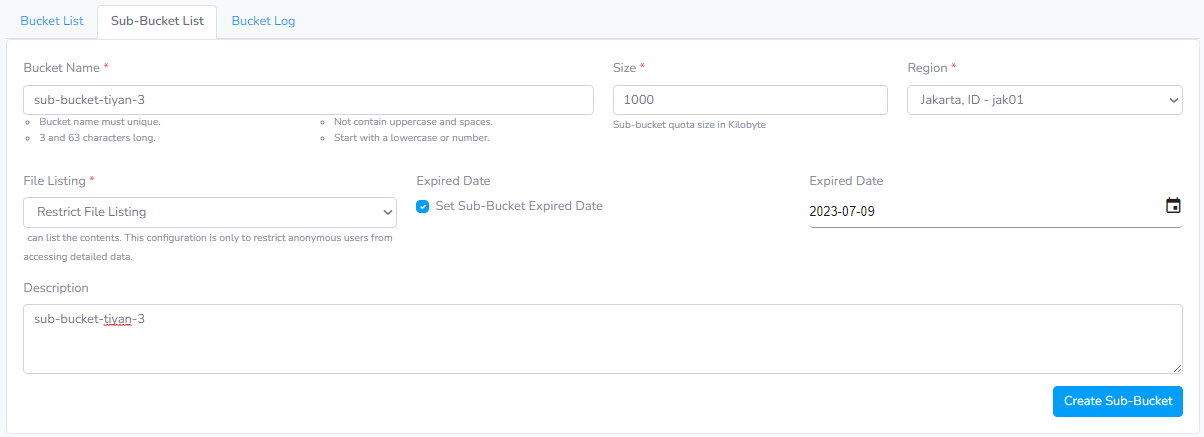
All the features and functions mentioned earlier can be found on the ‘Create Sub-Bucket’ page.
Here, you can set the sub-bucket quota and schedule automatic deletions using the ‘Expired Date’ feature.
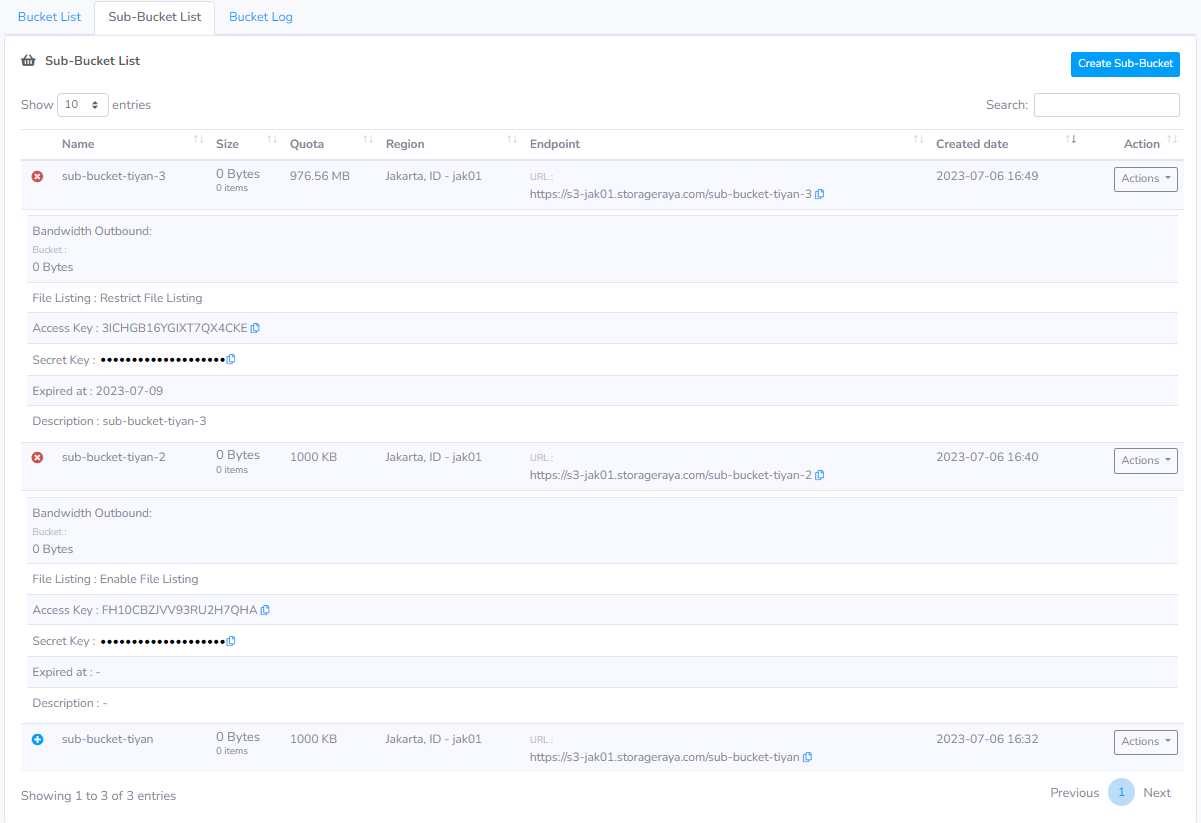
Here is a view of each sub-bucket that we’ve created. You can see that each sub-bucket has its own Access & Secret Key.
There’s a small difference between the main bucket and the sub-buckets. Sub-buckets don’t have an option to view files through the panel. Therefore, we can use a third-party application to work with them.
In this context, I will use CyberDuck.
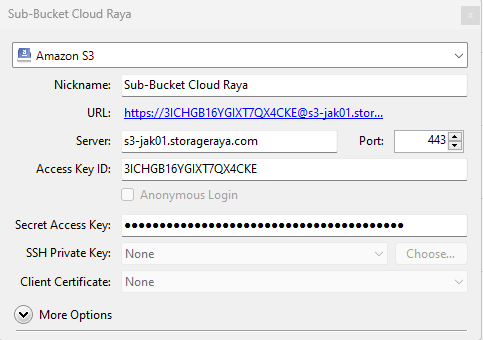
Input the settings as shown below and adjust your Access & Secret Key.
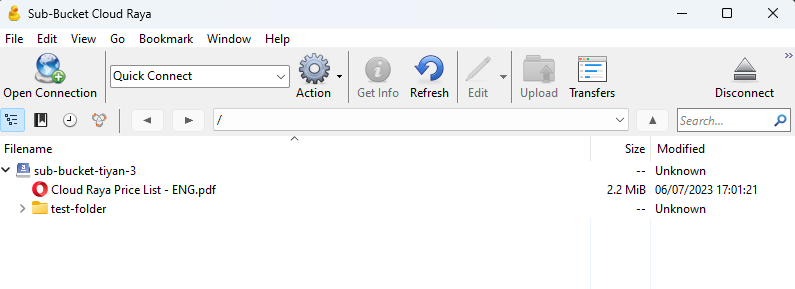
From there, we can already upload all the files we need.
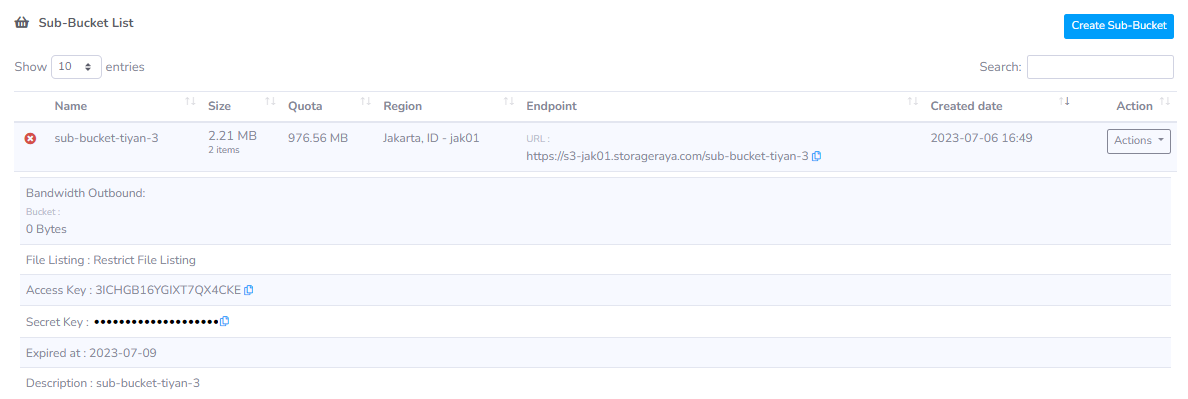
Inside the panel, it will display the number of files in that sub-bucket and their total size.
▶ Reviewing Bucket Log
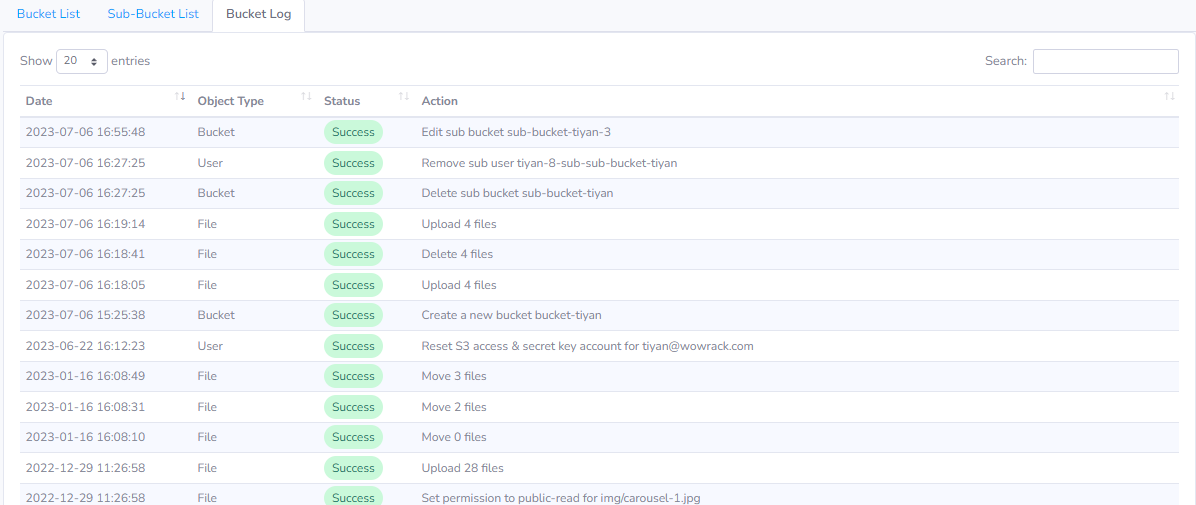
In the Bucket Log, we can see the history of activities related to the Object Storage that we have performed.