-
Products and Features
- How to Create and Manage VPC on CloudRaya
- Getting Started with CloudRaya Container Registry
- How to use Sudo on a CloudRaya Linux VM
- Keeping Your CloudRaya Linux VMs Up-to-Date
- Maximizing StorageRaya with Essential Practices
- Assign Multiple IP Addresses to Virtual Machine
- Generating a CloudRaya API key
- Simplify CloudRaya Management with API
- Deploying a Virtual Machine on CloudRaya
- Deploying a Kubernetes Cluster on KubeRaya
- Using StorageRaya – CloudRaya S3 Object Storage
- Opening Ping Access on Cloud Raya VM Public IP
- Maximize Your Storage Raya Access Speed with Content Delivery Network (CDN)
- How to Create Project Tag in Cloud Raya for More Organized VM Billing Report
- Exporting Cloud Raya VM to outer Cloud Raya's Infrastructure using Acronis Cyber Protect
- SSO Management on Cloud Raya
- Using the SSH key Feature in Cloud Raya Dashboard
- Cloud Raya Load Balancer, Solution to Distribute Load Equally
- Create your own VPN server with DNS-Level AdBlocker using PiVPN
- Fix Broken LetsEncrypt SSL Certificate due to Expired Root CA Certificate
- How to Make a Snapshot and Configure VM Backup in Cloud Raya
- How to Request Services or Licenses Products
- Adding, Attaching, and Resize Root Storage Disk in Cloud Raya VPS
- Managing your DNS Zone with DNS Bucket in Cloud Raya
- Create VM, Custom Package, Reinstall VM, and Adjusting Security Profile
- How to backup Linux VM via Acronis in Cloud Raya
- How to Backup Desktop Linux and Windows via Acronis in Cloud Raya
- Backing-Up Cloud Raya Windows VM Using Acronis Cyber Protect
- Load Balancing in Cloud Raya
- Establishing a VPN in Cloud Raya
- Generating an API Token
- Deploying a Virtual Machine in Cloud Raya
- Show Remaining Articles17 Collapse Articles
-
- How to backup Linux VM via Acronis in Cloud Raya
- How to Backup Desktop Linux and Windows via Acronis in Cloud Raya
-
- Maximizing StorageRaya with Essential Practices
- Using StorageRaya – CloudRaya S3 Object Storage
- Building a Static Website Using Storage Raya S3 Bucket
- Integrating S3 Storage Raya and Strapi for Asset Storage Optimization – Part 4
- Maximize Your Storage Raya Access Speed with Content Delivery Network (CDN)
- Managing Storage Raya from various tools and from various OS
- Binding NextCloud with CloudRaya S3 Object Storage as External Storage Mount
-
- How to use Sudo on a CloudRaya Linux VM
- Keeping Your CloudRaya Linux VMs Up-to-Date
- Implement Multi-Factor Authentication on CloudRaya Linux VM
- Assign Multiple IP Addresses to Virtual Machine
- Deploying a Virtual Machine on CloudRaya
- Configurating cPanel Using Ubuntu 20.04 on CloudRaya – Part 2
- Deploying cPanel Using Ubuntu 20.04 on CloudRaya - Part 1
- Exporting Cloud Raya VM to outer Cloud Raya's Infrastructure using Acronis Cyber Protect
- Using the SSH key Feature in Cloud Raya Dashboard
- Adding, Attaching, and Resize Root Storage Disk in Cloud Raya VPS
- Create VM, Custom Package, Reinstall VM, and Adjusting Security Profile
- How to backup Linux VM via Acronis in Cloud Raya
- Backing-Up Cloud Raya Windows VM Using Acronis Cyber Protect
- Deploying a Virtual Machine in Cloud Raya
-
Integration
- Implement Multi-Factor Authentication on CloudRaya Linux VM
- Accessing KubeRaya Cluster Using the Kubernetes Dashboard
- Building a Static Website Using Storage Raya S3 Bucket
- Integrating S3 Storage Raya and Strapi for Asset Storage Optimization – Part 4
- Integrating Strapi Content to Frontend React - Part 3
- Content Management with Strapi Headless CMS - Part 2
- Strapi Headless CMS Installation in CloudRaya - Part. 1
- Using SSH Key on CloudRaya VM with PuTTY
- Installing Multiple PHP Versions in One VM for More Flexible Web Development
- Replatforming Apps to K8s with RKE and GitLab CI
- OpenAI API Integration: Completions in PHP
- Building an Email Server on CloudRaya Using iRedMail
- Improving Email Delivery with Sendinblue SMTP Relay
- Building a Self Hosted Password Manager Using Passbolt
- How to Install Podman on Almalinux/Rocky Linux 9
- ElkarBackup: GUI Based backup Tools based on Rsync and Rsnapshot
- Improving Webserver Performance with SSL Termination on NGINX Load Balancer
- Using NGINX as an HTTP Load Balancer
- Automating Task with Cronjob
- Upgrade Zimbra and the OS Version
- Deploy Mailu on Rancher Kubernetes
- Export and Import Database in MySQL or MariaDB Using Mysqldump
- Backup & Sync Local and Remote Directories Using RSYNC
- Managing Storage Raya from various tools and from various OS
- Binding NextCloud with CloudRaya S3 Object Storage as External Storage Mount
- Simple monitoring and alerting with Monit on Ubuntu 22.04 LTS
- VS Code on your browser! How to install code-server on a VM
- Implementing Redis HA and Auto-Failover on Cloud Raya
- Using XFCE Desktop Environment on Cloud Raya VM
- Installing Python 3.7-3.9 on Ubuntu 22.04 Jammy LTS using PPA
- Implementing Continuous Integration with Gitlab CI and Continuous Delivery with Rancher Fleet
- Using Collabora Online on Cloud Raya NextCloud's VM
- Installing NextCloud in Cloud Raya- Detail Steps from the Beginning to the Very End
- Set Up High Availability PostgreSQL Cluster Using Patroni on Cloud Raya
- Set Up WAF KEMP in Cloud Raya Part 2
- Set Up WAF KEMP in Cloud Raya Part 1
- Using the SSH key Feature in Cloud Raya Dashboard
- Monitor Your Services Uptime Using Uptime Kuma
- Hosting Static Website with Hugo on Cloud Raya
- Kubernetes Ingress Controller using SSL in CloudRaya
- Reverse Proxy management using Nginx Proxy Manager
- Create your own VPN server with DNS-Level AdBlocker using PiVPN
- How to deploy Portainer on Linux to easily manage your docker containers
- High Availability Kubernetes Using RKE in Cloud Raya Part 3
- High Availability Kubernetes Using RKE in Cloud Raya Part 2
- High Availability Kubernetes Using RKE in Cloud Raya Part 1
- How to backup Linux VM via Acronis in Cloud Raya
- How to Backup Desktop Linux and Windows via Acronis in Cloud Raya
- Deploying Magento on Cloud Raya
- How to Install Nextcloud on Cloud Raya
- How to Install CWP in Cloud Raya
- How to Install Node.js and Launch Your First Node App
- How to install and secure MariaDB on Ubuntu 18.04 and 20.04 on Cloud Raya
- How to Install and Securing MongoDB on Ubuntu 18.04 and 20.04
- Classes: Post Installation on Ansible
- Classes: Install and Configure Ansible
- Classes: Introduction to Ansible for a robust Configuration Management
- How to Setup Active Directory Domain Service & DNS with Cloud Raya
- How to Host Your Own Docker Hub in Cloud Raya
- How to Setup Your Own Laravel with Nginx in Ubuntu 18.04
- How to Deploy Container in Cloud Raya using Docker
- Securing CentOS with iptables
- Install and Configure Squid Proxy in Ubuntu
- Installing Apache and Tomcat: A Quick Way
- Securing Ubuntu with UFW
- Install a Node.js and Launch a Node App on Ubuntu 18.04
- Installing LAMP in Ubuntu
- Installing LEMP Stack on Ubuntu 18.04
- Show Remaining Articles53 Collapse Articles
-
- Articles coming soon
-
- Implement Multi-Factor Authentication on CloudRaya Linux VM
- Configurating cPanel Using Ubuntu 20.04 on CloudRaya – Part 2
- Deploying cPanel Using Ubuntu 20.04 on CloudRaya - Part 1
- Integrating S3 Storage Raya and Strapi for Asset Storage Optimization – Part 4
- Integrating Strapi Content to Frontend React - Part 3
- Content Management with Strapi Headless CMS - Part 2
- Strapi Headless CMS Installation in CloudRaya - Part. 1
- Using SSH Key on CloudRaya VM with PuTTY
- Building an Email Server on CloudRaya Using iRedMail
- Improving Email Delivery with Sendinblue SMTP Relay
- Building a Self Hosted Password Manager Using Passbolt
- ElkarBackup: GUI Based backup Tools based on Rsync and Rsnapshot
- Improving Webserver Performance with SSL Termination on NGINX Load Balancer
- Using NGINX as an HTTP Load Balancer
- Upgrade Zimbra and the OS Version
- Deploy Mailu on Rancher Kubernetes
- Managing Storage Raya from various tools and from various OS
- Binding NextCloud with CloudRaya S3 Object Storage as External Storage Mount
- Simple monitoring and alerting with Monit on Ubuntu 22.04 LTS
- VS Code on your browser! How to install code-server on a VM
- Implementing Redis HA and Auto-Failover on Cloud Raya
- Using XFCE Desktop Environment on Cloud Raya VM
- Implementing Continuous Integration with Gitlab CI and Continuous Delivery with Rancher Fleet
- Using Collabora Online on Cloud Raya NextCloud's VM
- Installing NextCloud in Cloud Raya- Detail Steps from the Beginning to the Very End
- Set Up WAF KEMP in Cloud Raya Part 2
- Set Up WAF KEMP in Cloud Raya Part 1
- Monitor Your Services Uptime Using Uptime Kuma
- Create your own VPN server with DNS-Level AdBlocker using PiVPN
- How to deploy Portainer on Linux to easily manage your docker containers
- High Availability Kubernetes Using RKE in Cloud Raya Part 3
- High Availability Kubernetes Using RKE in Cloud Raya Part 2
- High Availability Kubernetes Using RKE in Cloud Raya Part 1
- How to Install Nextcloud on Cloud Raya
- Classes: Post Installation on Ansible
- Classes: Install and Configure Ansible
- Classes: Introduction to Ansible for a robust Configuration Management
- Connect Windows Active Directory on Cloud Raya with Azure AD
- How to Host Your Own Docker Hub in Cloud Raya
- How to Deploy Container in Cloud Raya using Docker
- Show Remaining Articles25 Collapse Articles
-
- Accessing KubeRaya Cluster Using the Kubernetes Dashboard
- Integrating S3 Storage Raya and Strapi for Asset Storage Optimization – Part 4
- Integrating Strapi Content to Frontend React - Part 3
- Content Management with Strapi Headless CMS - Part 2
- Strapi Headless CMS Installation in CloudRaya - Part. 1
- Creating Interactive Chatbot with OpenAI API in PHP
- Installing Multiple PHP Versions in One VM for More Flexible Web Development
- OpenAI API Integration: Completions in PHP
- Improving Webserver Performance with SSL Termination on NGINX Load Balancer
- Using NGINX as an HTTP Load Balancer
- Automating Task with Cronjob
- How to Deploy Django App on Cloud Raya VM Using Gunicorn, Supervisor, and Nginx
- How to Install Node.js and Launch Your First Node App
- How to Setup Your Own Laravel with Nginx in Ubuntu 18.04
- Install a Node.js and Launch a Node App on Ubuntu 18.04
-
- How to use Sudo on a CloudRaya Linux VM
- Keeping Your CloudRaya Linux VMs Up-to-Date
- Implement Multi-Factor Authentication on CloudRaya Linux VM
- Using SSH Key on CloudRaya VM with PuTTY
- Building a Self Hosted Password Manager Using Passbolt
- Improving Webserver Performance with SSL Termination on NGINX Load Balancer
- Export and Import Database in MySQL or MariaDB Using Mysqldump
- Backup & Sync Local and Remote Directories Using RSYNC
- How to Deploy Django App on Cloud Raya VM Using Gunicorn, Supervisor, and Nginx
- Set Up WAF KEMP in Cloud Raya Part 2
- Set Up WAF KEMP in Cloud Raya Part 1
- Using the SSH key Feature in Cloud Raya Dashboard
- How to backup Linux VM via Acronis in Cloud Raya
- How to Backup Desktop Linux and Windows via Acronis in Cloud Raya
- Securing CentOS with iptables
- Securing Ubuntu with UFW
- Show Remaining Articles1 Collapse Articles
-
- Configurating cPanel Using Ubuntu 20.04 on CloudRaya – Part 2
- Deploying cPanel Using Ubuntu 20.04 on CloudRaya - Part 1
- Integrating S3 Storage Raya and Strapi for Asset Storage Optimization – Part 4
- Integrating Strapi Content to Frontend React - Part 3
- Content Management with Strapi Headless CMS - Part 2
- Strapi Headless CMS Installation in CloudRaya - Part. 1
- Creating Interactive Chatbot with OpenAI API in PHP
- Installing Multiple PHP Versions in One VM for More Flexible Web Development
- Building an Email Server on CloudRaya Using iRedMail
- Building a Self Hosted Password Manager Using Passbolt
- Improving Webserver Performance with SSL Termination on NGINX Load Balancer
- Using NGINX as an HTTP Load Balancer
- Installing Python 3.7-3.9 on Ubuntu 22.04 Jammy LTS using PPA
- Reverse Proxy management using Nginx Proxy Manager
- Install and Configure Squid Proxy in Ubuntu
- Installing Apache and Tomcat: A Quick Way
- Installing LAMP in Ubuntu
- Installing LEMP Stack on Ubuntu 18.04
- Show Remaining Articles3 Collapse Articles
-
- Building a Static Website Using Storage Raya S3 Bucket
- Integrating S3 Storage Raya and Strapi for Asset Storage Optimization – Part 4
- Integrating Strapi Content to Frontend React - Part 3
- Content Management with Strapi Headless CMS - Part 2
- Strapi Headless CMS Installation in CloudRaya - Part. 1
- Creating Interactive Chatbot with OpenAI API in PHP
- Installing Multiple PHP Versions in One VM for More Flexible Web Development
- OpenAI API Integration: Completions in PHP
- Hosting Static Website with Hugo on Cloud Raya
- Deploying Magento on Cloud Raya
- How to Install CWP in Cloud Raya
- How to Setup Active Directory Domain Service & DNS with Cloud Raya
-
- Articles coming soon
How to Create and Manage VPC on CloudRaya
What is VPC?
A Virtual Private Cloud (VPC) is a virtual network dedicated to your CloudRaya environment. It offers enhanced control over your networking configuration, allowing for the isolation of resources, advanced access control lists (ACLs), and simplified management of network segmentation and IP addressing.
Configuring VPC in CloudRaya
Step 1: Access the VPC Menu
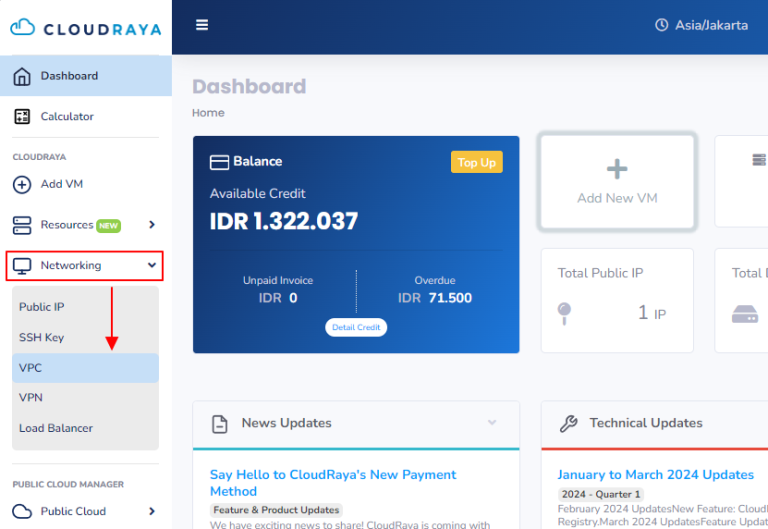
Log in to your CloudRaya account and navigate to the Networking menu > VPC.
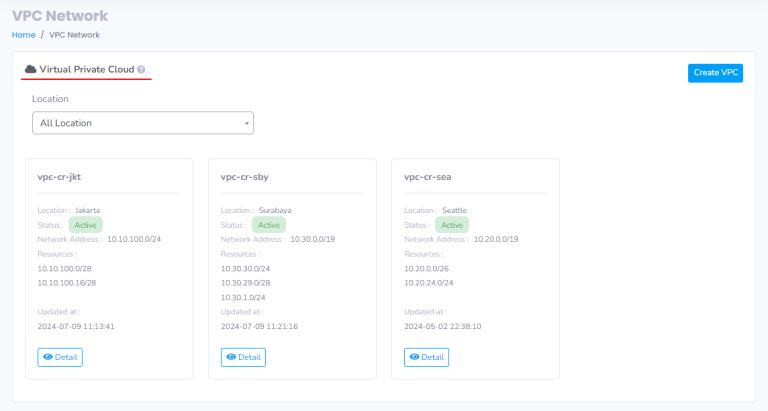
On the Virtual Private Cloud tab, a list of the VPC networks that we already have in a particular region/location will appear.
Step 2: Create a VPC Network
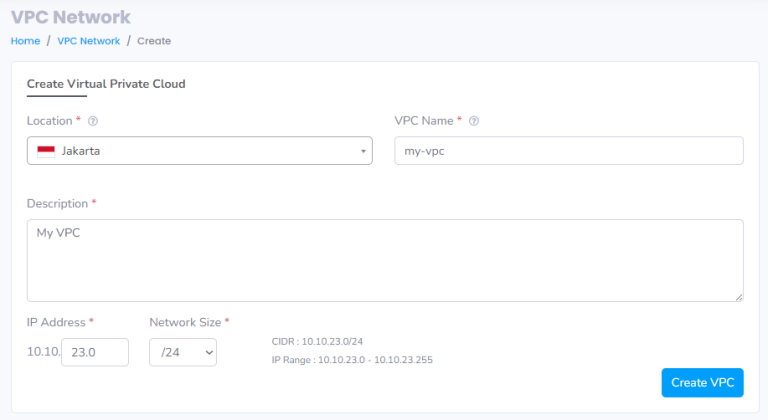
To start creating a VPC network, we can click on the Create VPC button.
On the Create Virtual Private Cloud page, fill in the following fields:
- Location: Select the region for the VPC Network (e.g., Seattle).
- VPC Name: Enter a name for your VPC network.
- Description: Provide a brief description of the VPC network.
- IP Address & Network Size: Specify the Super Network IP (e.g., 10.10.23.0) and Network Size (/24). The system will display the available IP ranges.
- If so, we can click on
Create VPC.
Step 3: Configure VPC Details
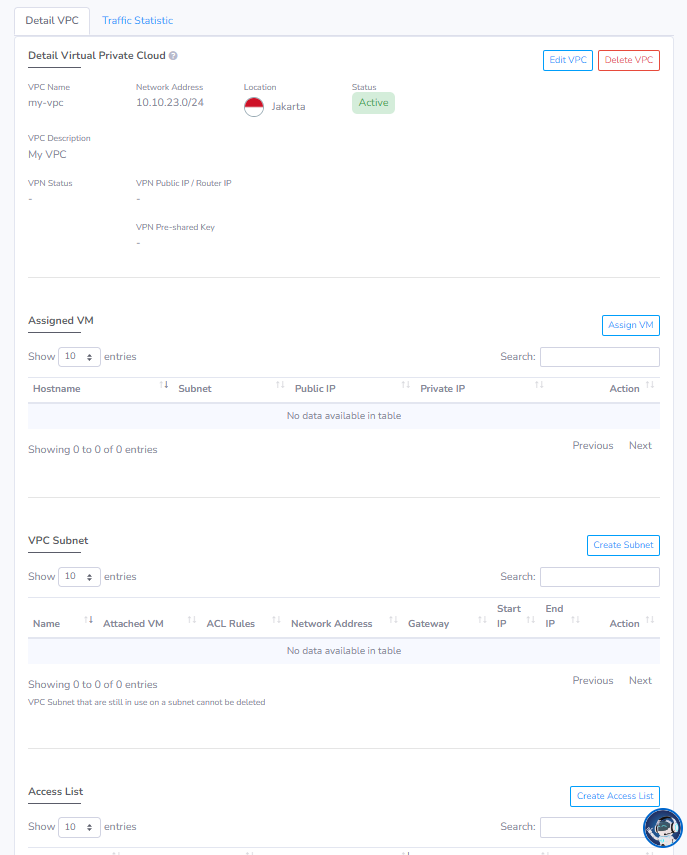
After creating the VPC network, you’ll be directed to the VPC Details page. This page includes several tabs and sections to customize your VPC settings.
- Detail Virtual Private Cloud: Review the information about your VPC.
- Assigned VM: View the VMs assigned to this VPC.
- VPC Subnet: View and manage your subnets.
- Access List: Manage ACL rules for your subnets.
Step 4: Create a Subnet
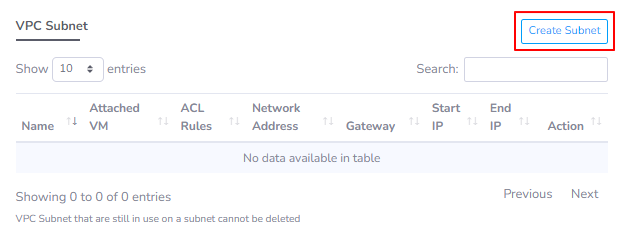
In the VPC Subnet section, click Create Subnet.
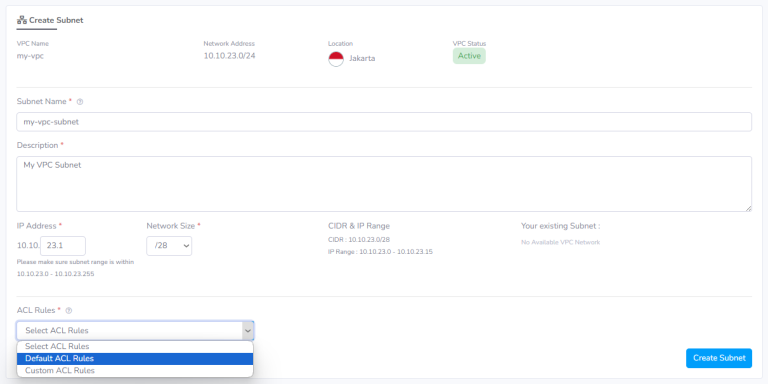
On the Create Subnet page, fill in the following fields:
- Subnet Name: Enter a name for the subnet.
- Description: Provide a description for the subnet.
- IP Address & Network Size: Specify the subnet range within the Super Network (/24). The range of the subnet must still be within the range of the Super Network that we created earlier (/24). For example, a subnet IP of 10.10.23.1 with a network size of (/28).
- ACL Rules: A collection of firewall rules that we can customize. We can specify which ports we want to open. You can choose the Default ACL Rules for a predefined configuration from CloudRaya, create custom ACL rules if you want to add specific rules, or use existing ACL rules you have created previously, which will also appear here.
- If so, Click
Create Subnet.
Step 5: Manage Subnet Lists
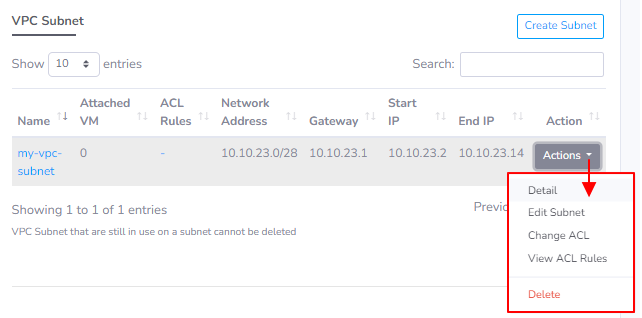
The newly created subnet will appear in the list. You can perform various actions such as:
- Detail: View subnet information and VM members.
- Edit Subnet: Edit the subnet name and description.
- Change ACL: Adjust the ACL Rule for the subnet.
- View ACL Rules: View and manage ACL rules.
- Delete: Delete the subnet. However, please make sure that there are no VMs attached to this subnet before doing so.
Step 6: Manage ACL Profiles
In line with the previous ACL Rules explanation on the Create Subnet process, once we finish creating the subnet, the ACL Profile will be displayed in this section. If you chose the default or custom configuration, the new ACL Profile will appear here. If you selected existing ACL rules, no new ACL Profile will be created.
In the ACL profile that we already have, we can manage several things such as changing its name, viewing the collection of rules, to deleting this profile.
Step 7: Manage ACL Rules
Now let’s explore the rules within each ACL profile.
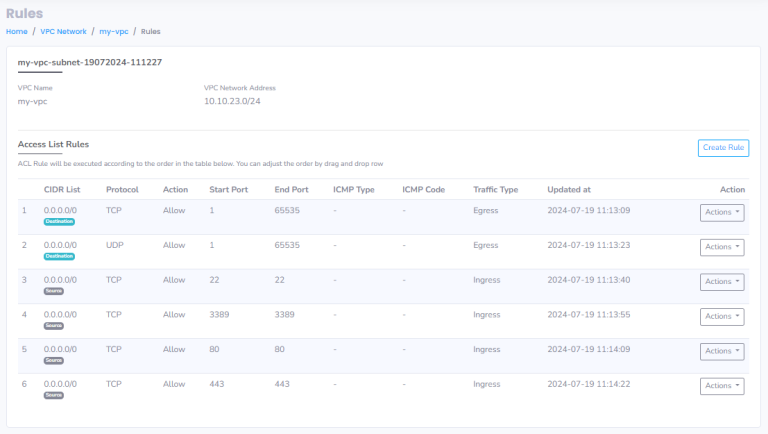
In the ACL Rules menu, you’ll see a list of ports you want to manage, their protocol types, CIDR lists, traffic types, and actions (whether you want to allow or deny traffic for each protocol, and port). You can manage each port individually or remove ports as needed.
Note:
The rule number determines the order in which the system reads these ACL rules. The system reads the rules in ascending order.
To understand traffic types:
- Egress: Traffic leaving our VM.
- Ingress: Traffic entering our VM.
For example, If we try to translate the set of rules above, it will be as follows:
Allow all ports with TCP and UDP protocols from 1 - 65535 from our VM, to be able to go to the internet.
And allow ports 22, 3389, 80, 443 with the TCP protocol to be able to enter our VM.
You can also add new rules by clicking the Create Rule button.
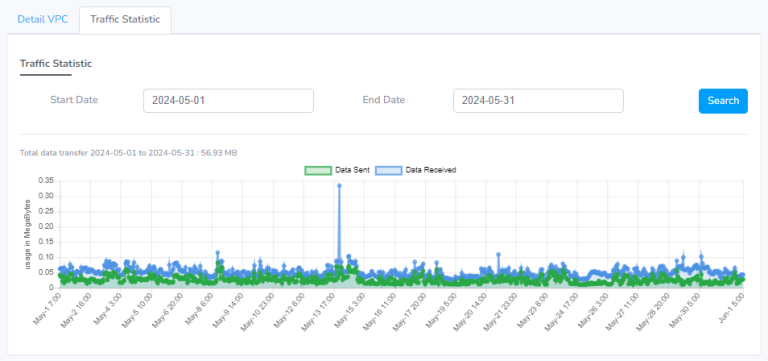
Traffic Statistic Tab
Check the traffic history and total data transfer used by the VPC Network.
Conclusion
In this article, we covered a brief overview of VPC, and how to configure and implement it within CloudRaya.
For a video tutorial, visit: YouTube Video.
For further questions, reach out to us via live chat or email our support team. Explore more insights on CloudRaya’s blog and Knowledge Base. Start creating new VMs and add CloudRaya’s VPC today!
