Setting up a business email used to be a time-consuming and complicated process. Today, it's much simpler with Zimbra and serverless deployment.
With serverless technology, setting up Zimbra Mail is faster and easier. You can simply deploy the application, complete a few basic configurations, and your business email is ready to use.
Thanks to this simplified approach, businesses of any size can launch a professional email solution without dealing with complicated server installation.
So, why should you choose Zimbra Mail?
Keep reading to learn what serverless deployment is and how you can set up Zimbra Mail.
Why Should You Choose Zimbra Mail?
Zimbra is an open-source email and collaboration platform designed for businesses.
It helps you to create and manage multiple professional email accounts using your own business domain, while also providing built-in collaboration features such as calendars, contacts, and tasks.
Everything is managed from a single platform, making day-to-day administration much easier.
Zimbra is suitable for businesses of all sizes, from small teams to large enterprises. You can start with just a few users and easily scale as your business grows.
Even better, setting up Zimbra Mail is now much easier thanks to serverless deployment.
What Is Serverless?
In this context, serverless refers to an application deployment method that eliminates the need to manually install and configure a server.
With serverless deployment, applications like Zimbra can be provisioned much faster because of the underlying server setup is handled automatically.
CloudRaya is one of the cloud providers that offers this capability through our Marketplace feature.
In CloudRaya Marketplace, application deployment is automated using ready-to-use templates. You can simply select the application, choose your preferred server specifications, and CloudRaya will automatically prepare the Zimbra environment for you.
Why Set Up Zimbra Mail Through CloudRaya Marketplace?
CloudRaya Marketplace offers several advantages for anyone looking to deploy Zimbra or other applications without dealing with complicated manual server installation, and here’s why:
-
Faster Deployment
Deploy Zimbra or other applications in just a few clicks. There's no need to spend hours configuring the server before getting started.
-
Automated Configuration
Basic configurations are automatically applied during deployment, reducing setup errors and helping you get your application up and running more quickly.
-
Scalable Resources
CloudRaya simplifies the scaling process whenever your workload grows. You can upgrade CPU, memory, and storage based on your business requirements.
-
Reliable Cloud Infrastructure
Zimbra and other serverless apps on CloudRaya Marketplace runs on a reliable cloud infrastructure, delivering high performance and dependable availability for any workloads.
What You Need Before Setting Up Zimbra Mail
Before deploying Zimbra, make sure you've prepared the following:
1. Create a CloudRaya Account
First, create a CloudRaya account by sign up through the CloudRaya Control Panel, verify your account, and make sure your balance is sufficient before starting the deployment.
2. Prepare Your Domain
Prepare the domain you'll use for your business email, such as yourcompany.com. This domain will later be connected to your Zimbra server so you can create email addresses like admin@yourcompany.com.
3. Configure DNS Records
Make sure you have access to your domain's DNS settings. Records such as A, MX, SPF, DKIM, and DMARC should be configured properly to ensure your email service works securely and reliably.
4. Estimate Your Server Resources
Estimate your server requirements based on the number of users you'll manage. The more email accounts you have, the more CPU, memory, and storage you'll need to maintain optimal performance.
How to Set Up Zimbra Mail with Serverless on CloudRaya
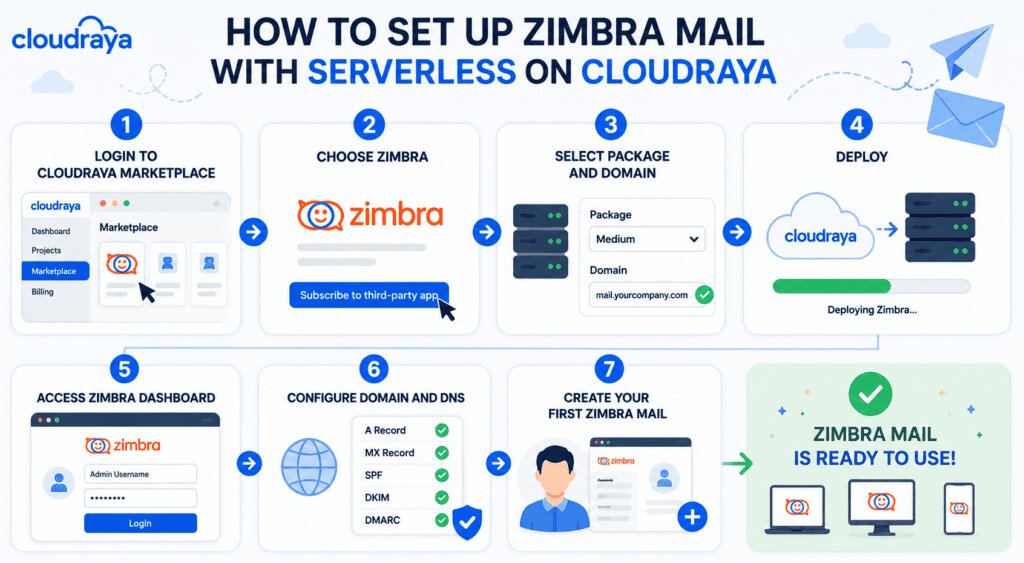
Once everything is ready, you're all set to deploy Zimbra. Follow these steps:
1. Log In to CloudRaya Marketplace
Sign in to the CloudRaya Control Panel and select the project where you'd like to deploy Zimbra. Then open the Marketplace menu to browse the available applications.
2. Select Zimbra
Find Zimbra in the Marketplace and click Subscribe to Third-Party App to
3. Choose Your Package and Domain
Select the Zimbra package that best fits your workload, then enter the domain you'll use for your business email.
4. Deploy Zimbra
Click Subscribe to Zimbra and wait for the deployment process to complete. CloudRaya will automatically provision the server and install Zimbra for you.
5. Access the Zimbra Dashboard
After deployment is complete, open the Zimbra URL provided by CloudRaya and sign in using your administrator account to start managing your email service.
6. Configure Your Domain and DNS
Point your domain to the Zimbra server by configuring the required DNS records, including A and MX records. Complete your SPF, DKIM, and DMARC configuration to improve email security and deliverability.
7. Create Your First Email Account
Your Zimbra environment is now ready. Log in to the Zimbra Administration Console and create your first email account based on your organization's needs.
Setting Up Zimbra on Android
You can also access Zimbra from your Android device. Here's how:
- Open the Gmail app or your phone's default Email app.
- Tap Add Account, then choose Exchange or IMAP, depending on your server configuration.
- Enter your email address, password, and the required server information.
If you're using Exchange ActiveSync, your email, contacts, and calendar will automatically sync with your device. If you're using IMAP, only your email messages will be synchronized.
Once the setup is complete, you can start accessing Zimbra directly from your Android phone.
Setting Up Zimbra on iPhone or iPad
If you're using an iPhone or iPad, setting up Zimbra is just as easy.
- Open Settings.
- Tap Mail.
- Select Accounts.
- Tap Add Account.
- Choose Microsoft Exchange or select Other if you're using IMAP.
- Enter your email address, password, server hostname, and any other required account information.
After verification is complete, your Zimbra account will be available in the built-in Mail app. If you're using Exchange ActiveSync, your contacts and calendar will also sync automatically.
Conclusion
Setting up Zimbra Mail is much easier than it used to be. With serverless deployment through CloudRaya Marketplace, you can deploy Zimbra quickly without going through the hassle of manually installing and configuring a server. Simply choose the package that fits your needs, complete a few configuration steps, and your business email is ready to go.
If you're looking for a business email solution that's easy to deploy, simple to manage, and scalable as your business grows, Zimbra is a great choice. Get started with Zimbra on CloudRaya today!