Building an Email Server on CloudRaya Using iRedMail
In the previous tutorial, we have learned on how SMTP relay can increase email delivery. Today, we will show you how to create an email server in CloudRaya using iRedMail, as this configuration allows you to have full access to your email infrastructure.
About iRedMail
iRedMail is an open-source platform based on a Linux/BSD server. The great advantage of iRedMail is its shell script, which allows users to automatically install and configure the entire components needed for an email server. iRedMail also provides mission-critical features needed to operate an email server such as antispam, antivirus, and user management tools. Last but not least, it allows us to infinitely create mailboxes and mail domains that can be stored in database systems such as MariaDB/MySQL, PostgreSQL, or OpenLDAP.
Other than the free open-source version, iRedMail also has paid versions which are iRedMail Easy and iRedMail Pro.
Pre-Instalation
▶️ System Requirement
There are several requirement we need to fulfill before installing iRedMail in Debian or Linux Ubuntu, which are as follows:
- It is highly recommended to use a vanilla server (vanilla as in no component such as MySQL, Postfix, Dovecot, etc. installed in the server), as iRedMail will automatically install all the necessary components in the installation process.
- CloudRaya recommends a VM with at least 4 GB of RAM. This size of VM can already accommodate low-traffic email server with antispam/antivirus protection enabled.
- Make sure the following UID/GID is not used by other users/groups: 2000, 2001, and 2002.
grep -E "^user[0-9]*:.*:(2000|2001|2002):" /etc/passwdgrep -E "^group[0-9]*:.*:(2000|2001|2002):" /etc/group
- Make sure the following UID/GID is not used by other users/groups: 2000, 2001, and 2002.
- Make sure you have the following ports open. You can open the ports in the Access Control List configuration at CloudRaya VPC. You can read more about how to open a port in CloudRaya VPC here.
▶️ Set FQDN as CloudRaya VM hostname

We will use an Ubuntu server in this tutorial.
First, we need to change the hostname of our VM. The hostname will be used by iRedMail as a link to access our web panel. Use the standard FQDN (Fully Qualified Domain Name) with the following as an example:
# hostnamectl hostname mail3.cloudforindonesia.com
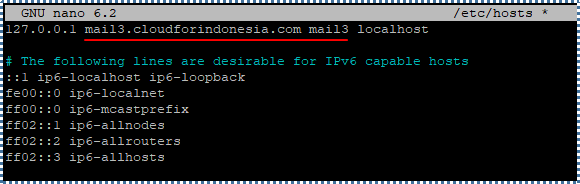
Next, update the static table lookup file of the hostname with the following at directory /etc/hosts.
# nano /etc/hosts
Add our hostname in the following line:
Reboot VM to apply the changes
# reboot
To check does the changes have been applied or not, use the following:
# hostname -f

iRedMail Installation
Install the following packages needed for iRedMail installer:
# sudo apt-get install gzip dialog
▶️ Download the Latest iRedMail Version
Download the latest iRedMail version using the following command wget
# wget https://github.com/iredmail/iRedMail/archive/refs/tags/1.6.2.tar.gz
Exctract the .tar archive:
# cd /root/
# tar zxf 1.6.2.tar.gz
Open the extracted folder with the following command:
# cd iRedMail-1.6.2/
▶️ Run iRedMail Installer
Run installer .sh within the folder with bash
# bash iRedMail.sh

You can configure your email server through several pop-up dialogues that appear throughout the installation process.
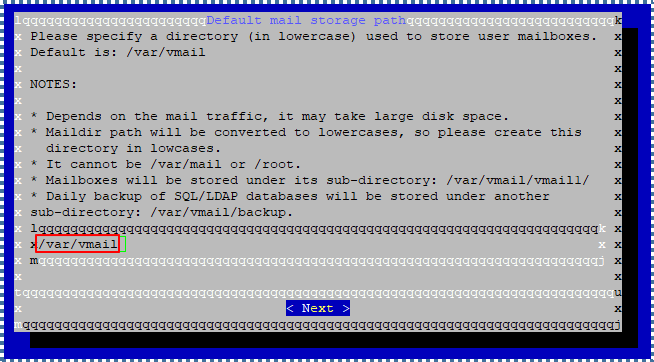
Choose your storage location. The default location is /var/vmail/.
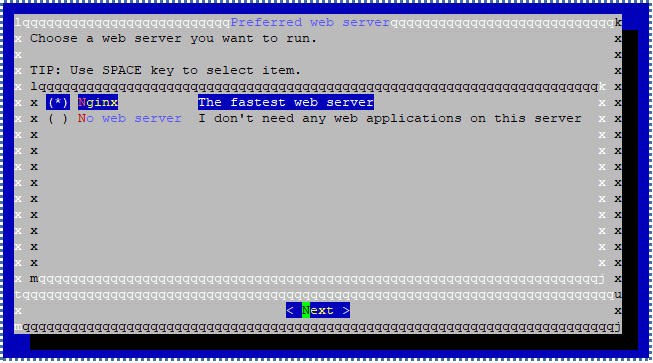
Next, choose what web server will be used for iRedMail. This tutorial will choose NGINX as the web server.
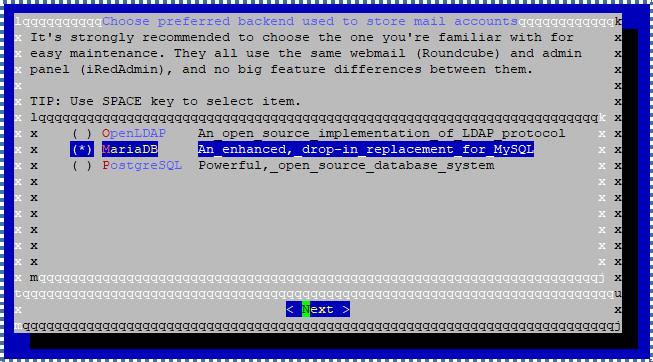
Decide which database system to store the email account. We recommend you choose the system you are familiar with. This tutorial will choose MariaDB as the database system.
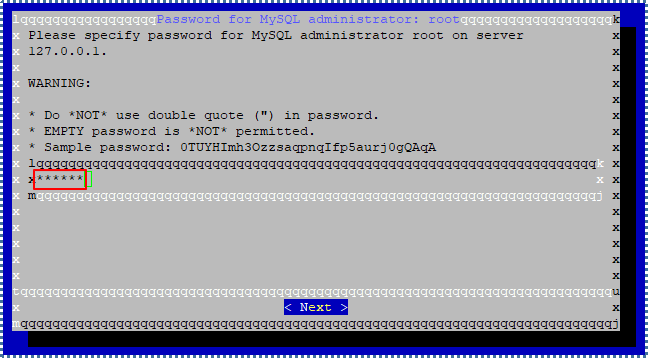
Create password for your MySQL root.

In the next pop-up, you will be asked to input the desired domain name. To add more email domain, you can do it in iRedMail admin panel.
Make sure to not use the same domain as the VM hostname domain.
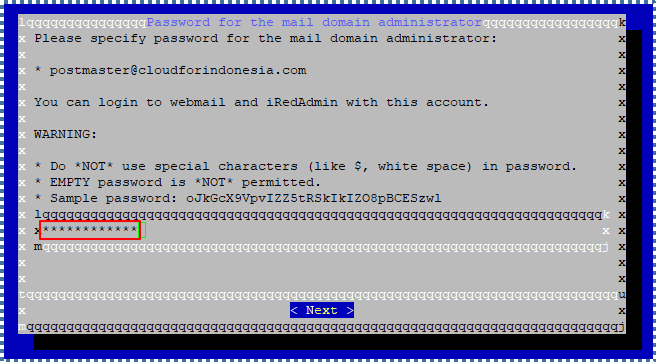
Next, create a password for the administrator domain email.

You will be given several optional components in the next pop-up. We recommend you install all of them.
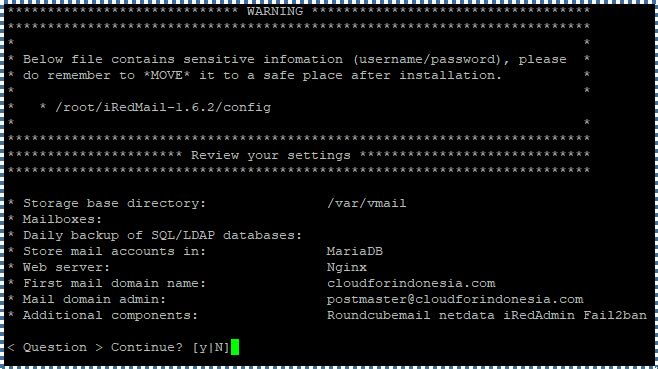
Your final configuration will be shown to you. To install all of the server mail components as configured, type Y
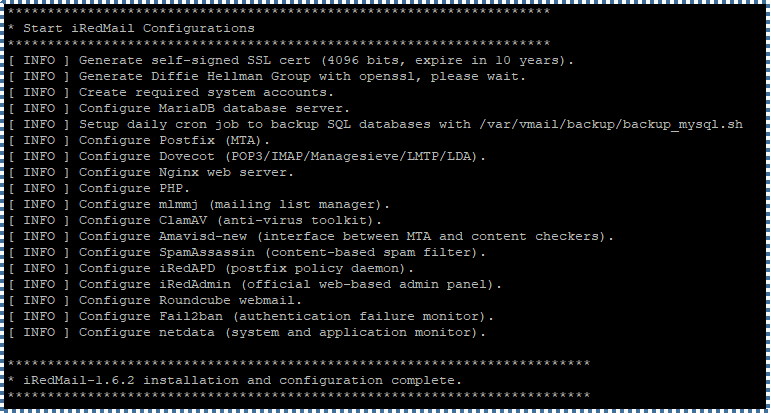
The installation process will take time. If complete, you will be shown the list of installed components by iRedMail wizard.

The last step of the process is to decide whether or not you want to activate the firewall rules provided by iRedMail. To activate it, type Y.
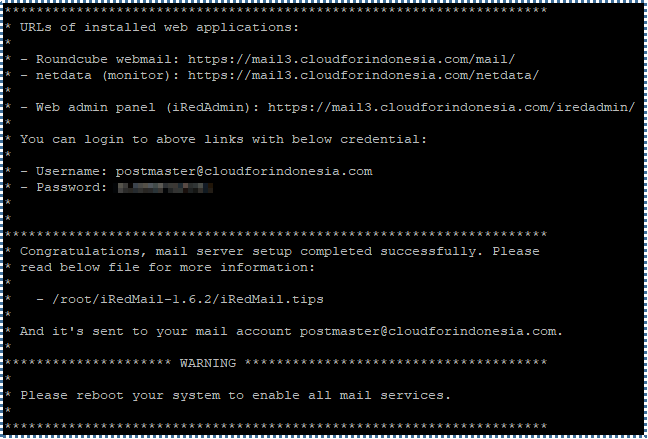
iRedMail installation is complete. Several important pieces of information will be shown to you, such as the URL for webmail, the URL to monitor the server through netdata, and the URL for the iRedAdmin panel with the login credential. You can find detailed information about the iRedMail through iRedmail.tips file.
# reboot
Reboot the VM to apply the installation with the command above.
Post-Installation
▶️ Add MX Record
Now, we need to add an MX record to our DNS management panel to register the domain we use to be recognized as a mail exchange.
The function of the MX record is to choose which server is responsible for sending and receiving emails for our domain. MX record installation to our server ensures our email delivery.
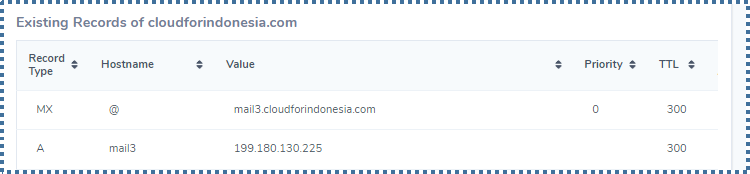
Create A and MX records as new records in the DNS management panel and wait for the propagation to finish (can be up to 48 hours).
▶️ Let’s Encrypt TLS Certificate Installation

A ‘not secure’ message will appear if you attempt to access the web panel. It happens due to the self-signed TLS certificate iRedMail uses. To avoid the message, you can install TLS from Let’s Encrypt for free.
⏭️ Obtain the Certificate
Access the VM through SSH, then run the following command to install certbot and its plug-in for NGINX at the Ubuntu repository.
# apt install certbot python3-certbot-nginx -y
Let’s use the webroot plugin to obtain the certificate since iRedMail has configured the TLS in the NGINX virtual host as default.
# sudo certbot certonly -a webroot --agree-tos --email tiyan@cloudforindonesia.com -d mail3.cloudforindonesia.com -w /var/www/html/
The above message will appear if every step is performed correctly. In this tutorial, all certificates and their components are stored at
/etc/letsencrypt/live/mail3.cloudforindonesia.com/.
⏭️ Installing the Certificate in NGINX
Now, we have to configure the NGINX web server to be able to use the new TLS certificate. First, let’s edit the SSL template file.
# sudo nano /etc/nginx/templates/ssl.tmpl
In the last 2 lines, you will find the following information:
…
ssl_certificate /etc/ssl/certs/iRedMail.crt;
ssl_certificate_key /etc/ssl/private/iRedMail.key;
In this tutorial, we will change it to:
…
ssl_certificate /etc/letsencrypt/live/mail3.cloudforindonesia.com/fullchain.pem;
ssl_certificate_key /etc/letsencrypt/live/mail3.cloudforindonesia.com/privkey.pem;

Save and close. Test the NGINX configuration and don’t forget to reload it with the following command.
# sudo nginx -t
# sudo systemctl reload nginx
At this point, when you open the admin page, you should not receive the ‘not secure’ message screen since the web server already uses the new TLS certificate.
⏭️ How to Install the Certificate in Postfix and Dovecot
You cannot just secure your web server with a TLS certificate. You also need to configure the Postfix SMTP and Dovecot IMAP server. It is important to configure these servers to avoid false warnings from mail client desktops, such as Outlook and Thunderbird, that the email is not equipped with a TLS certificate.
First, let’s edit the Postfix configuration:
# sudo nano /etc/postfix/main.cf
Find these 3 lines:
…
smtpd_tls_key_file = /etc/ssl/private/iRedMail.key
smtpd_tls_cert_file = /etc/ssl/certs/iRedMail.crt
smtpd_tls_CAfile = /etc/ssl/certs/iRedMail.crt
…
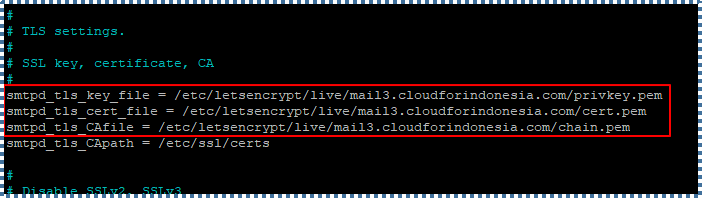
In this tutorial, we will change it into:
…
smtpd_tls_key_file = /etc/letsencrypt/live/mail3.cloudforindonesia.com/privkey.pem
smtpd_tls_cert_file = /etc/letsencrypt/live/mail3.cloudforindonesia.com/cert.pem
smtpd_tls_CAfile = /etc/letsencrypt/live/mail3.cloudforindonesia.com/chain.pem
…
Save and close, followed with reload-ing the configuration:
# sudo systemctl reload postfix
Next, we edit the configuration file for Dovecot:
# sudo nano /etc/dovecot/dovecot.conf
Find these 2 lines:
…
ssl_cert = </etc/ssl/certs/iRedMail.crt
ssl_key = </etc/ssl/private/iRedMail.key
…
And change it into:
…
ssl_cert = </etc/letsencrypt/live/mail3.cloudforindonesia.com/fullchain.pem
ssl_key = </etc/letsencrypt/live/mail3.cloudforindonesia.com/privkey.pem
…
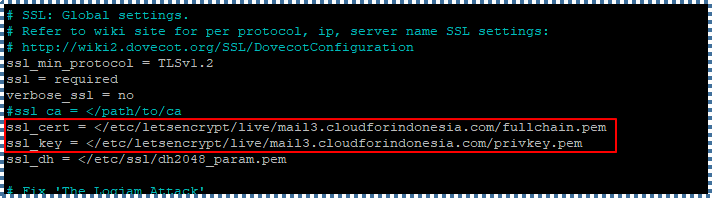
Save and close, followed with reload-ing the configuration:
# sudo systemctl reload dovecot
▶️ Increasing Email Delivery Rate
SPF, DKIM, and DMARC work together to ensure that any emails you receive come from legitimate sources and are not being tampered with in transit, reducing the risk of phishing and spoofing.
⏭️ SPF record
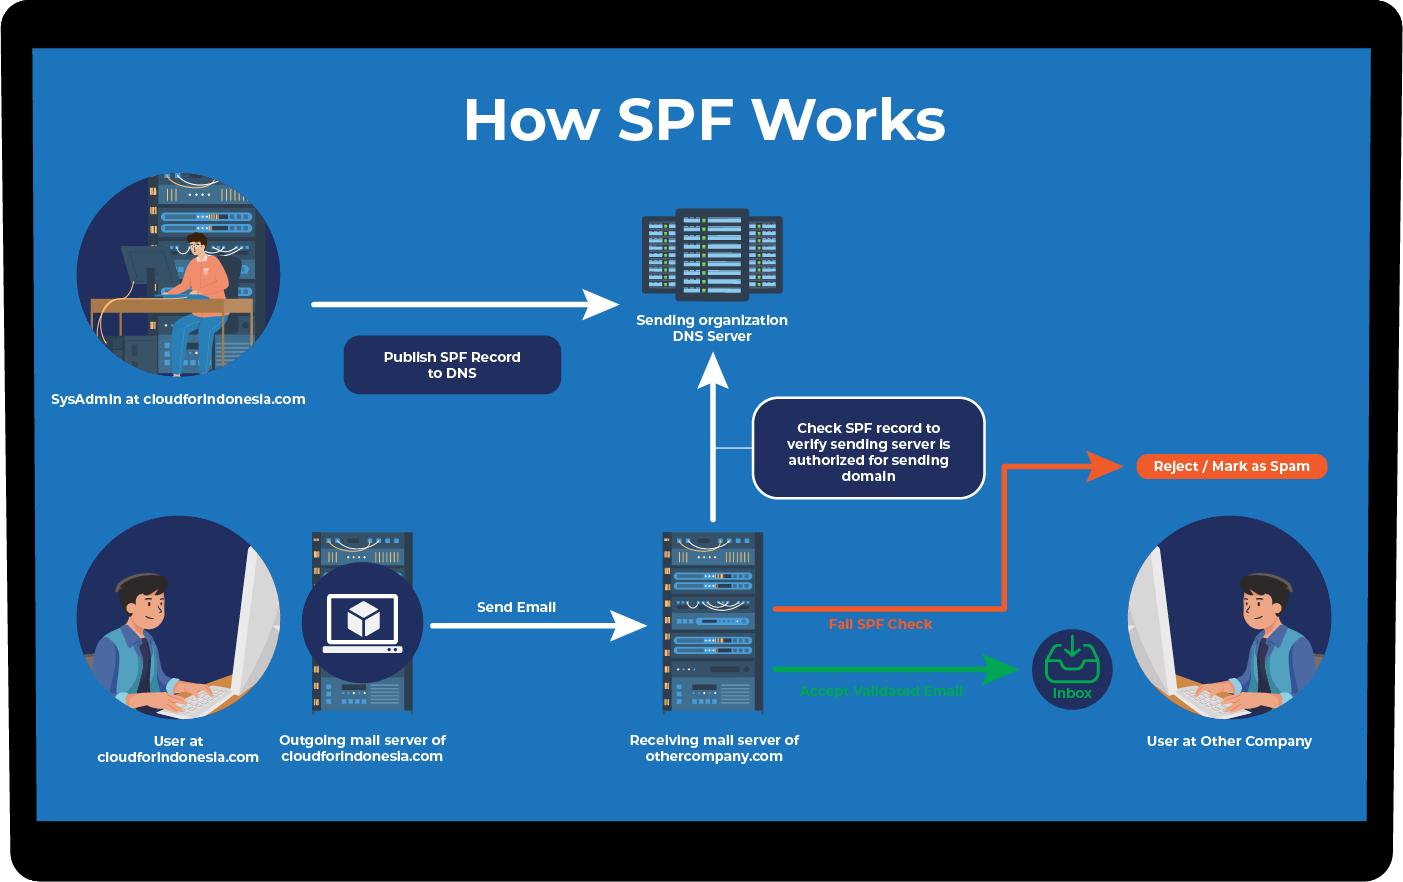
SPF (Sender Policy Framework) is a DNS record that contains list hosts or IP addresses allowed to send email on behalf of our domain, effectively validating the email and preventing it from being falsified. Within the record is also an additional configuration regulating what will happen if the email is sent not following the proper configuration.
Create a new TXT record at the DNS management panel. In this tutorial, we will create the record as follow:

The point of the above configuration is to allow any IP addresses tied to the domain to sent emails and to send it from server registered in MX record, with ~all mark as a soft fail.
⏭️ DKIM record
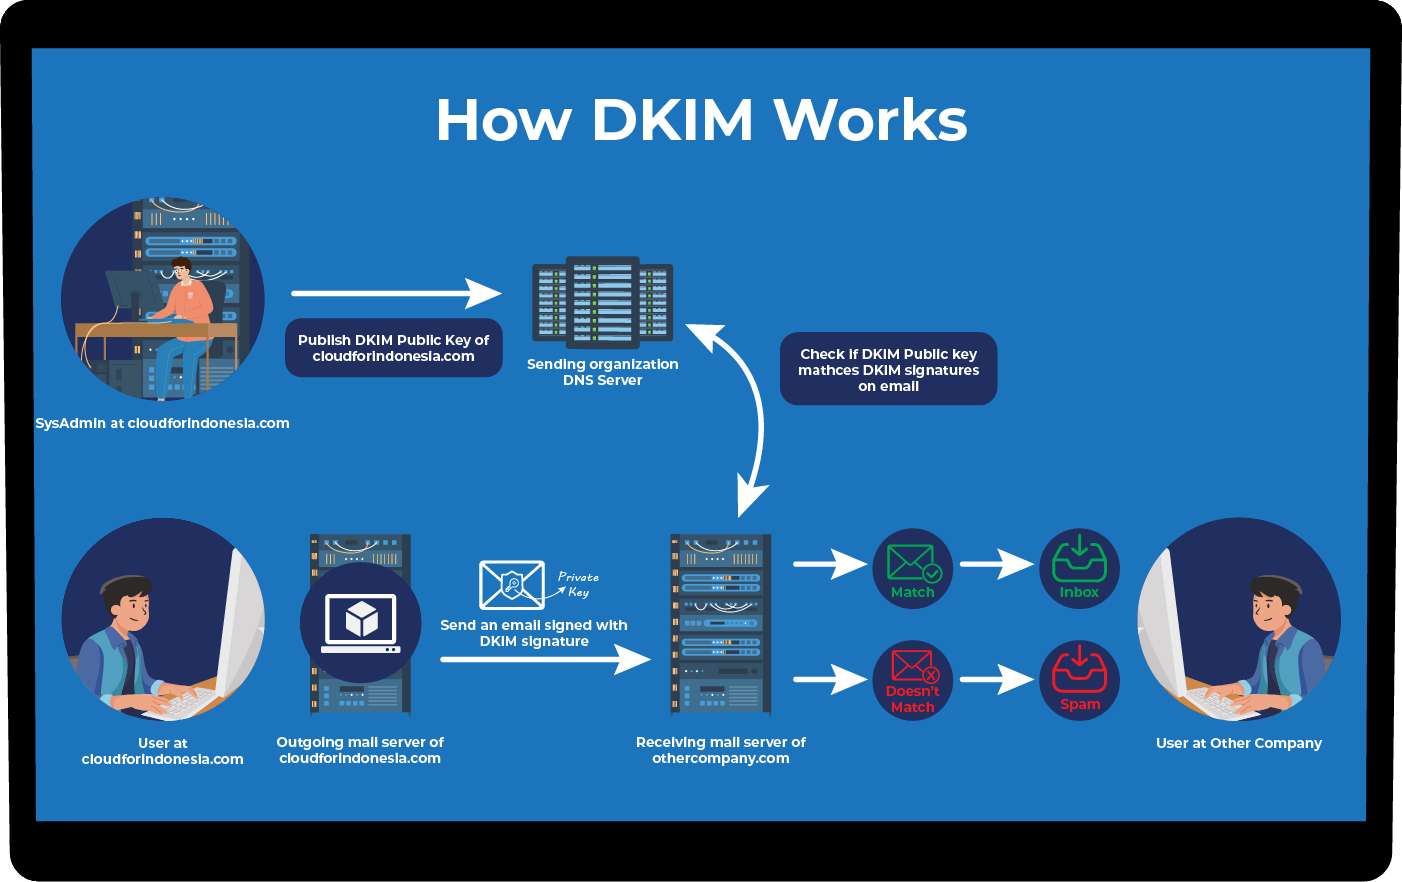
DKIM (DomainKeys Identified Mail) is the technology used to verify the legitimacy of the email received comes from the sender domain. It works by encrypting a private key to the email sent, which is then saved as a public key into our DNS record domain.
When the email is received, the receiver server will perform DKIM verification using the public key stored in the DNS record. Successful verification means the email is legitimate and there is no tampering or change during transit.
iRedMail installation has automatically configured the DKIM private key into our email server during the installation process. What you only need to do is to add the DKIM public key to the DNS management.
Run the following command to display the DKIM public key:
# sudo amavisd-new showkeys
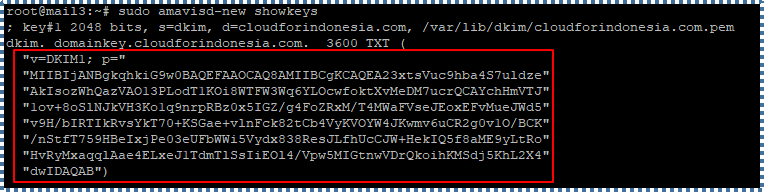
Create a new TXT record in the DNS management panel based on the public key displayed. Make sure to delete all quotation marks and spacing as displayed below.

Check the DKIM record using the following command.
# sudo amavisd-new testkeys
The process may take some time depending on the propagation process. If the propagation is finished and the DKIM record you input is correct, you will see the pass as follows.

⏭️ DMARC record
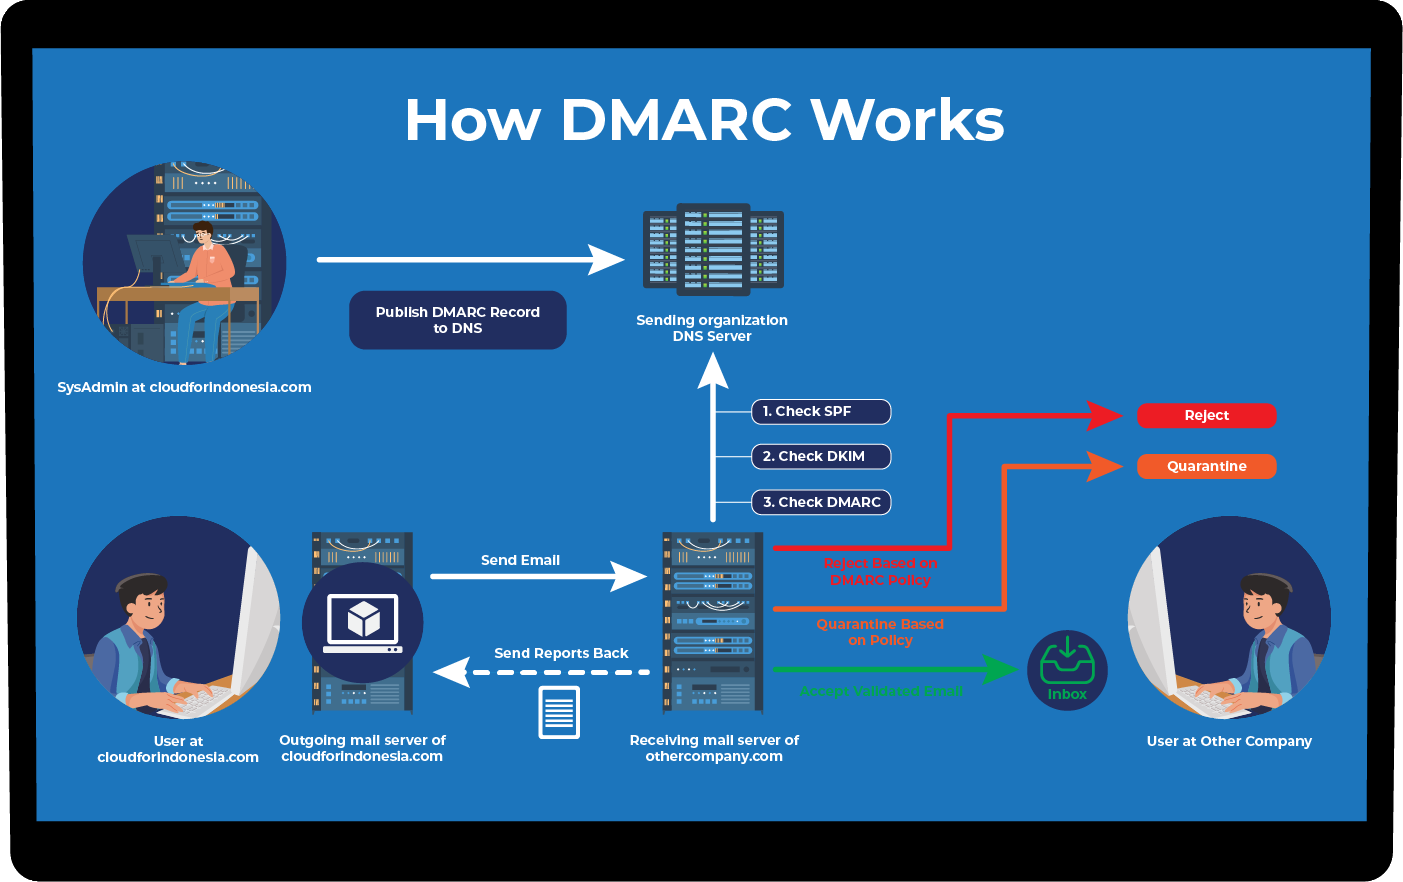
DMARC (Domain-based Message Authentication, Reporting, and Conformance) is an email verification protocol that regulates how to handle received emails that fail to be verified by either SPF or DKIM.
DMARC allows email receivers to create a regulation on what to do if the email received fails to be verified, such as rejecting the email or quarantining the email in the spam folder. DMARC also allows the sender to receive a report about the status of the sent email, thus increasing the security of the email.
To add DMARC, create a new TXT record filled with common DMARC configuration as follow.
v=DMARC1; p=none; rua=mailto:report@cloudforindonesia.com

The above example will activate the “none” policy for our domain. This policy will make the receiver server send reports to report@your-domain.com if there are any emails that fail SPF or DKIM verification without giving special instructions on how to handle the failed-to-verified emails.
By choosing the “none” policy, we can collect the report and analyze emails sent from our domain. Thus, we can quickly find a rising problem and make sure emails from our domains can be verified by others. After a while, we can decide to tighten the policy into “quarantine” or “reject” if necessary.
Exploring and Using iRedMail
Now, we can start to explore iRedMail admin panel and start sending our first email.
▶️ Web Panel Access
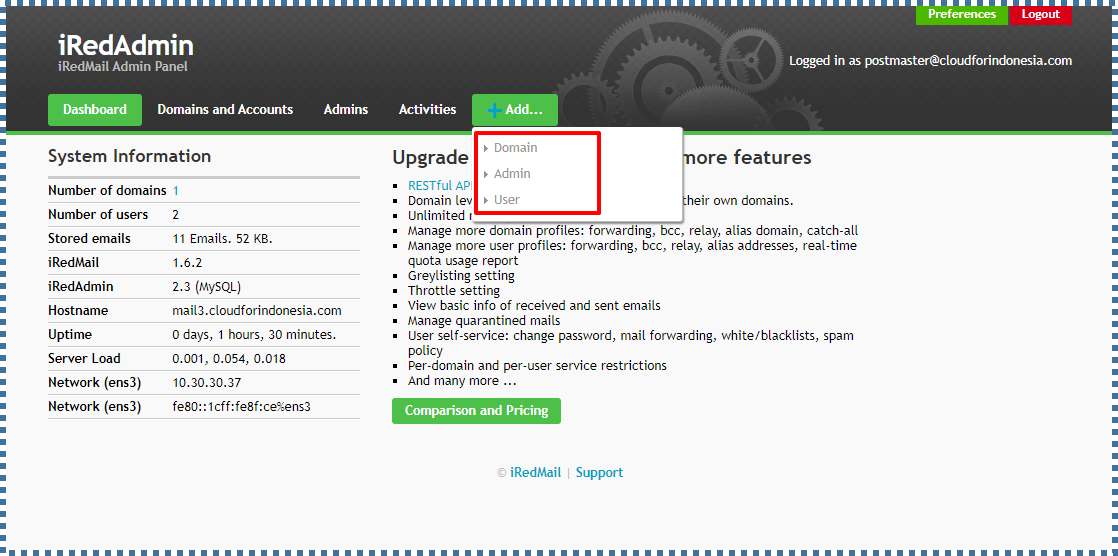
You can find several things that you can do within the panel, such as managing domain, account, etc.

Now, let’s add the email account we want to use to send our first email with.
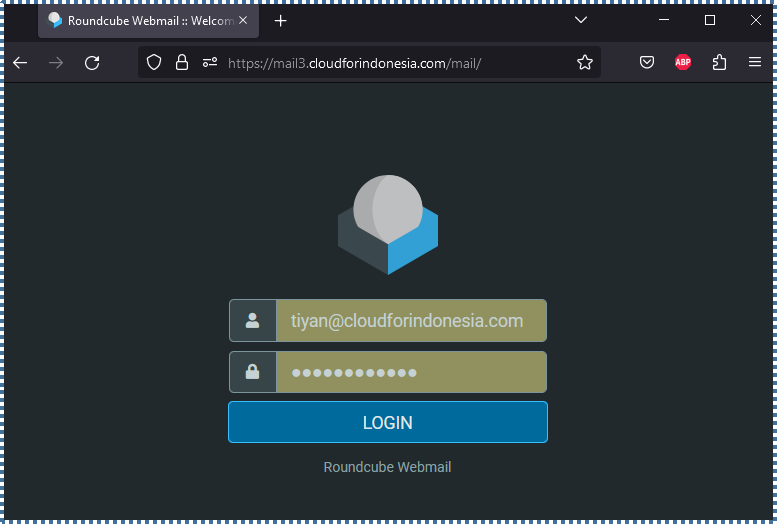
Access the web mail of the account you previously created. You can find further example from the following page https://mail3.cloudforindonesia.com/mail/

Create and send your first email.
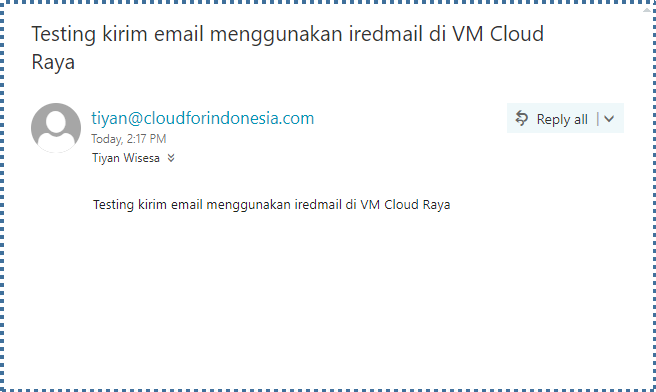
Check if the email you sent from the iRedMail is received to the designated receiver.
Conclusion
That is all from this tutorial of building iRedMail mail server in CloudRaya’s virtual infrastructure.
Don’t forget to check other knowledge base at CloudRaya Knowledge Base and visit our blog to learn the up-to-date news of the IT world. Perhaps you like to learn from a video instead? Then go to our YouTube channel, where you can find the video version of this tutorial and many others.